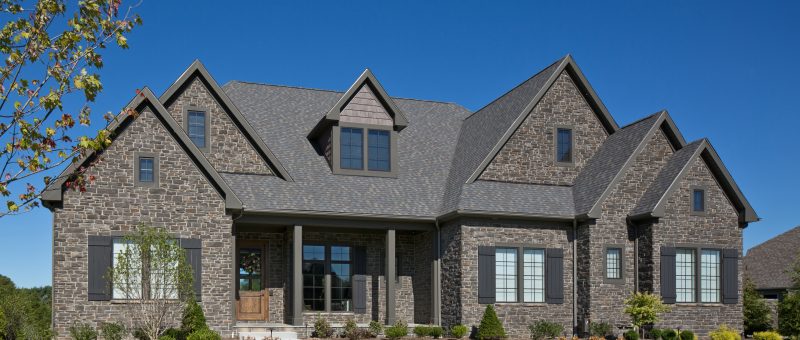
Manufactured Stone Veneer VS Siding: How Do They Compare?
The exterior of the home offers the ultimate first impression, and cladding plays a prominent roles. Choosing the right material can make the difference aesthetically as well as in the home’s long-term performance. But what is the best option when comparing manufactured stone veneer vs. siding? Manufactured stone is one of numerous options for the façade—and one of the soundest investments. But how does it compare to other cladding materials?
Cost & Return on Investment
When placing manufactured stone veneer vs. siding side by side, manufactured stone is often the more premium-priced option when it comes to first cost, especially compared to traditional vinyl siding. But the price tag is only part of the story.
Manufactured stone veneer offers the highest return on investment of any cladding material – by a significant percentage. According to the Remodeling 2024 Cost vs. Value Report, manufactured stone veneer recoups 153% of its cost. This dramatically greater than all other cladding materials, including fiber cement siding replacement (88.4%) and vinyl siding replacement (80.2%).
Aesthetics
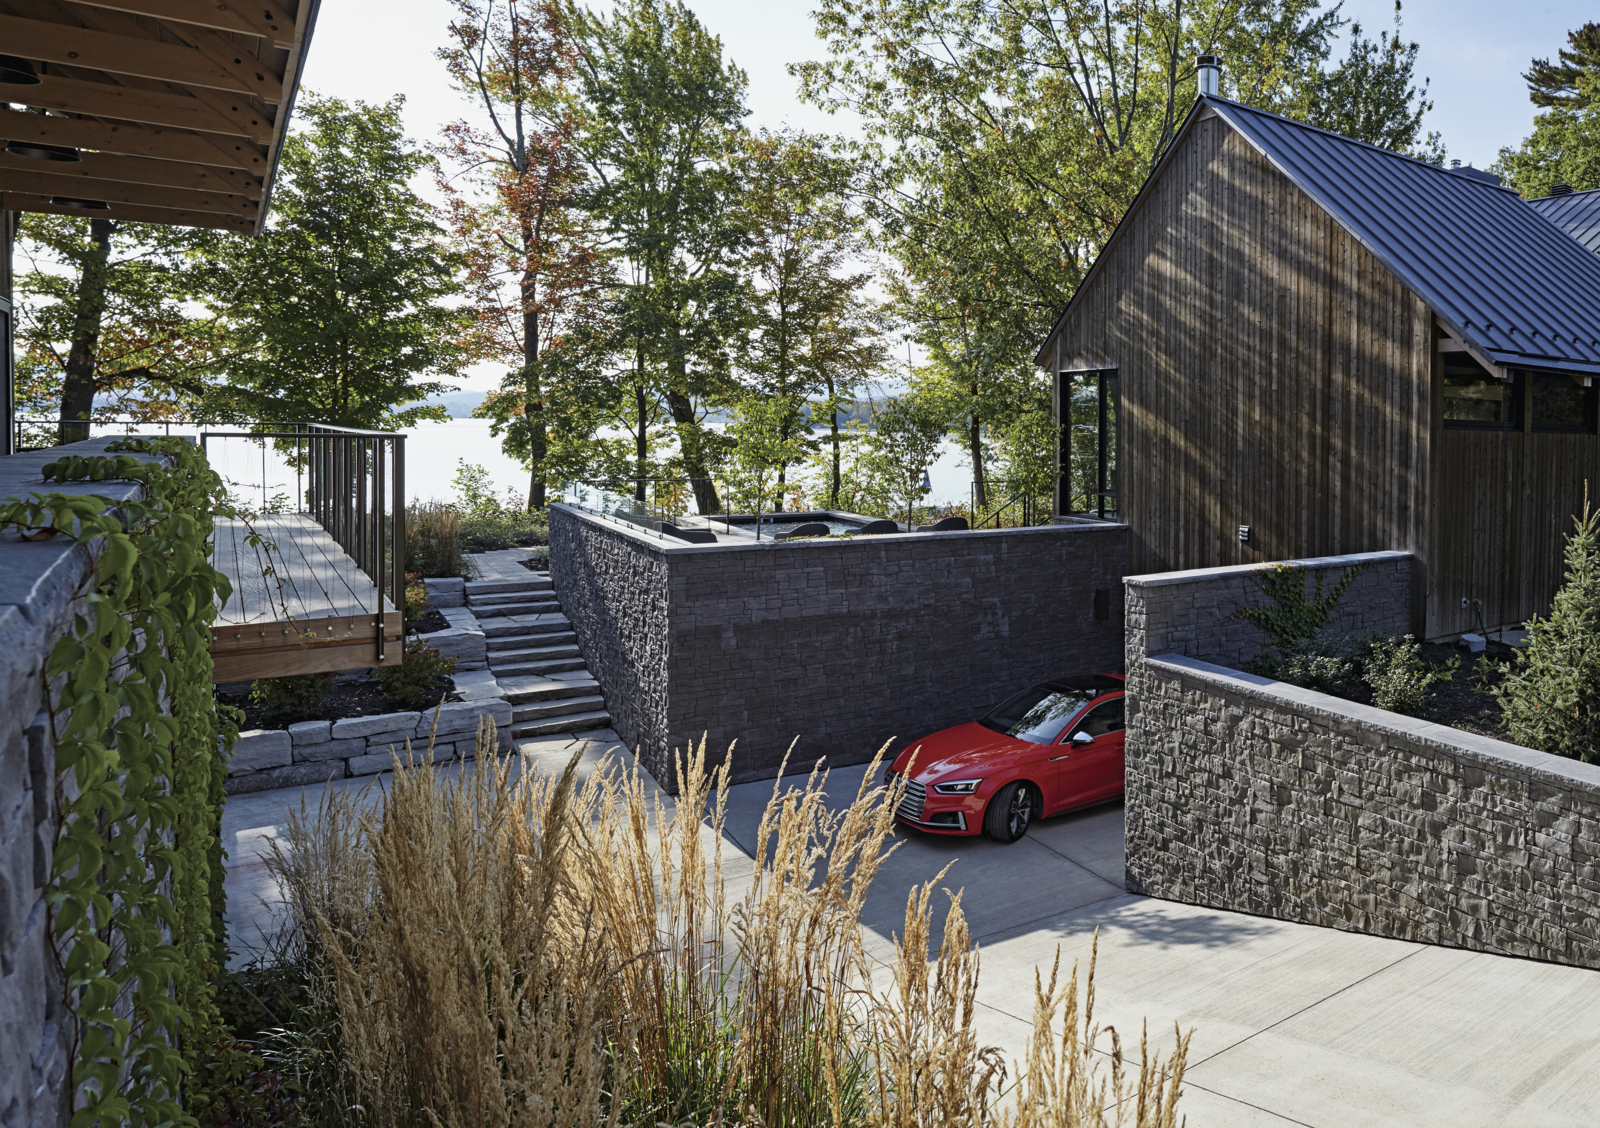
Manufactured stone veneer directly replicates stone found in nature – typically using actual stones to craft molds – typically at a lower price point than the real thing. Vinyl and fiber cement siding surfaces often are designed to replicate wood grain, but authenticity can vary greatly from brand to brand and is often reflected in the cost.
Not only does it look natural, MSV brings stone profiles and colors that consumers may not otherwise be able to get because quarried stone (and clay for brick) is usually sourced locally. Manufactured stone veneer allows buyers to choose a stone look that may be difficult (or impossible) to get at their location due to supply, distance, or cost.
Appearance
Beyond just authentic looks, manufactured stone veneer delivers a solid look on the wall, with blends and shapes limited only to the installers imagination. Vinyl siding can appear wavy on the wall if not fastened properly and shows visible seams.
Durability
Cement-based products are known for their durability, reliability, and longevity, and manufactured stone is no exception. Manufactured stone veneer and fiber cement siding are durable through all types of extreme weather, including wind, heat, and fire. Manufactured stone colors weather in similar ways to natural stone.
Installation
With panelized installation, vinyl siding has a lower learning curve and can be hung by siding contractors and experienced DIYers. Manufactured stone veneer is installed by masons and does take time to develop expertise. CMHA offers an MSV Installer program that provides fundamental MSV installation guidelines and industry best practices. This helps ensure better quality work as well as highly valued credentials.
Longevity
Lifespans and warranties for all three cladding types can vary greatly depending on quality, though all three outperform wood. Manufactured stone veneer lasts a minimum of 25 to 50 years, though its life expectancy is likely much greater as evidenced by the existence of concrete going back centuries. According to Today’s Homeowner, stone siding has a lifespan of more than 100 years, fiber cement siding can last up to 60 years with proper care, and vinyl siding lasts 30-40 years.
Maintenance Manufactured stone veneer, vinyl, and fiber cement all boast low-maintenance properties, with each requiring just occasional cleaning. Depending on the brand and the paint, fiber cement siding will eventually need to be repainted and recaulked, which MSV and vinyl will not require. Ultimately, choosing a cladding material comes down to a balance of preferences and priorities—first and foremost being what overall aesthetics is the buyer seeking and what is their budget. From there, weigh options for lifespan, maintenance, performance, and more before making final selections.
Building materials face deterioration from a variety of threats, the most serious and persistent being water and moisture. Although masonry is known for its durability of relative ease of maintenance, all building materials require proper installation—especially when it comes to moisture management.
It’s impossible to control all moisture entering a building, but there are many tactics to manage the moisture so that damp materials dry out quickly and water can exit quickly. Architects and installers must take a holistic look at the building envelope, including sheathing, weather resistant barriers (WRBs), drainage planes, and attachment systems that will help keep moisture out of the assembly, as well as important details such as flashing, transitions between materials, and sealants to ensure as much water as possible is being shed from the building.
Root Causes of Water Damage
Moisture-related problems in building enclosures have three root causes:
• External sources of moisture such as humidity, rainwater, and groundwater • Internal sources of moisture such as plumbing leaks, cooking, bathing, and even perspiration and respiration • Construction moisture that is present in building materials such as concrete and lumber.
Bulk water, capillary water, and water vapor are the three types of moisture that pose the most threat to building envelopes and must be mitigated through moisture management strategies. Bulk water from rain, snow, or groundwater can be the most damaging and enters the building from an opening in the envelope or a driving force such as air pressure or gravity.1 Bulk water can be controlled with proper flashing, sealants, and rain screens that work to drain any incidental water that does get behind the façade despite other waterproofing measures.
Capillary action is the movement of water and vapor through porous materials such as stone and brick due to the forces of adhesion, cohesion, and surface tension. Water wicks through these materials against the pull of gravity — think of rising damp in concrete or masonry. Two nonporous materials placed closely together can also provide a channel for capillary action to occur. The U.S. Office of Energy Efficiency and Renewable Energy notes, “Capillary action can best be controlled by providing a capillary ‘break’ such as plastic, metal, damp-proofing compound, or another impermeable material, or by leaving air spaces that are too large for capillarity to occur.”2
Moisture can be transported on air and enter a building through uncontrolled pressure sources such as the wind stack effect or controlled sources such as air handlers that move moist air past the building envelope and through even the tiniest of holes.
Water vapor can also pass through a building through vapor diffusion, which is dependent on the driving forces that push it into the building as well as how permeable the building materials are. Vapor barriers are used to slow down the movement of water vapor into a building. There are very specific guidelines for the permeability rating of these barriers and where they should be placed based on the climate where a specific project is located.3
Dangers of Moisture Intrusion
When water is not properly managed, it can be detrimental to the durability of the building as well as occupants and property inside the building.
Moisture intrusion can cause condensation within the walls, which ultimately deteriorates wood materials, causing sheathing and framing to rot. When insulation inside walls becomes wet, there is a significant reduction in thermal values. Metal components such as structural fasteners may rust and corrode, and adhesives will ultimately fail in the presence of excess moisture. Efflorescence, a white deposit of surface salt on the exterior of a building, can occur on masonry, which can also be damaged during freeze/thaw cycles as moisture within the masonry expands and contracts. Water-soluble materials such as gypsum can even return to solution.
Uncontrolled moisture allows mold and mildew to grow within walls, and eventually it will take hold inside the building and HVAC systems, posing a significant danger to the health of occupants. Damage to paints, coatings, furnishings, and interior components will eventually ensue.
Moisture Management Strategies
To avoid the negative effects of water intrusion, there are important building practices to follow when designing wall assemblies and specifying materials. Working from the inside to the outside of a wall assembly, specifying an appropriate type of sheathing and a compatible weather resistant barrier is the first layer of moisture management. If appropriate, a rainscreen system and weep screed can also be designed into the wall assembly to further drain incidental water. For example, manufactured stone veneer uses a rainscreen product in conjunction with a weather resistant barrier, or in some cases as the sole WRB, for installation.
Proper sealing is the next line of defense and includes meticulous attention to flashing and caulking details. Flashing should be installed around windows and doors, at all penetrations, and in various areas throughout the roof such as step flashing and roof diverters. Next, appropriate fasteners and sealants must be applied that are compatible with the material substrate. It’s vital to know how different materials interact and separate dissimilar materials if they may cause moisture penetration, corrosion, or another reaction that could compromise the structural integrity of materials and the building itself when improperly handled. Material connections are supremely important, as well, particularly when they are two very different products.
MSV Specifications for Water Management
Moisture issues can arise from rain or rain that is driven by wind into a wall assembly and by inward vapor drive. Bulk water intrusion and vapor drive can lead to damage and rot in sheathing and structural members in both wood- and steel-framed structures. Inward vapor drive can occur because WRBs are vapor-permeable, and moisture stored within the MSV or mortars can be driven by the sun and heated through the WRBs directly into the sheathing and stud bays. If the cladding is in contact with the barrier, water can linger in those locations, causing them to remain wet for extended periods of time. This can happen in both hot and cold climates.
In MSV installations, a two-layer WRB system provides a drainage plane to protect against capillary draw. Including a rain screen system between the WRB and stone veneer creates a drainage space that better prevents water intrusion. This ventilated air space allows bulk water to drain out, but also serves as a capillary break, meaning water penetrating behind the cladding is intercepted. The use of other fundamentally sound design details, such as rough opening protection and sill flashing beneath windows and doors, is particularly effective against water intrusion. Including diverter flashing at the roof/wall intersections, saddle flashing at low-to-high walls, flashing at floor lines, and deck flashing can all help to prevent moisture-related issues.
To avoid the negative effects caused by humidity, rain, and wind, it is crucial that trained professionals install MSV products. Improper installation — most often stemming from transitions around windows, penetrations, and exterior light fixtures — coupled with the fact that improper installation is not immediately evident, can lead to severe damage and increased costs. Defective installations cause more obvious damage in wetter climates, but in areas with less rainfall, moisture can stay hidden for years until it manifests as a much larger issue.
In general, to avoid the negative effects of water intrusion, the following top six building practices should be done correctly:
• Weather-resistant barriers • Flashing around windows and doors • Step flashing and roof diverters • Detail flashing • Flashing at all penetrations • Weep screed
CMHA offers an MSV Installer program. The course teaches installers fundamental MSV installation guidelines and industry best practices. Not only will it ensure better quality work, but the certificate is a highly valued credential by consumers and the broader marketplace.
Elevate Your Home with Stone Veneer: 5 Perfect Places for Accent Walls
In the world of home construction and DIY, creating an accent wall isn’t just about aesthetics; it’s about making a bold statement. These accent walls, also known as feature walls, are where craftsmanship meets character, and they’re more than just a visual interest; they’re a game-changer for your project.
While paint and wallpaper have their place, they can’t match the enduring value and impact of stone veneers and architectural tile. Accent walls not only elevate the aesthetics but also add substantial value to a property, and it’s simple to maintain, ensuring your home interiors remain a source of awe for decades.
Choosing the right spot for an accent wall might seem challenging, but often, the room itself provides strong cues. Here, we delve into five strategic settings perfect for your stone veneer accent wall.
Artepiso Orchid
1.First Impressions Matter
Remember, you don’t get a second chance to make a first impression. Stone veneer on a wall greets your guests and sets the tone for your entire space. It’s the introduction that demands attention and admiration.
The placement of the Artepiso Orchid wall tiles in the space above acts as a focal point for anyone who may walk through the front door. These playful tiles, like any framed art, are sure to get the conversation started and create a welcoming atmosphere as soon as guests enter the house.
Light and easy to install, Artepiso 3D architectural tile adheres to most surfaces with a simple and inexpensive installation. They can also be painted for an attention grabbing splash of color.
Beon Stone® Carbo Classic
Pangaea® Fieldstone Cambrian
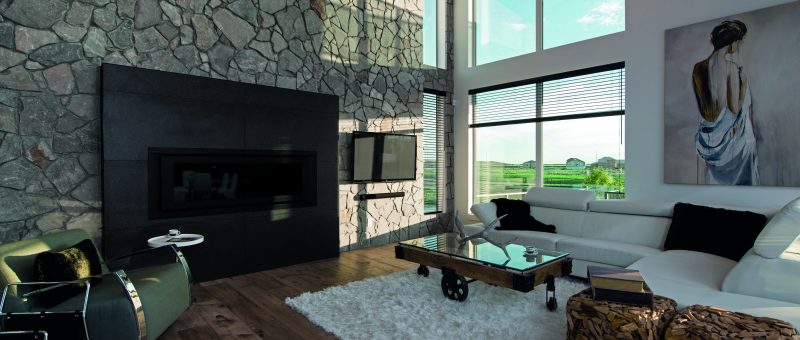
2.Accentuate the Architecture
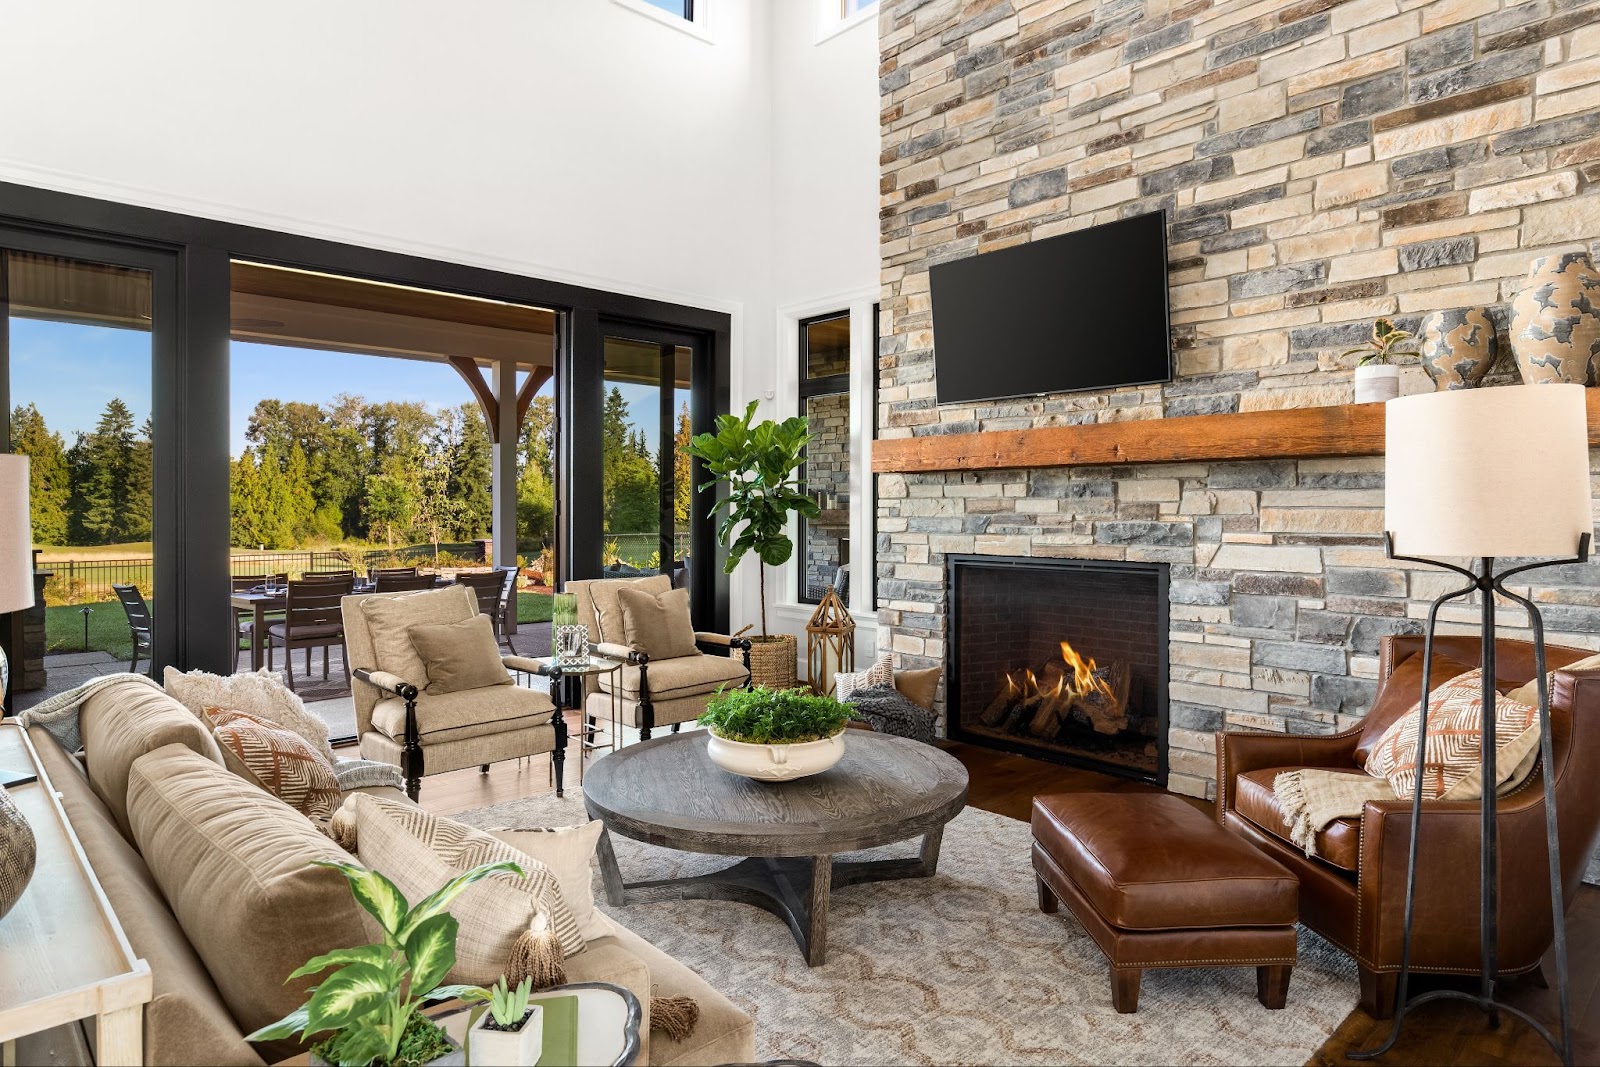
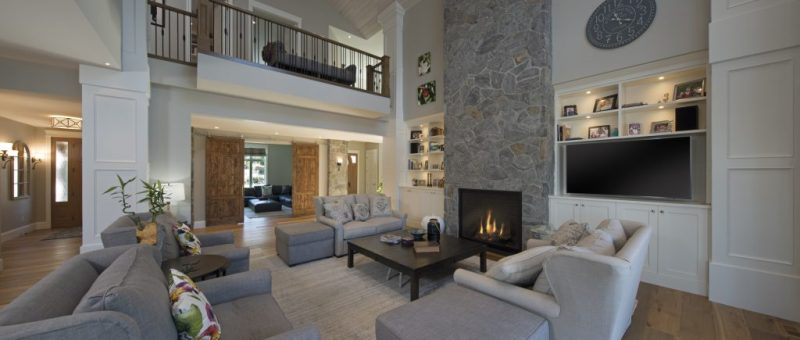
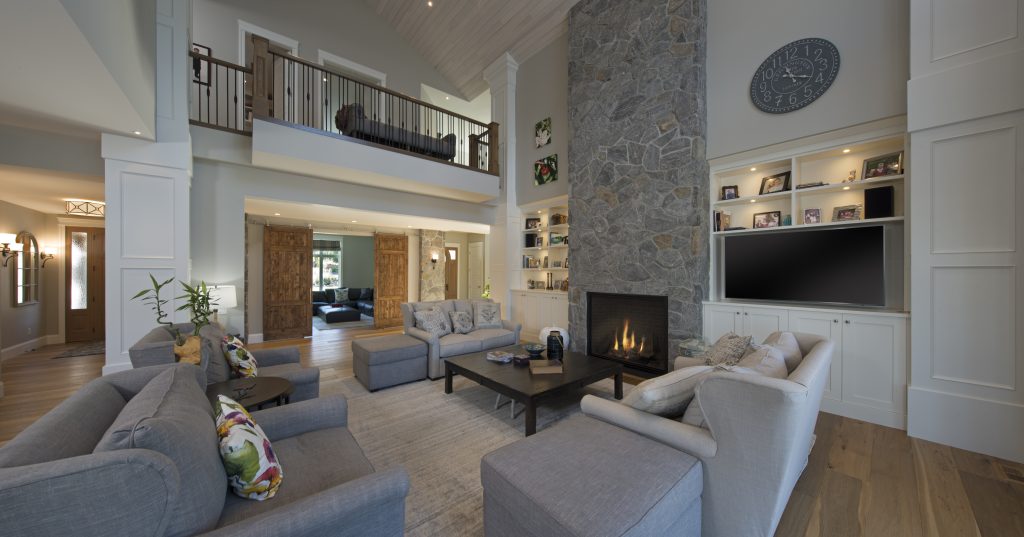
Craftsmen know that great rooms deserve great features. Stone veneer can turn ordinary walls into stunning showcases. Fireplaces, floating room dividers, and walls with architectural details become canvases for your creativity.
A masterful example of this approach can be achieved with Be.on Stone® Carbo Classic veneer panels. Rather than installing shelves in the cutout section of the kitchen shown above, a stone matching the style around the adjoining room was applied, with artwork placed over it. From this vantage point, it gives the appearance of a window that offers a peak at the stone wall continuing behind it.
Ready to accentuate your home walls with another quick renovation, then look no further than your dated fireplace. Building materials like thin stone veneer and Pangaea® Fieldstone Cambria, seen above, transform any drab fireplace wall or surround into the family’s room’s best feature. See more fireplace inspiration in our blog, 5 Interior Projects To Tackle This Winter with Stone Veneer.
Pangaea® New England Quarry Ledgestone
Artepiso Andes
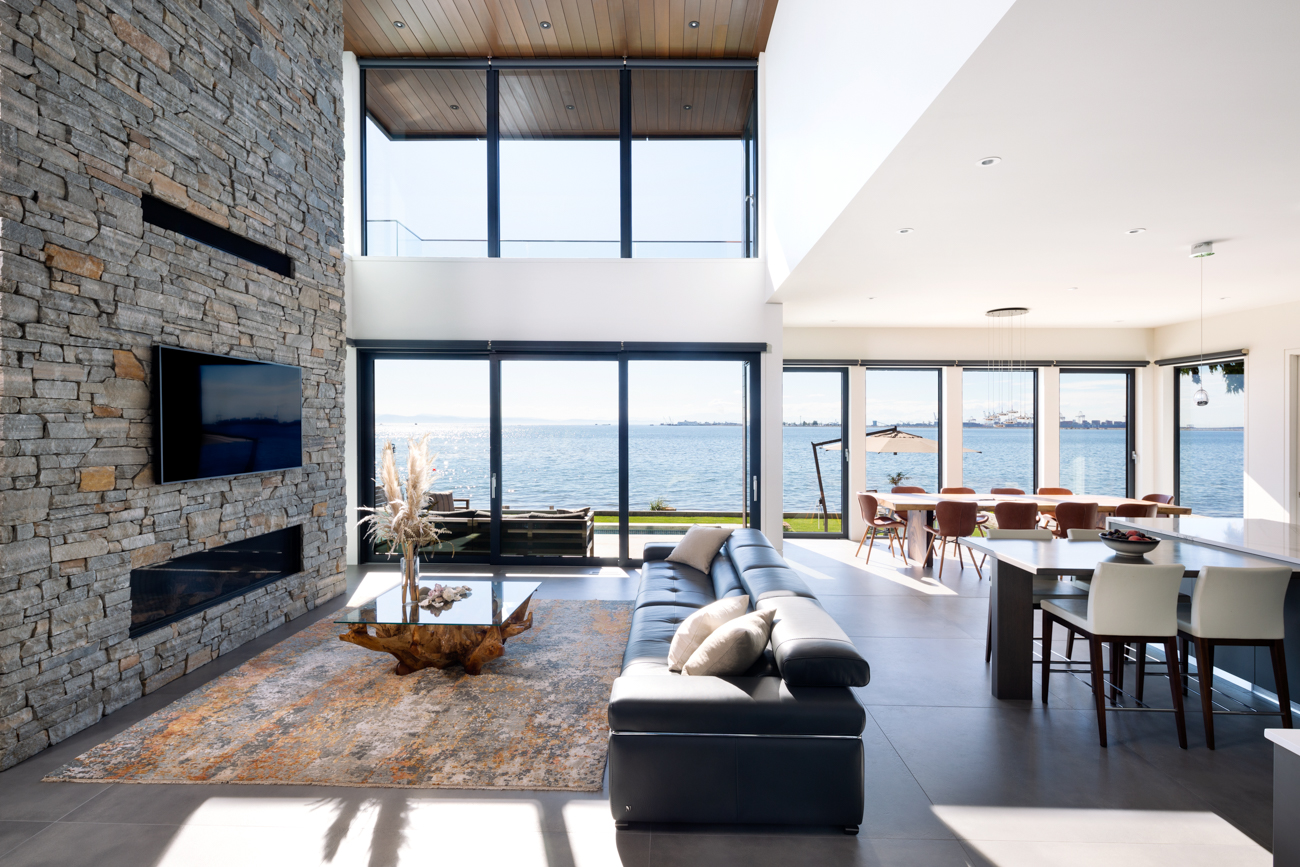
3. Chase the Light
Sometimes, all you need to find the perfect spot for your accent wall is to follow the light. Let the natural light be your guide, drawing visitors’ eyes to your masterpiece. However, be cautious with walls that get intense backlighting or the window views will overshadow the veneer.
When crafting the room with those captivating waterfront views in mind, practicality was key. The choice of Pangaea® New England Quarry Ledgestone veneer wasn’t just about aesthetics; it was a smart decision. It blends seamlessly with the elegant wood paneling on the ceiling, all while ensuring the natural light from those massive windows takes center stage.
For those of you who like to get creative with lighting, consider adding some excitement with Artepiso 3D architectural tiles, seen here in hexagonal Andes shapes. These tiles boast intricate grooves and peaks, creating a mesmerizing interplay of light and shadow. And if you want to kick it up a notch, apply a coat of vibrant, glossy paint to make them shine even brighter.
Cultured Stone® Echo Ridge Country Ledgestone
4. Read the Room
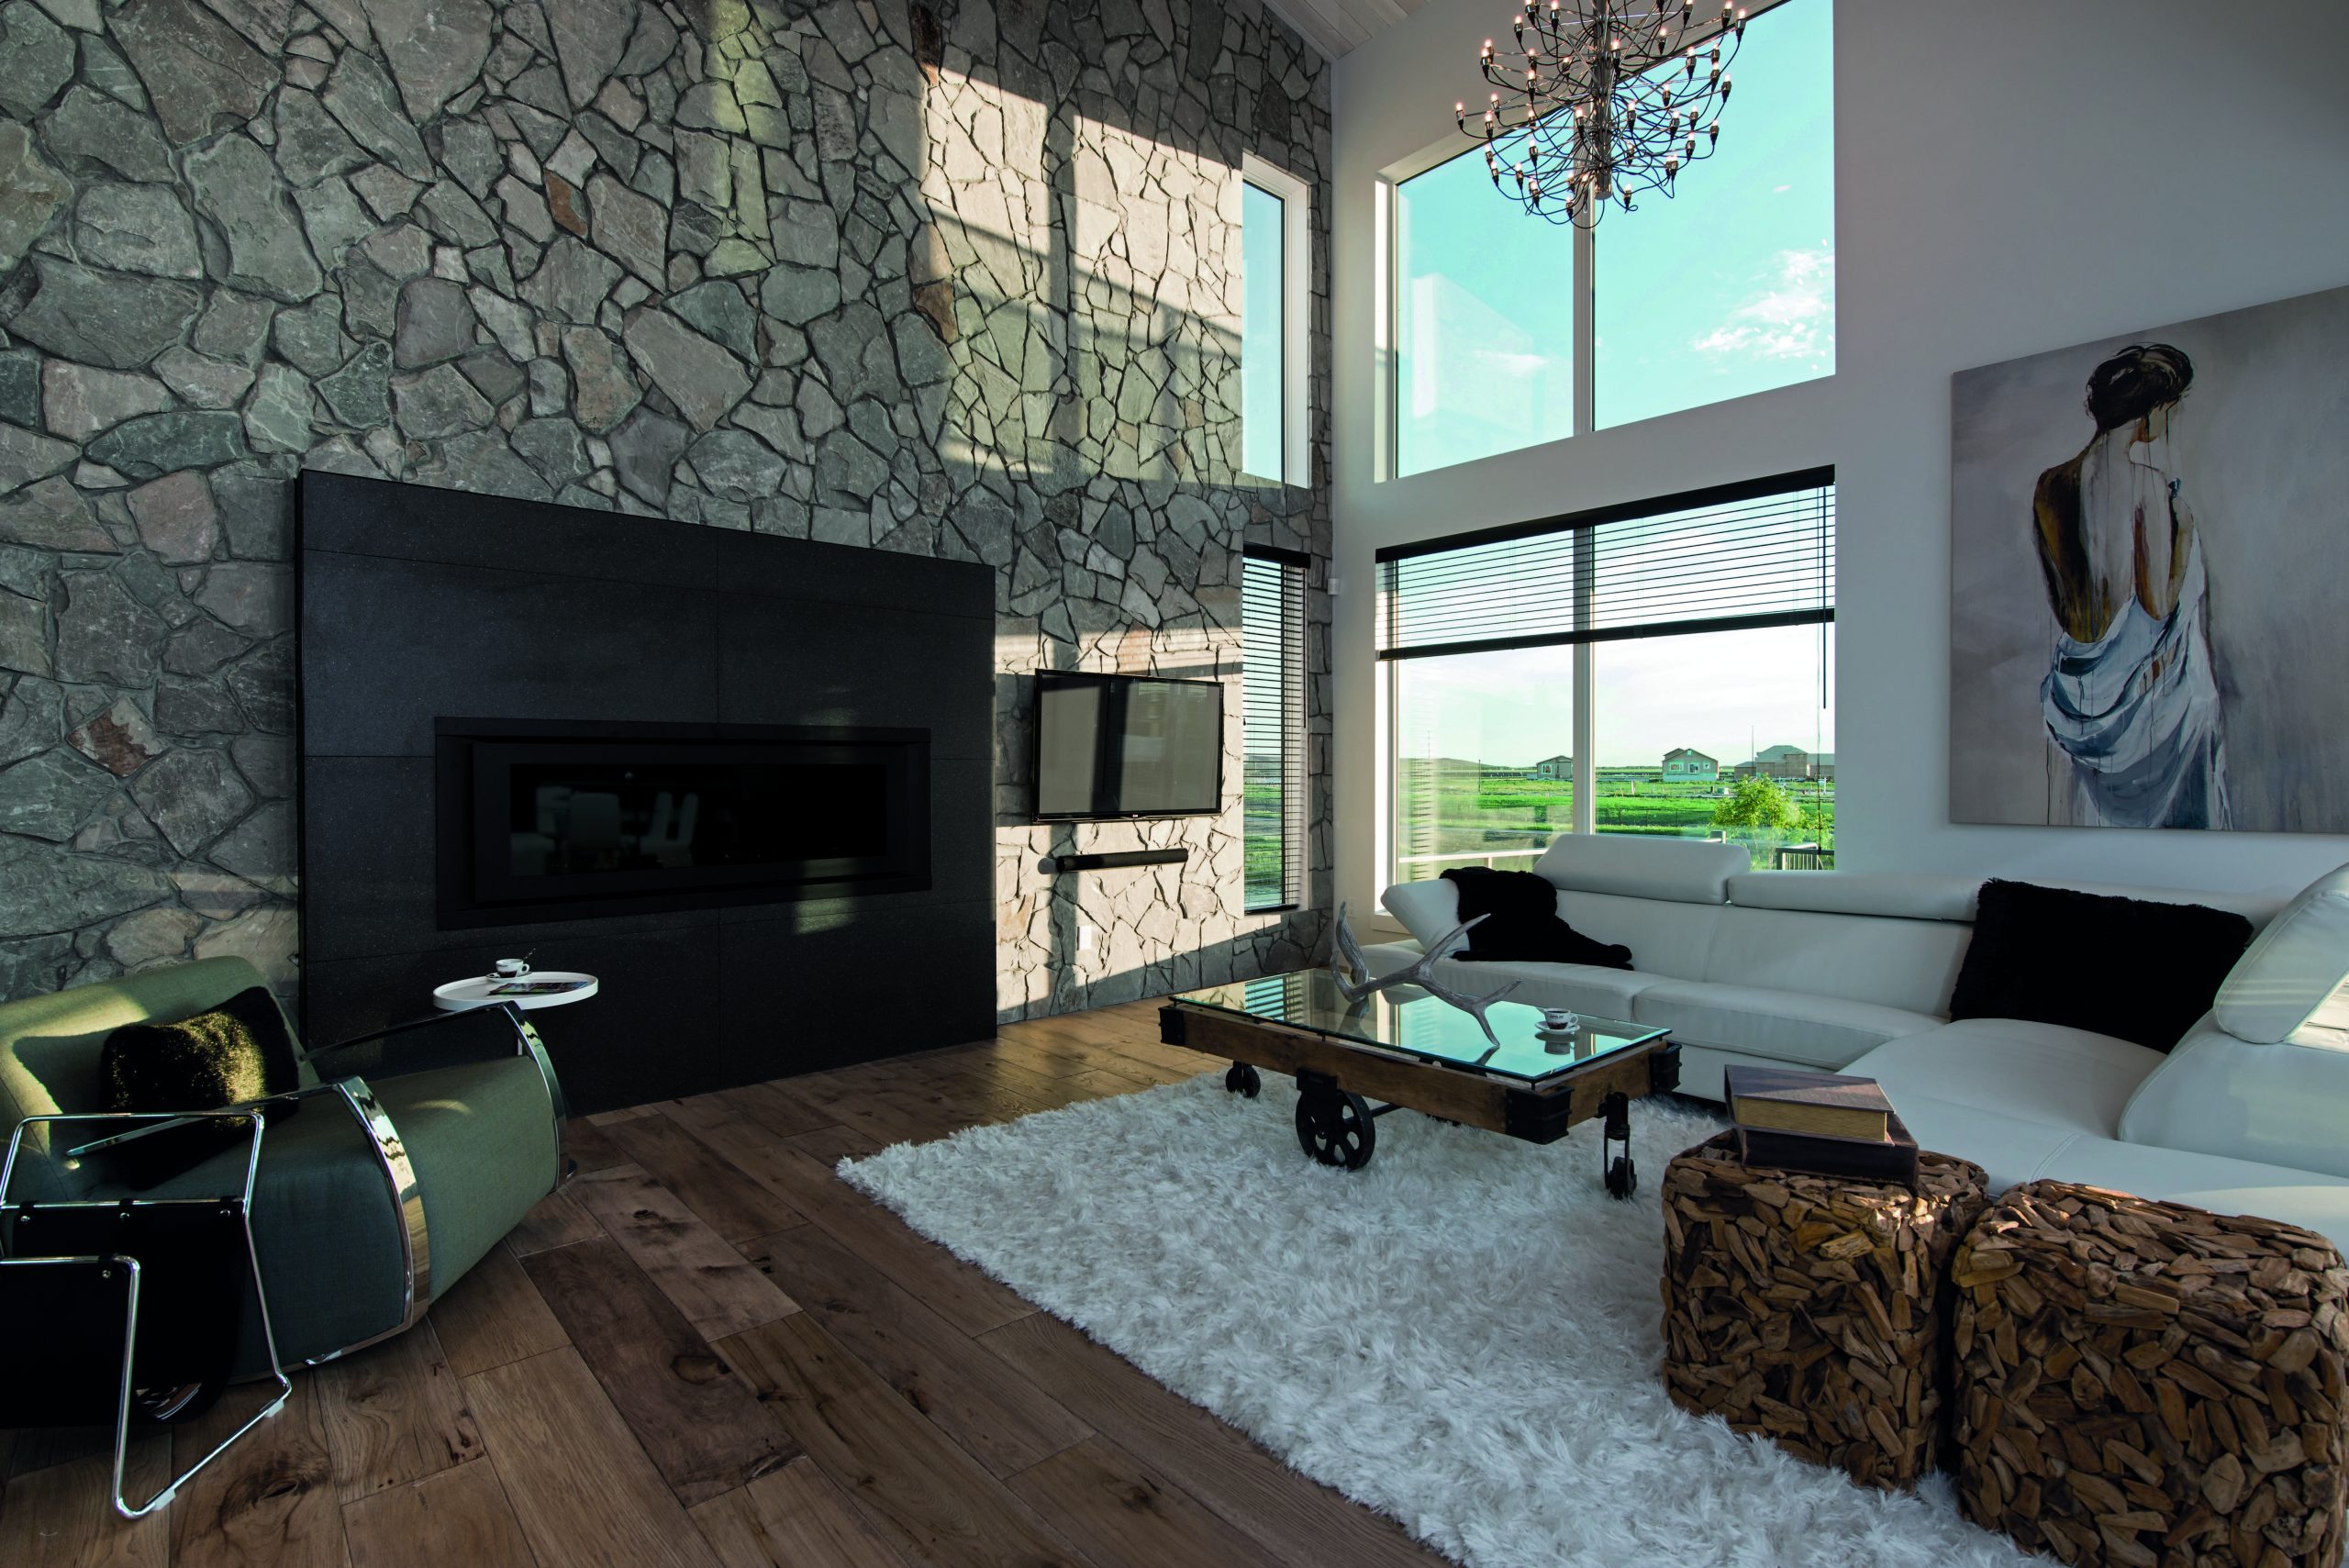
Look at the room’s layout; it often reveals the ideal accent wall location. Is there a wall where all the furniture converges? Maybe one housing a fireplace or TV? That’s your focal point, and that’s where stone veneer shines.
Take a look at the arrangement of the above living room, featuring Cultured Stone’s® Echo Ridge Country Ledgestone veneer. Would a feature have made better sense anywhere else? Note how the veneer calls out to the stone visible through the window on the home’s exterior.
Dutch Quality Winesburg Plank 4&6
5. Beside Views
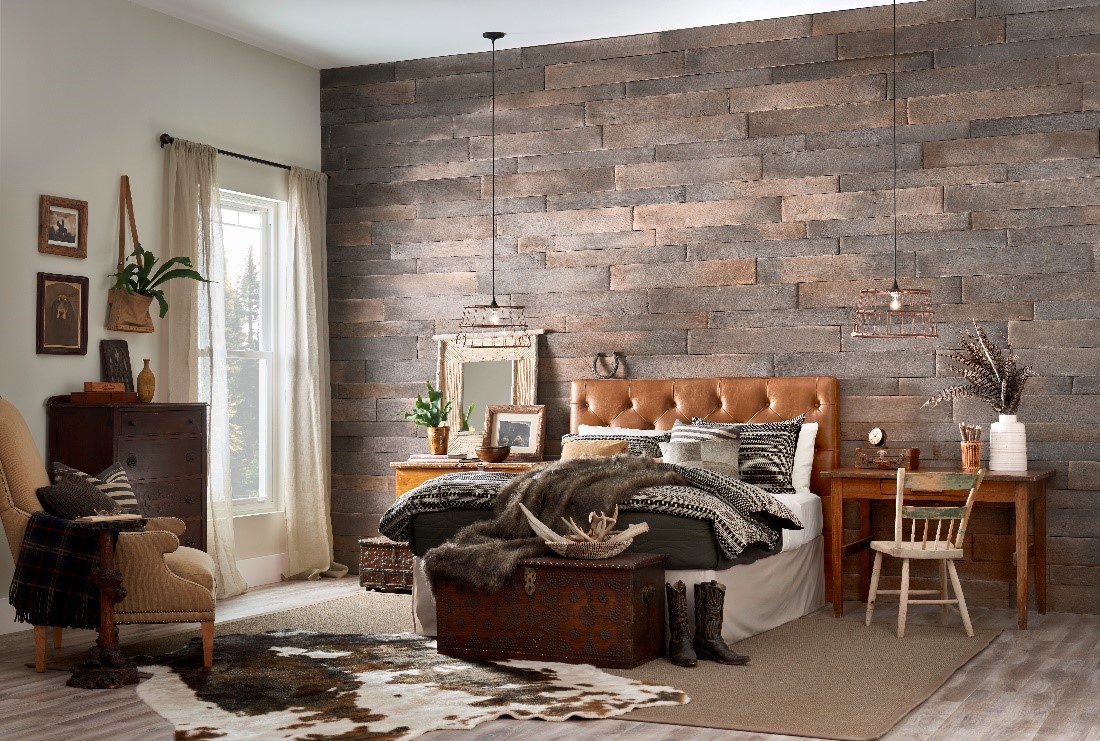
In the bedroom, the most impactful accent wall is typically the one behind the bed. It highlights the bed as the most important feature of the room (which it is), and with the right material choice, can look like an extension of the headboard itself. And when you’re laying in bed, the view of an accent wall straight ahead may not have the calming effect you need.
Take a look at the red and brown hues of the Cultured Stone® Winesburg Weathered Plank 4&6 veneer. This manufactured stone was molded to precisely replicate the grain and character of reclaimed barn wood; its artistry and craftsmanship are molded to replicate the warmth of reclaimed barn wood.
We Make It Easy!
Creating a statement with stone veneer has never been easier. six brands of natural and manufactured stone veneer products available in hundreds of colors, shapes and sizes, Instone is your partner in making your vision a reality.
A Step-by-Step Guide to Stone Veneer Fireplace Upgrades
Ready for a decorative fireplace makeover? If that old brick fireplace doesn’t quite match your home’s new vibe, there’s no need to fret. Think of it as an opportunity rather than a challenge.
Swapping out the dated look for a stylish stone veneer fireplace is simpler than you might think. And guess what? In most scenarios, you can leave those bricks right where they are.
Sure, red brick fireplaces have that quintessential American charm. But, if yours looks a bit weary after years of cozy fires, it might be time for a change. While some folks opt for a quick brick fireplace makeover with heat-resistant paint, nothing beats the elegance and value boost of a naturalstone facade.
Wondering about the how-tos? Whether you’re thinking of adhering stone veneers directly onto the bricks or using nifty tools for an extra-sturdy bond, we’ve got the lowdown. Take a look at your options and tap into Instone’s treasure trove of resources to guide you every step of the way.
Prepping for Interior Stone Veneer
Before you dive into your fireplace transformation, it’s essential to set the stage for a smooth installation. Start by laying a tarp around the fireplace area. This step ensures that any stray mortar or debris doesn’t play havoc with your floors.
Next, give those bricks some TLC. It’s important to remove any dirt, dust, or loose materials that could compromise the adhesion of the stones. A vacuum with a brush attachment should do the trick for most of the cleaning. For stubborn spots, a gentle wipe with a damp sponge will work wonders. And if you come across areas of the brickwork that are crumbling or a bit unstable, consider giving them a light sanding to create an even surface.
Choose Your Backing
Option 1: Metal Lath
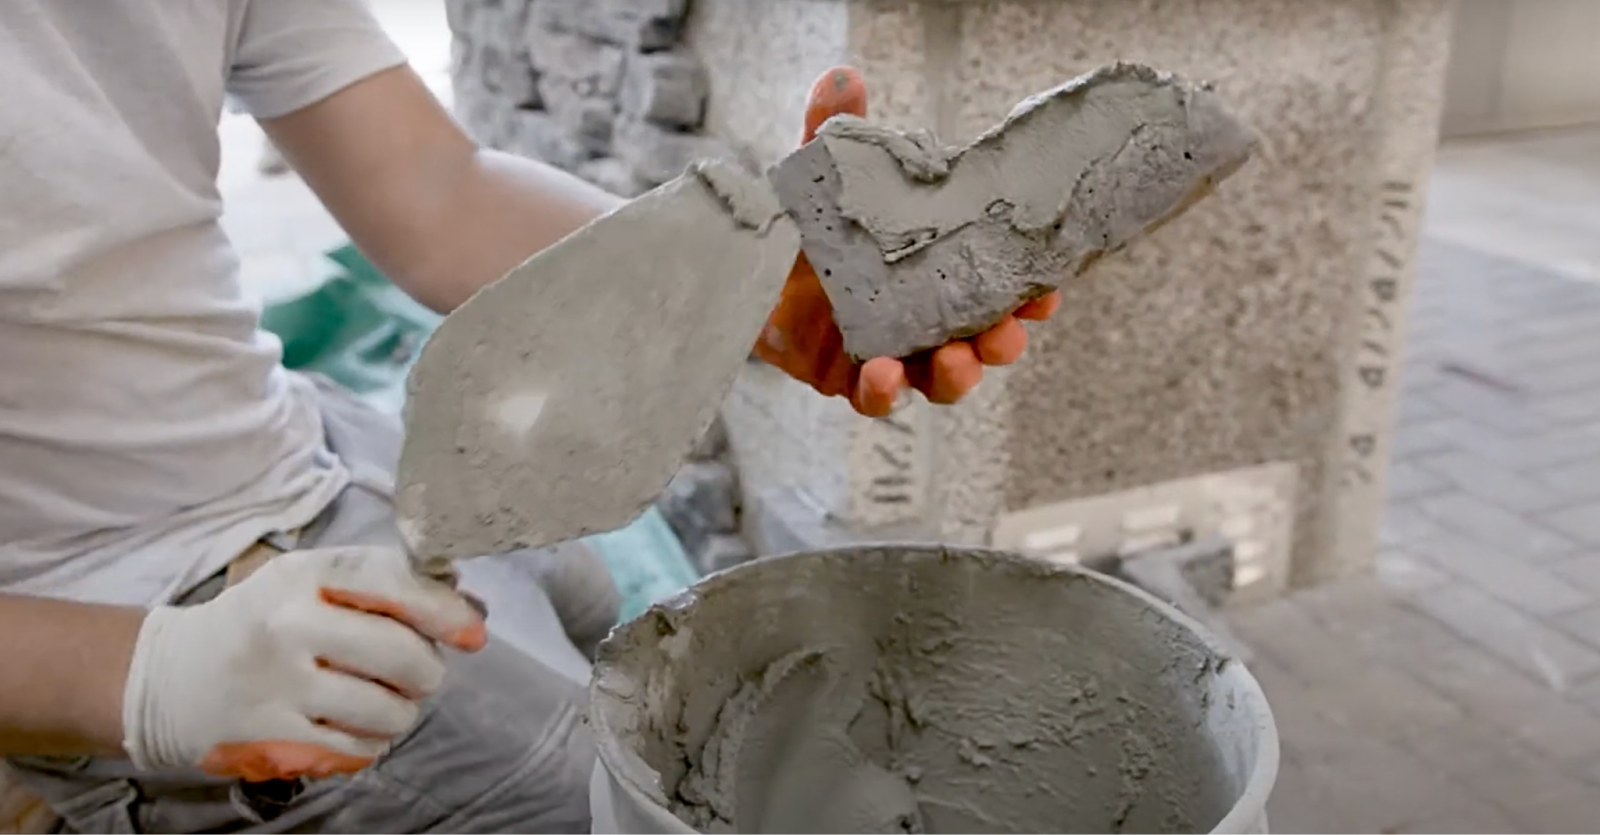
Want to ensure that your stone veneer clings on like a champ? Enter the metal lath. This meshy marvel is not only strong but also flexible. Shape it around your fireplace, get it to hug those corners, and even trace out that fancy mantel.
After drilling or nailing the lath into the bricks, you’ll want to apply a scratch coat over its entire area. Fill all of the gaps with mortar, build about ½ inch layer on top of the lath, and comb over it with the trowel’s teeth to create grooves for the stones to grip to. Once the scratch coat dries, you can begin applying mortar to the back of the stones and attach them to the surface.
Option 2: Cement Board
Want a simpler DIY? Then cement board might be your best bet. It offers a clean slate, making your veneer application smooth and easy. After fastening the cement board to your fireplace, you’ll want to spread a scratch coat, groove it nicely, let it dry, and then give it time to dry.
Then you can apply mortar to your stones and install them with ease.
Option 3: Direct Application
Got a fireplace in tip-top condition? Why not skip the lath or cement board and go direct? Apply the veneer straight onto the brick, but make sure those bricks are ready for the spotlight — means no crumbling faces, loose bricks, unstable cracks, or other substances on the fireplace that could weaken the bonding.
A tiny caveat: if your bricks have a paint job, it’s best to opt for either Option 1 or 2.
If you choose traditional stone veneer take the time to do a little prep. Before you begin, make sure your stones are clean and lay them out in your desired pattern.
Be sure that you have all the necessary materials at hand. Always follow the manufacturer’s guidelines for installing your chosen type of stone veneer. In most cases, you’ll need your trusty trowel, type S Mortar, and a masonry saw before getting started.
For more detailed instructions, check out these comprehensive guides for Cultured Stone and Pangaea.
If you’re seeking inspiration for your fireplace makeover, take a look at these inspiration pages.
And if the DIY route isn’t your cup of tea, you can find a certified installer near you by searching our database.
Let Instone Make it Easy
Navigating the world of stone veneer fireplaces can be overwhelming, but don’t sweat it! Instone’s network of suppliers is ready to guide you. They’ll help you pinpoint the perfect method and materials tailor-made for your project. Ready to rock that decorative fireplace transformation? Contact Instone today for a dealer in your area.
Upgrade Your Stone Veneer Siding Game: Get Quick & Stunning Results
Fast-track Your Masonry Projects with Instone’s Solutions
Whether you’re a contractor or a weekend warrior do-it-yourselfer, you feel the need … The need for speed.
Installing a veneer one stone at a time is meticulous work that takes time. Time that could be spent on a family outing, crossing tasks off the to-do list, or doing the things you love. Or in the case of a masonry professional, time that holds you back from moving on to the next job.
Instone offers two high quality solutions that are easy to install and help you cruise through stone veneer siding installations. Interloc Natural Stone Panels and Be.on® Stone are three to eight times faster to install. And they work well on interior and exterior applications.
Both stone siding brands have their own unique features but share a common approach in producing panels made of multiple stones. The professionally designed panels can cover plenty of ground in a hurry. The veneer panels fit together seamlessly and are designed for stress-free installation, making projects simple enough for any moderately handy do-it-yourselfer to take on.
Using Interloc or Be.on Stone, a wall that looks like it’s clad with thousands stones will only actually require a few dozen stone veneer panels. Chris Camosse, general manager for Massachusetts-based Camosse Masonry Supply, said these creative products have been hot sellers and given his company an edge.
“With the proprietary products that Instone finds, it allows us to have something that our competitors in the area don’t have – for example, the Interloc interlocking panel systems,” Camosse said. “These have become a huge success not only with homeowners but with contractors. Everyone sees the value of the product and the time it saves.”
Interloc Natural Stone Veneer Panels – Real Stone 8x Faster
A Loc on Quality
Interloc panels feature thin natural stone pieces that are set into mortar and shaped to fit tightly together, hiding joints and giving the appearance of a stacked stone masonry wall. With Interloc, the hard work of selecting and arranging individual stones is already handled at the factory. Adding to the ease of installation, Interloc stone veneer panels have rough grooves on their backs that aid bonding.
Camosse first began carrying Interloc products about three years ago. Since then, he has held short how-to courses for contractors to introduce the product. During the courses, he demonstrates the panels’ consistency, time savings, and helps them become familiar with the product.
“The product we got on day one was the same quality as the product we got a year in, so that proved a lot to us as well.”
Chris Camosse, general manager for Massachusetts-based Camosse Masonry Supply
Interloc is available in two styles: New England, which features a blend of grey and warm, earthy colored stones, and Berkshire, a more consistent grey stone with sandy highlights. Use our online savings calculator to compare costs of Interloc vs. standard stone veneer siding.
Be.On Stone Veneer Panels – Mechanically Fastened
Above and Be.on for Simplicity
Instone President and CEO Kevin Grotke recently took on a DIY project of his own, adding wainscoting around the outside of a cottage he bought for family getaways. After giving some thought to his options, he determined Be.on Stone mortarless stone veneer siding was the ideal choice.
“We’re only here on the weekends so I’ve only got a day and a half to get this done, which is why I decided to go with this rather than a mortar and a lath application.”
Kevin Grotke, Instone president and CEO
Be.on Stone, also known as “screw-on stone veneer” or “stone veneer siding,” requires no mortar. It requires few tools – if you have a screw gun, a tile saw, a level and a tape measure, you’re off to the races.
As Grotke demonstrates in this video, the key is applying a starter strip along the base of the wall at the beginning of the job and making sure it’s level.
Once you’ve screwed in the initial row of veneer panels, you can run the rest of your panels above them quickly and perfectly level. Whether you have a standard OSB or plywood wall, you only need two or three fasteners per panel and don’t need to hit a stud.
Best of all, you won’t need a confusing assortment of panels to form your corners. As explained in our InBuilding Design series, the same pieces are used for inside and outside corners.
“You don’t need to order inside corners, you don’t need outside corners. One panel does it all,” Hortigan said. “All you have to do is figure out what your square footage is.”
Plus, with Be.on Stone’s patented D.Rain water management system, any rain that makes it behind the stone veneer drains automatically to the bottom of the wall, preventing mold and other damage to the structure. The product also has a 50-year warranty.
Be.on Stone comes in four styles, ranging from the Element collection, with its old European flavor, to the more contemporary Horizon. Each has its own variety of color options. Try our Virtual Designer for an instant glimpse at what a Be.on Stone veneer would look like on your home.
We Make it Easy!
Contact Instone today to learn more about why Interloc and Be.on Stone products are the fast, easy solutions for your next stone veneer job or DIY home exterior and siding project.