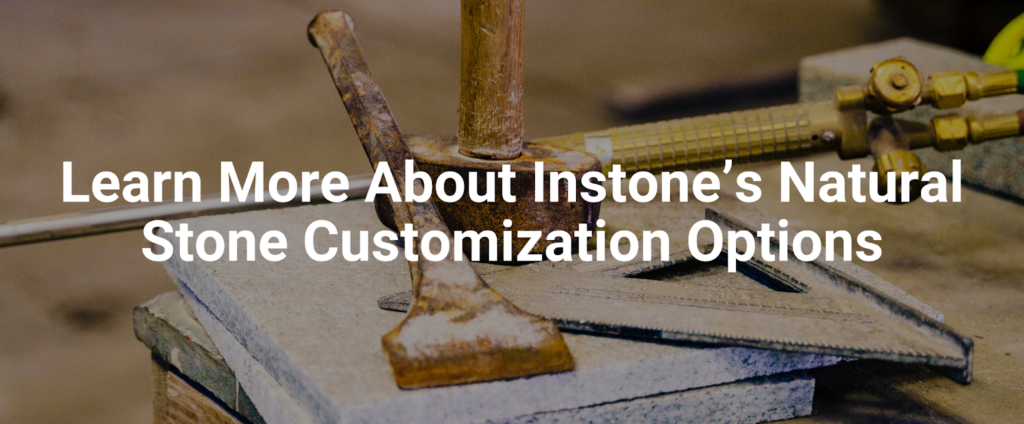
Precision in Every Cut: A Guide to Handling Manufactured Stone Veneer
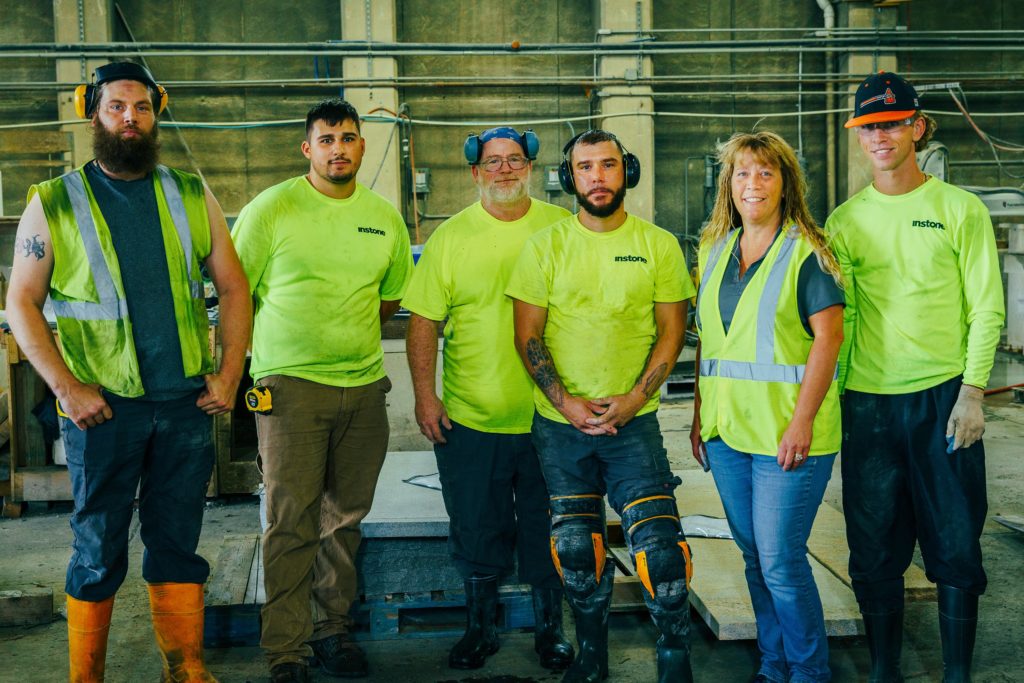
Cruz Leon is the founder of Crux Lon Hardscape University, based in South Elgin, Illinois. His award-winning program helps masonry professionals hone their craft with dozens of class offerings like the Outdoor Living Bootcamp, the Masonry & Outdoor Kitchens Workshop and the 2-Day Hardscapes Hands-On.
Cruz Leon and Family
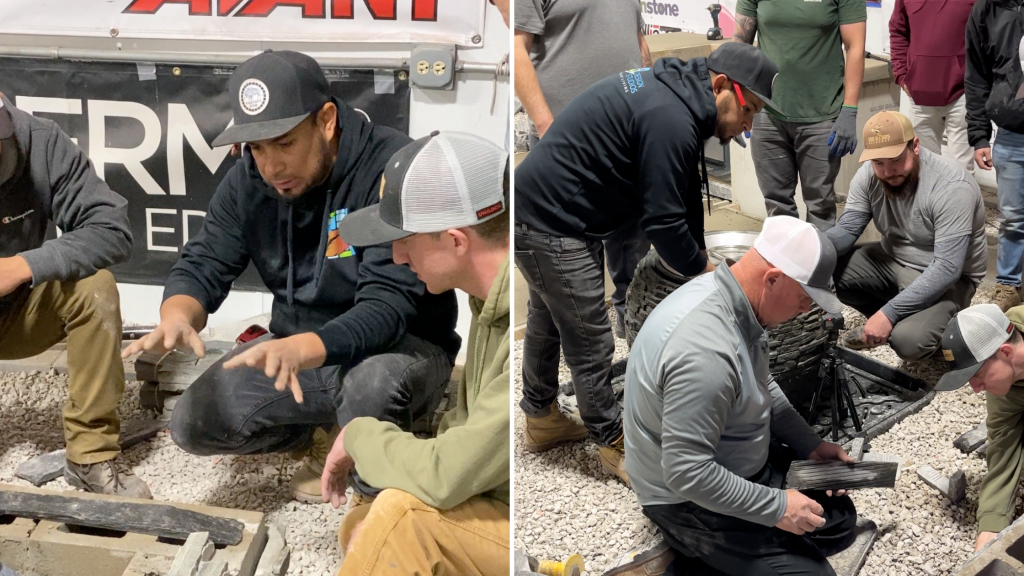
Leon began working with hardscapes as a high school student in 1999 before starting his own business six years later. At the encouragement of colleagues who told him he had a knack for teaching the trade, he launched the University three years ago. We asked Leon to share some tips and insights for cutting manufactured stone veneer (MSV) products.
Hardscape class with Leon
Pay Attention To The Details
To Leon, great cuts are less a matter of technique than they are a state of mind. Finesse takes time. However, masons often feel the pull to finish a project as fast as possible and start their next paying gig. As long as the work looks passable, they’ll consider it done.
“It’s all about how you do your job,” Leon said. “I know some guys just want to get it done and move on to the next job. We’re different – we want to get it done as perfectly as possible.”
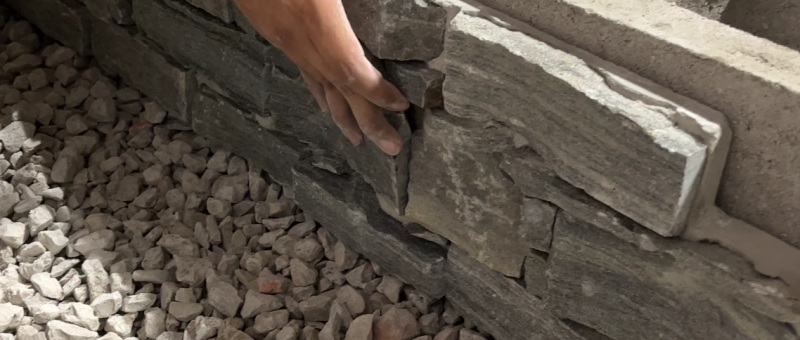
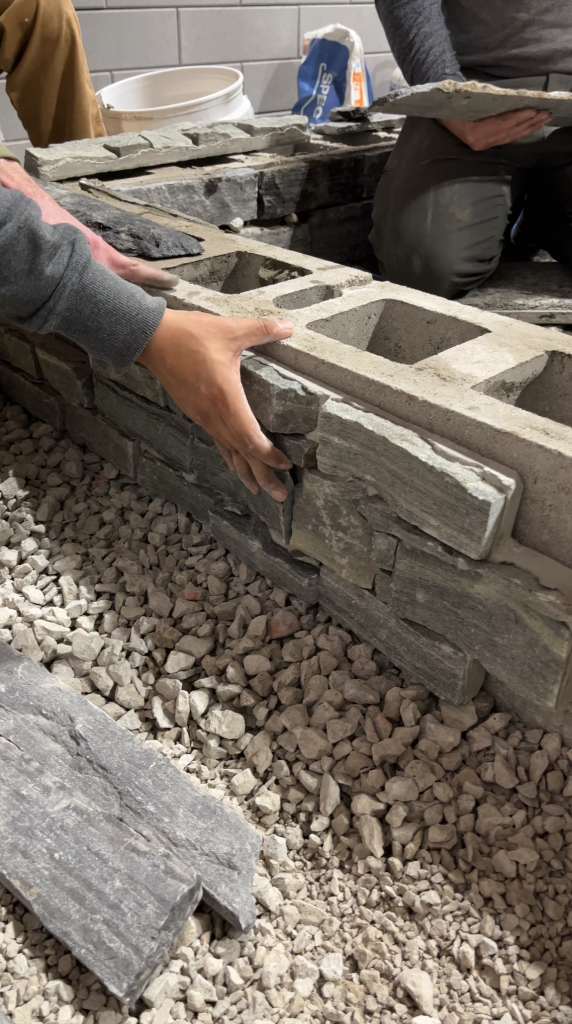
Leon is a believer in going the extra mile make sure that no stone is crooked or sticks out awkwardly from the rest. If a corner doesn’t fit perfectly, he’ll take the extra time to sculpt it.
In the end, this attention to detail has been more worth the while. His reputation as a mason who demands quality work of his crews has spread through his area, and he is now frequently sought after and recommended for lucrative, high-end projects.
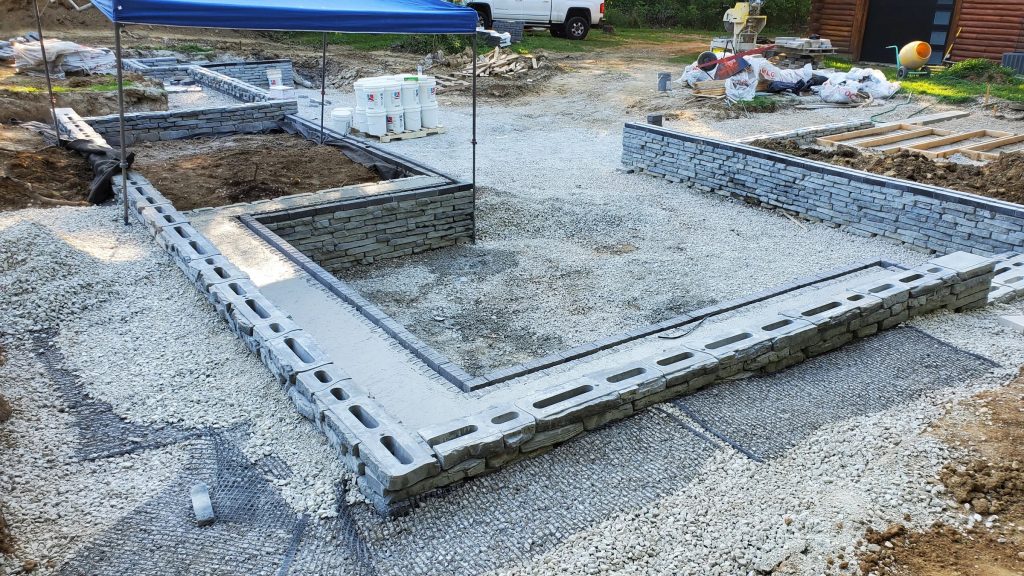
Plan Ahead
Leon always likes to lay veneer pieces on the ground first to arrange how they’ll look on the surface. While some products come pre-sorted to speed the installation, he prefers the process of mixing them up.
Even when the stones are arranged by the manufacturer, installers will usually face decision points when they’ll have to deal with gaps in the pattern. For example, while installing veneer around a fireplace, a mason needs to get creative about which stone colors to use and how to cut them while framing the opening. When making cuts in situations like these, Leon likes to chisel the edges to make them look as rough and natural as possible.
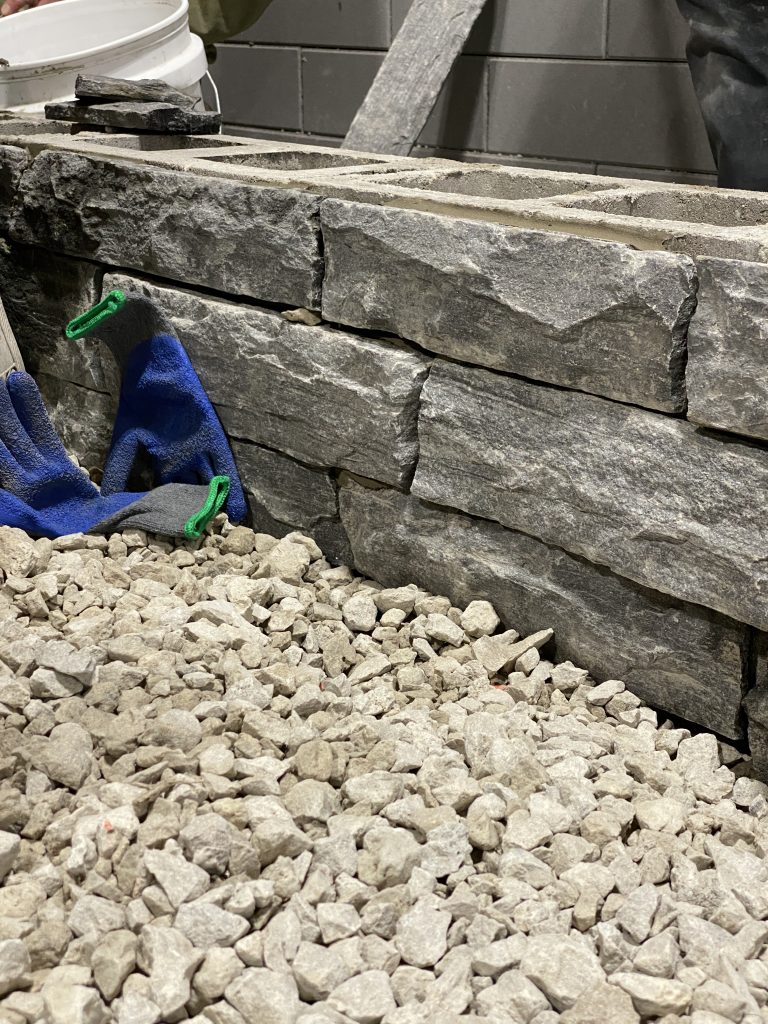
Keep it Clean at the Top
Especially when working with veneer panels, Leon prefers to avoid cuts to the upper sections that are most clearly in view. He’ll start by placing a level piece of wood near the ground to guide a first row of panels or stones and then work his way up. Once the top has been reached, he’ll infill the bottom portion, where any pieces of stone that needed to be cut are not visible as prominently.
When installing individual stones, Leon acknowledged that it’s not practical to check every piece to make sure it’s level. Instead he likes to draw marks on the wall every four inches or so and follow them to ensure the stones stay on track. After finishing every 2-by-2-foot area or so, he steps back to take in the full picture, and make any cuts or tweaks needed to make it look right.
A Measured Approach
Since cutting stone is time consuming, Leon likes to figure out ways to do fewer of them. At the start of any job, he recommends taking some extra time to scan the job site, think through your strategy, and take measurements that can help you avoid mistakes later.
When using veneers or pavers that come in large sizes, Leon doesn’t believe it looks good when the pattern abruptly ends with a bunch of small, cut pieces. To avoid this, take measurements at the beginning to determine how you can use cuts that are as large as possible on both ends of the rows.
Keep Learning
Years ago, Leon used to hear complaints about masons working too fast, too shoddy, and depressing the value of everyone else’s work by not charging enough. So he decided to do something about it.
Leon started the Hardscape University with the aim of providing a fast, affordable way for masons and workers who wanted to transition from fields like landscaping to get a formal education on the craft’s finer points. Whether you need a primer on cutting stones or operating special machinery, he recommends masons of all experience periodically set aside time for professional development at programs like his.
“I feel like our trainings are elevating the industry by helping people understand why the job needs to be done right,” Leon said. “Once they understand that, they’ll figure out how to charge what needs to be charged – sometimes they don’t know any better. If they educate themselves, it’s good for everyone.”
Need a special cut that you don’t have the tools or background to handle? Reach out to Instone’s Fabrication and Design Services. Our team can work with you on custom cut-to-size hardscaping and partner with you in the design of large-scale projects and sourcing of stone products.
How to Achieve Superhero Status With Clients & Boost Sales
We all know that spring signals the start of a busy season for those in the construction, masonry, and hardscaping fields. Homeowners are eager to kick off their long-awaited renovation projects. This is an excellent time to lay the groundwork for a successful sales year.
Achieving success goes beyond simply providing top-notch materials. It demands a strategic approach that prioritizes quick and efficient service, outstanding product quality, and, most importantly, the satisfaction of your clients.
This guide is designed to arm you with actionable advice to enhance your interactions with customers, ultimately helping you secure more contracts and boost your sales.
Prompt & Accurate Quotes: First Impressions
The first step towards a successful spring should be no surprise: communication is key. Many homeowners will shop around when starting a large home project. Swift, detailed, and professional quotes are essential and do more than provide numbers; they showcase your engagement, dedication, and professionalism.
You can influence their hiring decisions from the start by ensuring your quotes exude clarity, accuracy, and a comprehensive outline of expectations and deliverables. A messy quote can come across as unprofessional and unbothered and be seen as a reflection of your work on the job site.
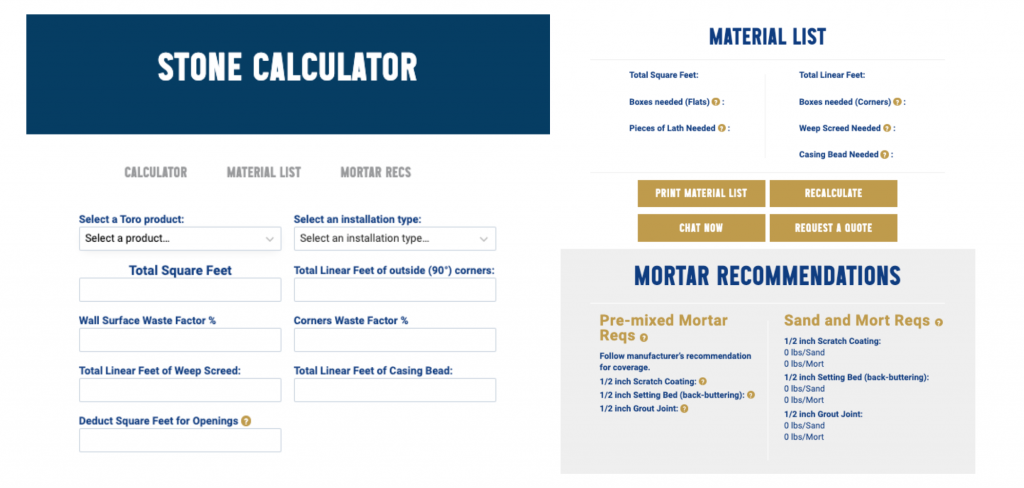
Toro Stone Calculator
Use tools like the Toro Stone Calculator to help you estimate how much stone and other materials you need for a project. Additionally, Instone dealers can easily log in, create a quote in minutes, save the quote, and send it or print it for the customer, ensuring a professional-looking quote is provided instantly. Of course, you can always reach out to us for swift and detailed quotes as well. A precise quote reflects your professionalism and can be the deciding factor for potential clients.
Advise on Material Choices: Quality Meets Budget
While some homeowners will have researched materials independently, many only know what they want the final product to look like — but not how to achieve it. You can help guide homeowners through a maze of options to find what suits their desired aesthetic best. Your expertise can help them make informed, budget-conscious decisions. This is where you can highlight the value of investing in Instone’s premium materials for lasting satisfaction and peace of mind.
Incorporate Innovative Techniques: Building for the Future
Stone masonry is an ever-evolving art that shifts as innovative new techniques and tools emerge. That’s why it’s so important to be aware of — and to quickly incorporate — industry-leading building techniques, like new moisture management systems, into your work whenever possible.
It is important for you to educate homeowners on the benefits of using these industry-leading systems and solutions in their projects. Understanding these long-term advantages ensures that their investment is not just for the present but a contribution to their home’s future. Plus, it helps build your authority as an industry leader.
This error message is only visible to WordPress admins
Error: No posts found.
Promote Upselling Opportunities Wisely: Enhancing Value
Any upselling must be done strategically for the homeowner’s benefit and must align with the homeowner’s budget and expectations. This approach not only improves the outcome but also enhances customer satisfaction.
Here’s how you can apply this strategy effectively:
Offer bundled product options that enhance the overall project—like combining landscape stone with stone veneer for outdoor kitchens or fireplaces. This not only simplifies the purchasing process for your clients, making your shop a one-stop solution but also enhances their space’s aesthetic and functional value.
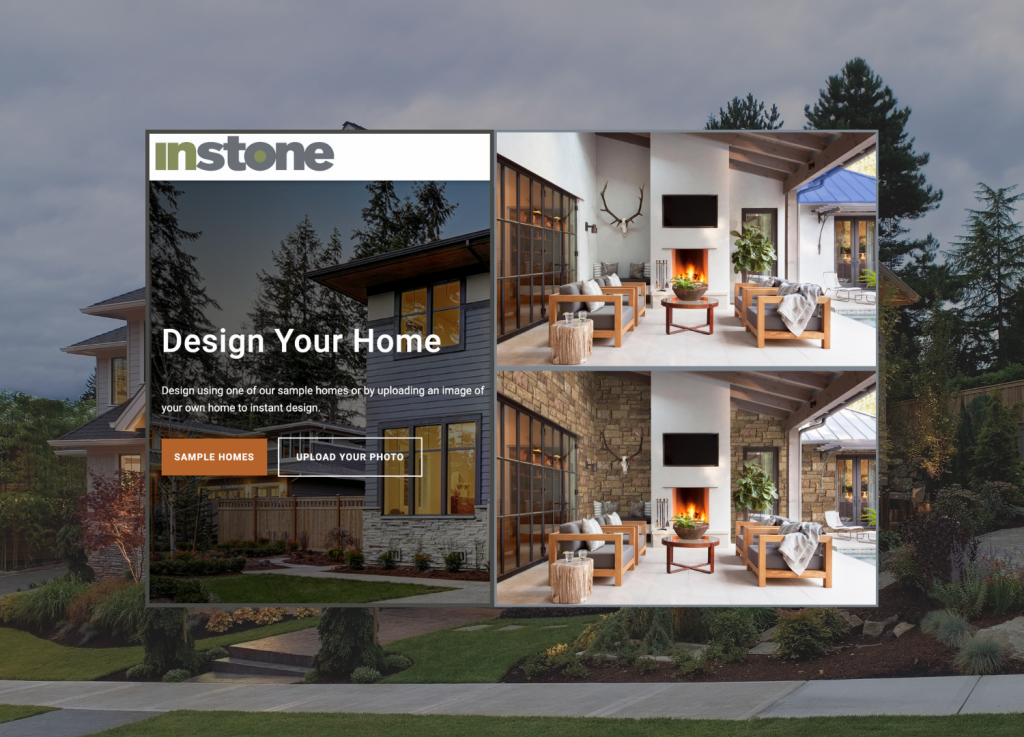
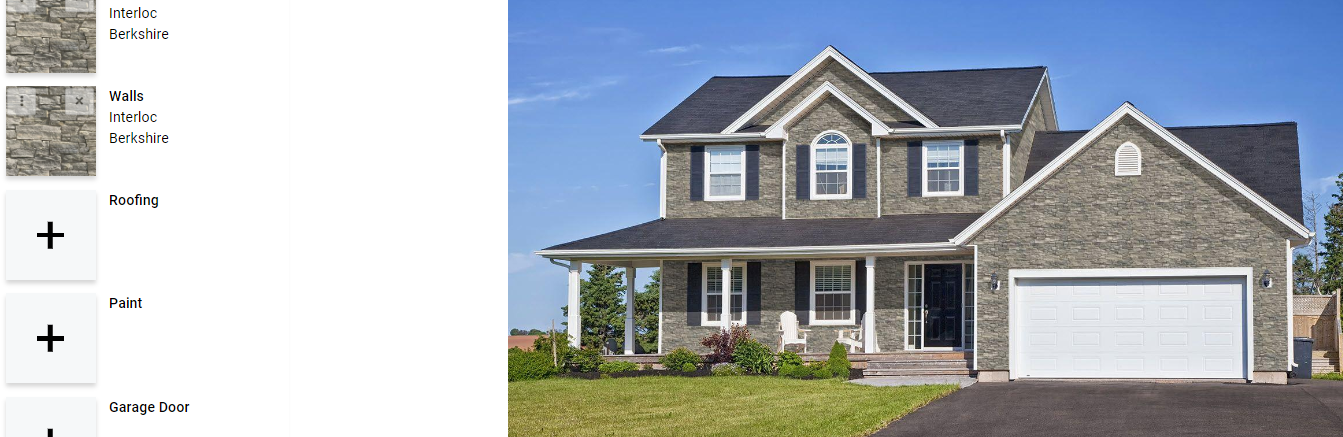
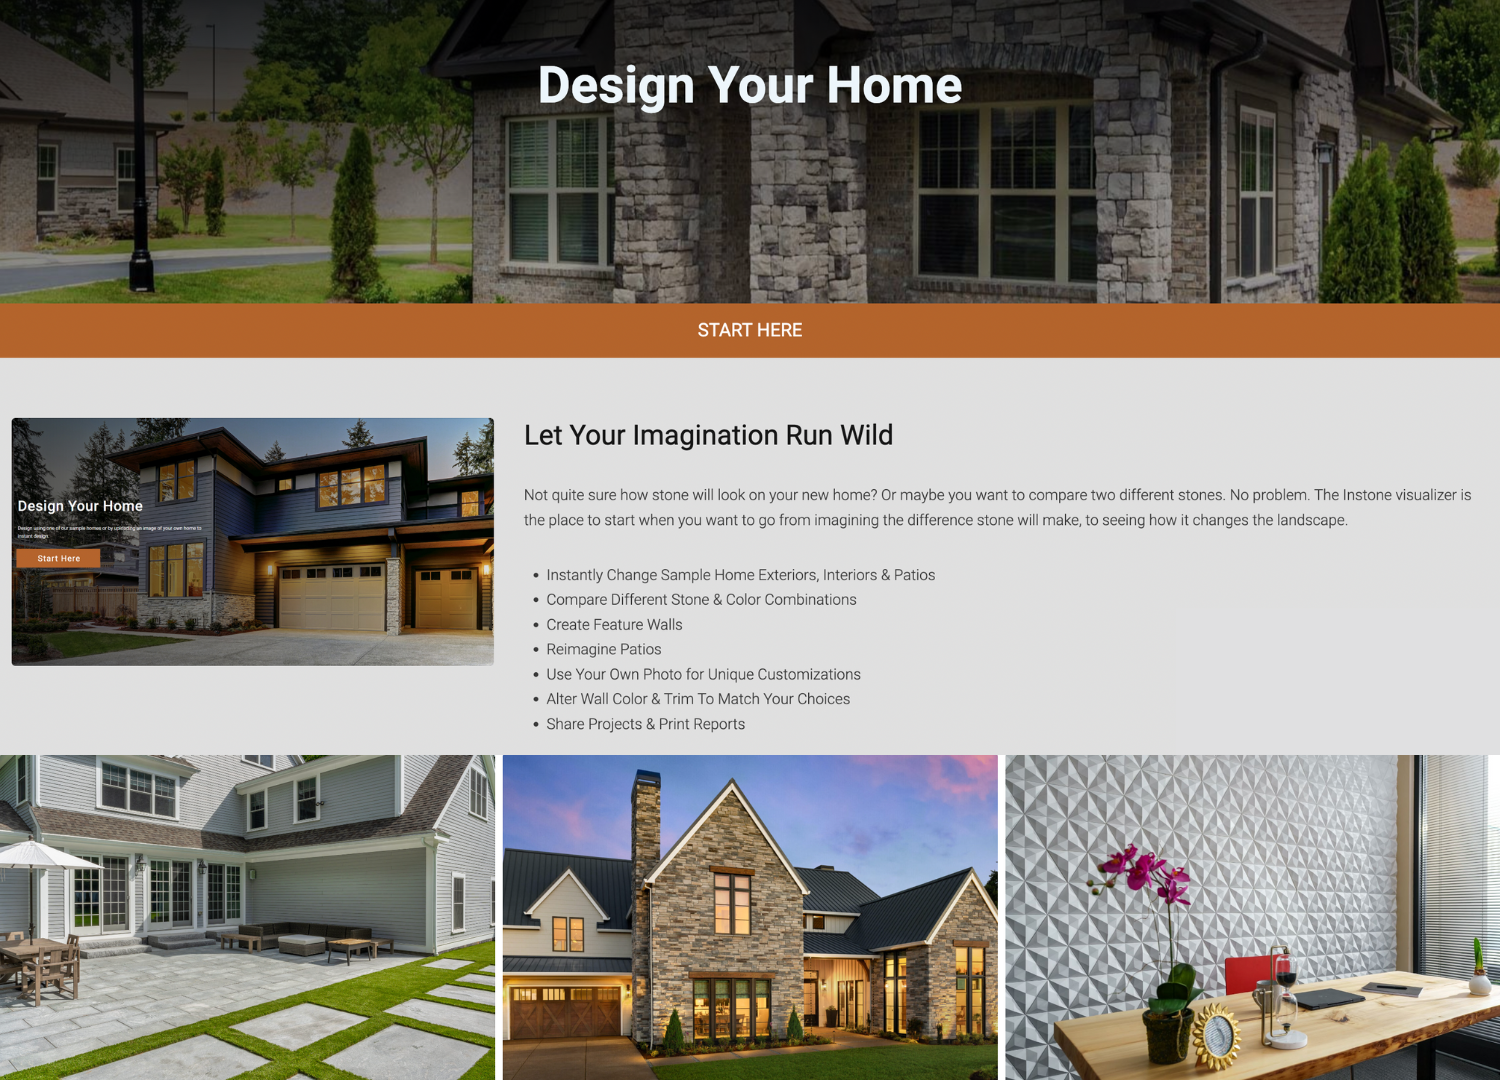
Instone’s Visualizer
Utilize Visualization Tools: Seeing is Believing
Looking for ways to stand out from the competition? Elevate your proposals by incorporating visualization tools. These innovative tools can transform your quotes from simple documents into engaging visual experiences that better communicate the value and vision of your work. By allowing your clients to see their projects’ potential outcomes, you’re enhancing their understanding and excitement and establishing your commitment to transparency and quality. In a market where first impressions are crucial, leveraging visualization tools can be a game-changer in convincing homeowners to choose your services over others.
Maximize the benefits of this approach with the Instone Visualizer, a powerful tool designed to bring your client’s vision to life right before their eyes. Here’s how you can integrate this tool into your sales strategy:
Interactive Kiosks: Establish interactive kiosks at your business locations where clients can actively engage with the visualizer. This allows them to visualize the impact of different stone and color combinations on sample home exteriors, interiors, and patios, enhancing their decision-making process with an immersive, hands-on experience.
Staff Training: Ensure your staff knows how to guide clients through the visualizer. Well-trained employees can assist clients in exploring a variety of design possibilities, helping them reimagine their spaces from creating feature walls to transforming patios.
Website Integration: Embed a link to the Instone Visualizer on your business website, giving clients the convenience to start their design exploration from home. They can effortlessly modify wall colors, trim and compare different stones to ascertain which aligns best with their aesthetic preferences.
Before and After with the Instone Visualizer Tool
The Instone Visualizer allows clients to use sample homes for their design endeavors and allows them to upload their own photos for unique customizations. This tool simplifies decision-making by providing a realistic preview of the finished project. Clients can share their designs, print reports and even access tutorial videos on how to use advanced editing tools within the visualizer. With these capabilities, designing a home with stone has never been easier or more accessible, making the Instone Visualizer an essential part of your sales and marketing arsenal.
Maintain Clear Communication: Building Trust
Trusting someone to work on or in your home can be a challenge. Reliability and trust are built through clear and consistent communication. One way to do this is to regularly update homeowners with project timelines and delivery times. This demonstrates your commitment to meeting their needs and provides them with a sense of comfort, as they aren’t left wondering about these details.
Understanding the importance of prompt service is why we offer optimal lead times that can be conveniently checked on our website—just enter the quantity for an approximate lead time. This feature allows homeowners and dealers to plan precisely, knowing when to expect their materials.
Our commitment to efficient service delivery is a testament to our dedication to ease and efficiency. Our route truck delivery system is designed to simplify the delivery process, removing any uncertainty by utilizing pre-scheduled weekly lanes that service our dealer network from one of our three distribution centers. It’s a testament to our dedication to ease and efficiency—when you need the product now, we make it easy.
By integrating these logistics details into your communication strategy, you promise reliability and deliver on it. This reinforces trust with your clients, ensuring they feel well-informed and confident in their choice to work with you.
Respect the Workspace: A Reflection of Professionalism
It is essential to remember that your ‘workspace’ is someone else’s home. Keeping this in mind and respecting their personal space will go a long way to making for a happy homeowner.
No matter how good the results are, a disrespectful contractor will likely cost you work in the future, while a well-executed job done by someone respectful can lead to good word of mouth and more jobs.
Aura Blue Ice Natural Sandstone
Document Your Projects: Showcase and Inspire
Visual storytelling is a powerful tool that should not be overlooked. Keep homeowners engaged with your work with pictures. Document the various stages of your projects and use them to enhance your social media and website presence.
The adage “seeing is believing” rings particularly true here; providing tangible examples of your completed work highlights the quality and diversity of your offerings and inspires and attracts potential clients. In today’s digital age, a visually compelling portfolio is indispensable for standing out in a crowded marketplace and fostering trust in your craftsmanship.
Leverage Social Media: Build Your Brand
Social media platforms like Instagram are invaluable because they are indispensable extensions of your professional portfolio. These platforms serve as a vibrant showcase for the photos you capture while documenting your work and the testimonials you garner from satisfied clients. Social media amplifies your visibility and significantly enhances your credibility in the eyes of potential clients. A robust social media presence does more than just display the quality and scope of your projects; it also creates a dynamic platform for attracting new clients and engaging with your community.
By actively sharing updates, progress shots, final reveals, and client testimonials on social media, you effectively broadcast your commitment to quality, transparency, and customer satisfaction. This ongoing dialogue with followers and the broader community fosters a sense of engagement and belonging, transforming your social media space into a lively forum for exchange and inspiration. Plus, social media offers an easily accessible avenue for prospective clients to discover your work and envision the potential transformation of their own spaces.
Consider creating events like a customer appreciation day or an open house to thank your existing customers and also entice potential clients. Promote these events through your social media channels and feature highlights and updates on your website to showcase your active community involvement and commitment to customer service.
Keeping Your Website Updated: A Digital Storefront for Your Brand
Speaking of your website, remember it’s the digital storefront of your business and is just as crucial as your physical location. It’s the hub where potential clients land to explore what you offer and make decisions. That’s why regularly updating your website with your latest offerings and ensuring that the digital reflection of your brand is current and comprehensive is valuable time spent. This step is vital and often missed, which can be a significant oversight in a digitally-driven market.
By consistently refreshing your website content with the latest product information and updates, you’re not just aiming for more sales; you’re enhancing the value and experience for your clients. This dedication to providing up-to-date and accessible information aligns with client needs and reinforces their decision to choose your services. A well-maintained website, paired with a vibrant social media presence, builds credibility and solidifies your position as a forward-thinking and client-focused leader in your industry.
Looking for assistance to keep your website fresh and your marketing on point? Instone has got you covered. Our dealers have exclusive access to our wide array of resources from web developers to social media experts, ensuring your marketing stays updated and search-friendly.
IG: @brickworkssupplycenter
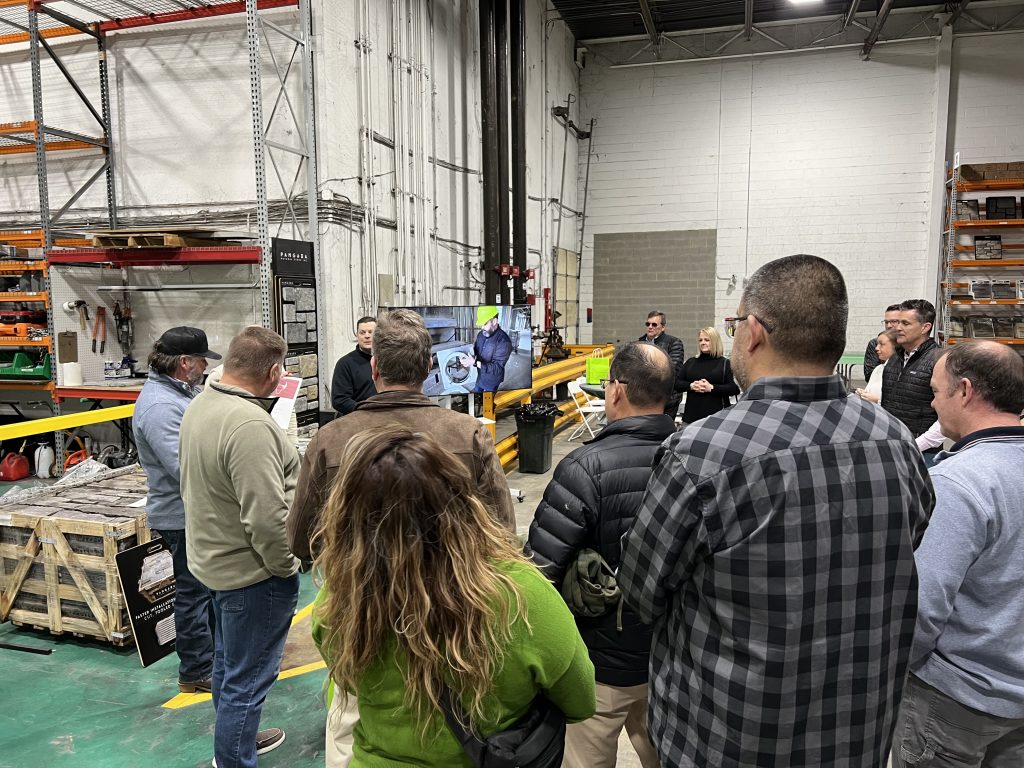
Dealer event held at Instone’s Alsip location.
Obtain Certifications: The Power of Education
Securing a competitive edge in the construction, masonry, and hardscaping industries is crucial for winning contracts and building a reputable business. One strategy to achieve this is through a commitment to continuous learning and professional development. This commitment to professional growth does more than just elevate your technical capabilities; it signals to prospective clients that you are a forward-thinking contractor who values innovation, safety, and the highest standards of quality.
The certifications and knowledge you acquire become powerful tools in your marketing arsenal, allowing you to confidently articulate the value you bring to every project. Plus, staying on top of the latest industry trends, techniques, and materials ensures that you can offer cutting-edge solutions that resonate with homeowners looking for modern, durable, and aesthetically pleasing outcomes.
Enhancing Your Expertise: Instone’s Educational Resources
Deepen your knowledge of stone masonry by leveraging Instone’s comprehensive suite of educational and training resources. Videos covering state-of-the-art stone veneer techniques, on-site installations, and specialized instructional content are just a click away. Gain valuable insights into our premium natural stone collections, like the Aura Natural Landscape line and Pangaea Natural Stone veneer, and learn to confidently recommend the best solutions to clients. By subscribing to our YouTube channel, you ensure you’re always at the forefront of the industry, ready to deliver excellence to your clients with the best-in-class materials for veneer, hardscaping, and fireplaces.
Spring is all about growth and opportunity. You can achieve sales and build long-term relationships with your clients by providing prompt service, utilizing high-quality materials, and ensuring customer satisfaction. Let this season bring you to new heights of professional excellence and customer delight.
With the Instone Visualizer, you can complete a wall-to-wall virtual home makeover in a matter of minutes. The free online tool allows you to simulate what a home or property would look like after a renovation with any combination of stone products from Instone’s expansive catalog.
Powerful yet simple, the Visualizer offers installers and dealers a way to show clients renderings of projects that can be used to assist with sales, and homeowners a way to browse their options for veneers, pavers and other stone products. Users can upload photos of a job site and redo a wall or patio area with new masonry in a couple of clicks.
Instone Vice President of Natural Stone Products Justin Alicandro said the Visualizer has made the need to assemble stone samples or create mockups for clients obsolete.
“This is so much more efficient than the way we used to do things,” Alicandro said. “Homeowners can come out of a session knowing pretty much what they want, and if they don’t like the products once they see real samples, they can tweak the project again in the Visualizer and try a plan B. The Visualizer is such a great tool.”
Visit the Instone Visualizer Page for More Tips & Techniques To Create The Perfect Rendering.
How It Works
To get started, find or snap a digital photo of your project area and add it to the Visualizer. (If you don’t have an image available, you can browse our samples for one that resembles your property.) Photos should be at least 1600 pixels wide and not exceed 16 MB. A standard camera phone pic will do nicely.
With the photo now online, the Visualizer’s AI will scan its features and automatically identify areas most likely for stonework. The technology will also recognize features like windows and doors and omit them. If it misses a wall or ground section you’re interested in, don’t worry – you can draw a polygon to highlight the area manually.
You can then click on any of these areas and choose the interior or exterior Instone masonry product you’d like to see applied there. Once it appears, you can try different brands, profiles, and colors to see how they look, and even change the stone sizes on the fly. The images you create can be saved, shared, and easily edited later.
Fine-Tuning
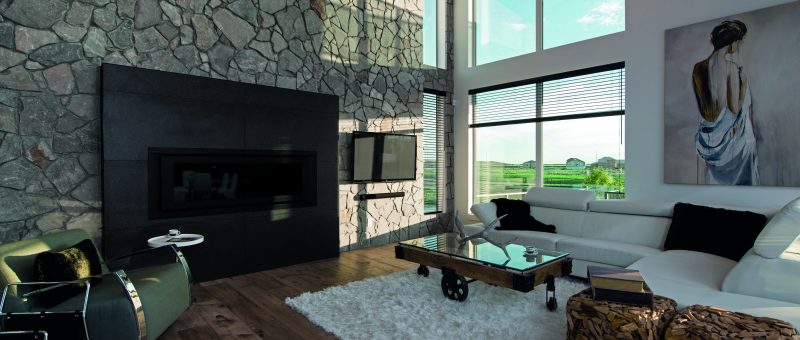
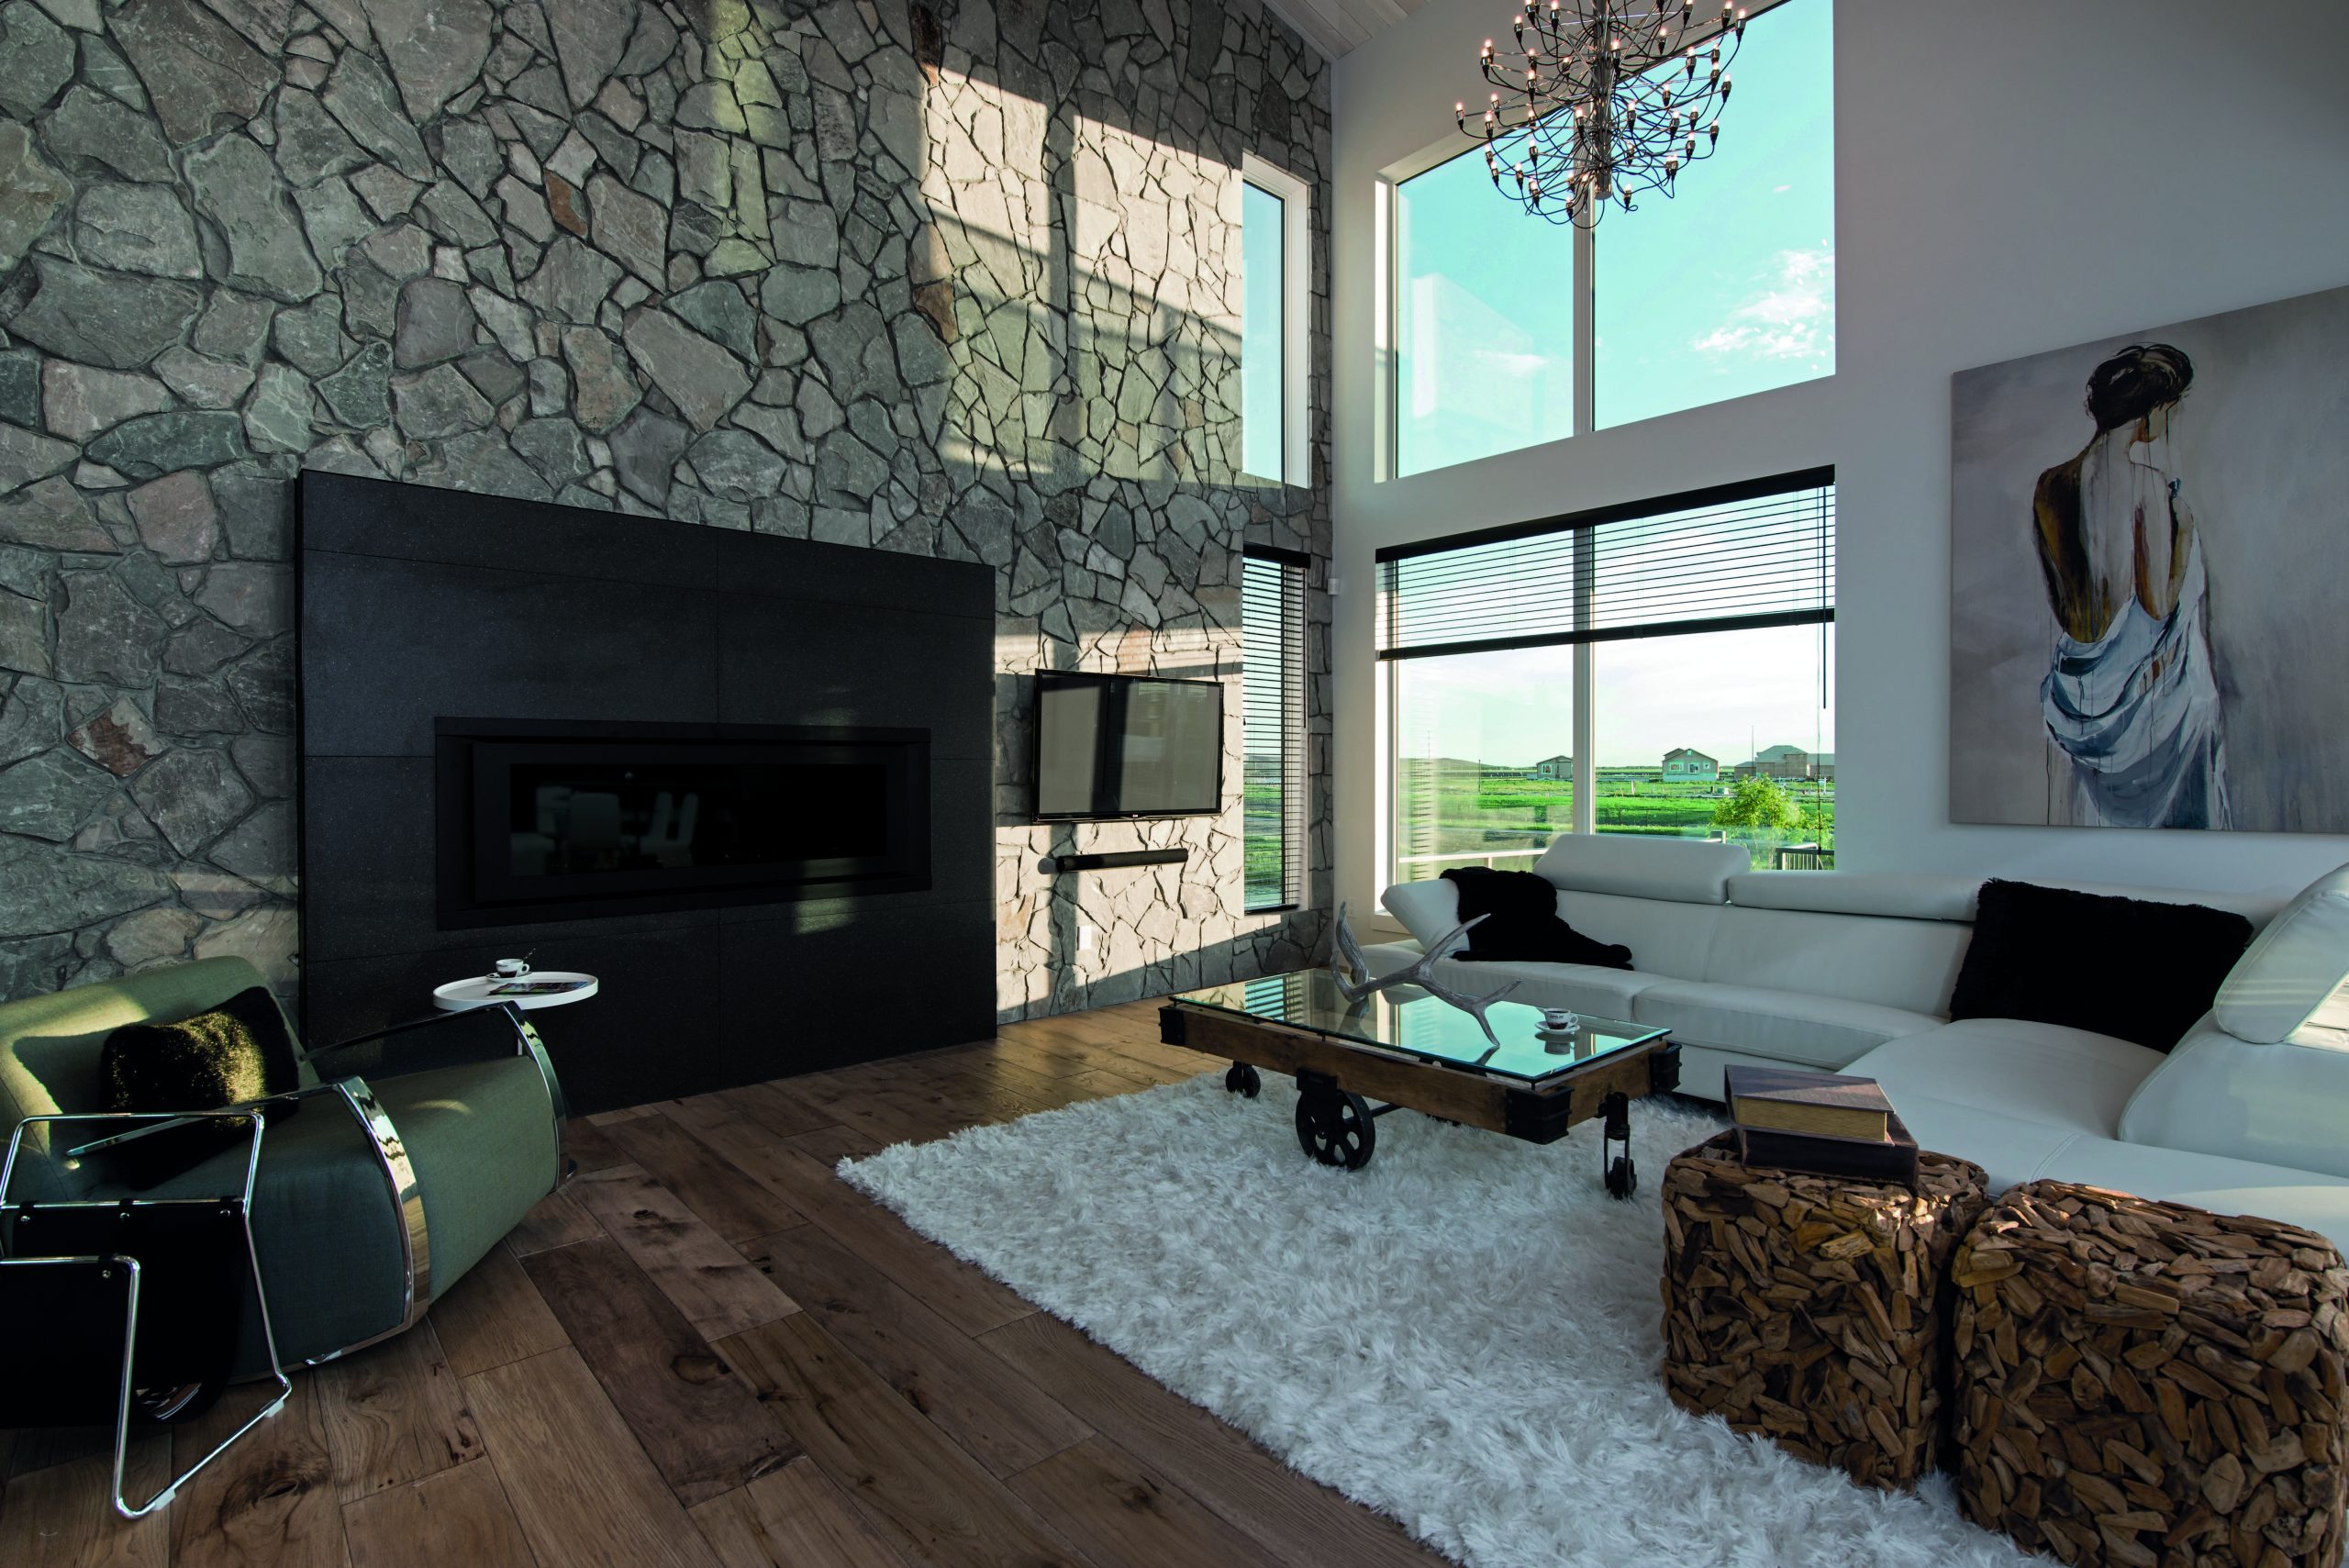
The Visualizer has multiple editing tools to help fine-tune your renderings and make them more realistic. You can adjust the opacity of the masonry to totally block out the surface beneath it or to allow important features to peak through. Another tool allows you to adjust the perspective, which can realign the stone if it’s not quite level or doesn’t track the angle of the surface accurately.
For the best results, we recommend taking your photos facing straight ahead toward the surfaces that will be clad. If possible, it’s best to move any furniture or other obstructions out of the way.
The Visualizer will even help you simulate the appearance of non-stone upgrades. You can apply paint colors to your banisters and doors or try out new shingle styles and colors on the roof. These features can be combined with the stone improvements to give you a full picture of how all of the materials will look together.
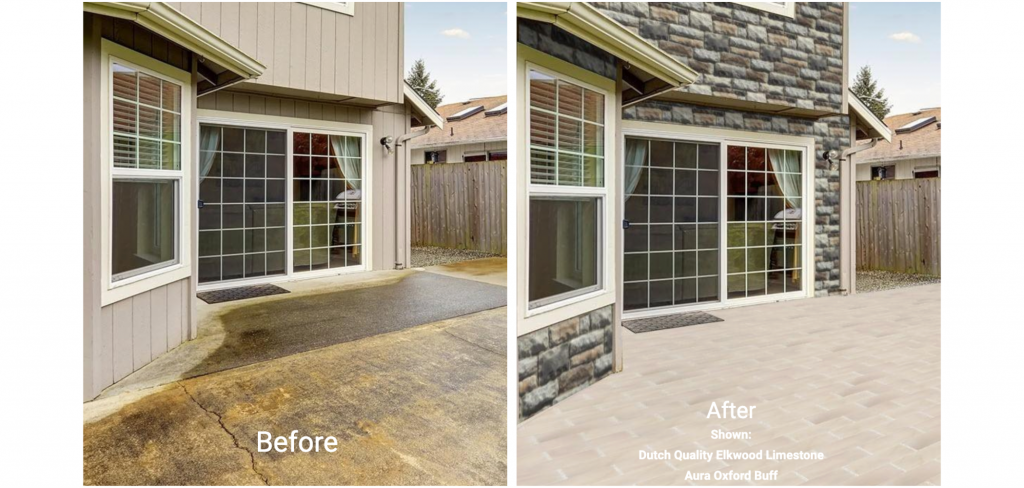
Before and after using the Instone visualizer with Pangaea® 3 Course Ashlar Oxford
Share & Create a Report
The Visualizer offers a range of options for sharing before and after images with clients or anyone else who may be interested in giving feedback. You can quickly export the renderings as JPG and PNG files or use share buttons to email them or post them to Facebook, Twitter/X or Pinterest.
Of high value to masonry professionals, the system can generate attractively formatted reports showing the finished home and thumbnails identifying all of the products featured in the project.
“For a contractor trying to win a job, price is obviously important, but if you can demonstrate for a homeowner what their house is going to look like when it’s complete, that will definitely set you apart from others trying to quote the job,” Instone Chief Operating Officer Rob McKay said. “Ultimately, a lot of people will still want to see a sample and feel it in their hands, but the Visualizer is a great tool to help them narrow down their choices.”
Watch Our Full Tutorial
For a full demonstration of what’s possible with the Visualizer, watch our training video (“Pro Tips for Selling With The Instone Visualizer”) above. You can also check our Visualizer page for FAQs and a series of shorter videos with tips and demos focused on specific Visualizer questions.
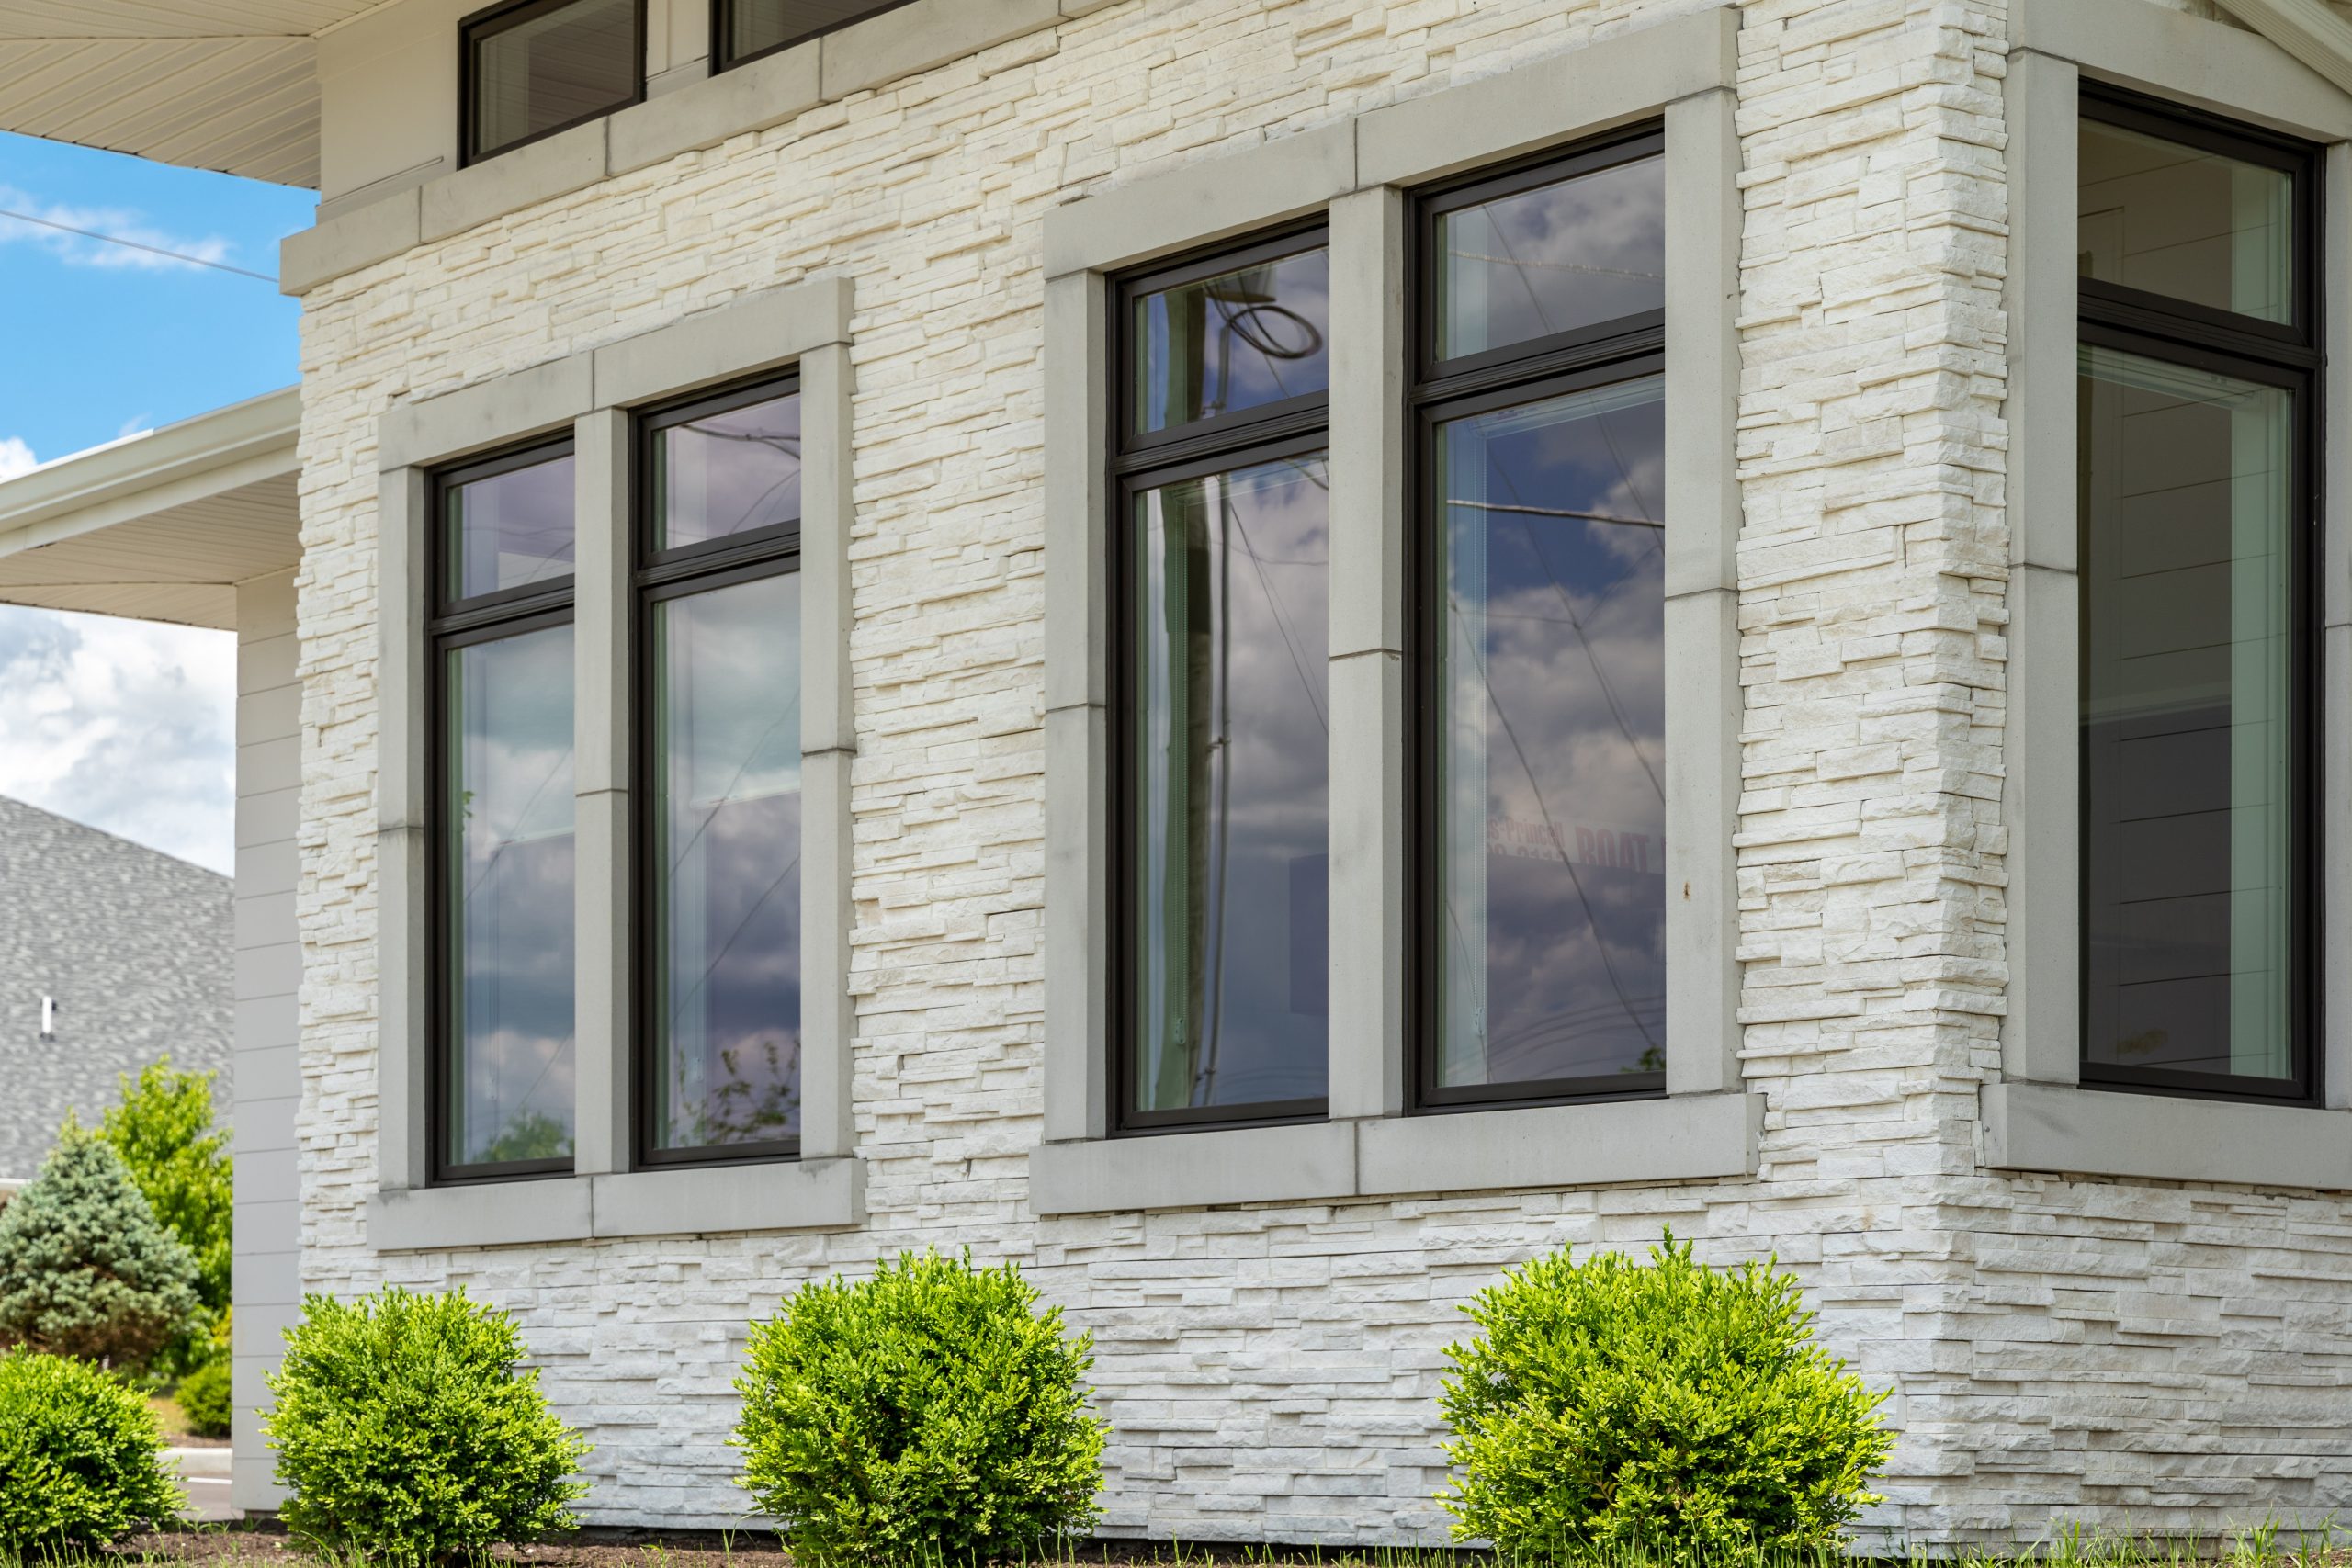
Elevate Your Home with Stone Veneer: 5 Perfect Places for Accent Walls
In the world of home construction and DIY, creating an accent wall isn’t just about aesthetics; it’s about making a bold statement. These accent walls, also known as feature walls, are where craftsmanship meets character, and they’re more than just a visual interest; they’re a game-changer for your project.
While paint and wallpaper have their place, they can’t match the enduring value and impact of stone veneers and architectural tile. Accent walls not only elevate the aesthetics but also add substantial value to a property, and it’s simple to maintain, ensuring your home interiors remain a source of awe for decades.
Choosing the right spot for an accent wall might seem challenging, but often, the room itself provides strong cues. Here, we delve into five strategic settings perfect for your stone veneer accent wall.
Artepiso Orchid
1.First Impressions Matter
Remember, you don’t get a second chance to make a first impression. Stone veneer on a wall greets your guests and sets the tone for your entire space. It’s the introduction that demands attention and admiration.
The placement of the Artepiso Orchid wall tiles in the space above acts as a focal point for anyone who may walk through the front door. These playful tiles, like any framed art, are sure to get the conversation started and create a welcoming atmosphere as soon as guests enter the house.
Light and easy to install, Artepiso 3D architectural tile adheres to most surfaces with a simple and inexpensive installation. They can also be painted for an attention grabbing splash of color.
Beon Stone® Carbo Classic
Pangaea® Fieldstone Cambrian
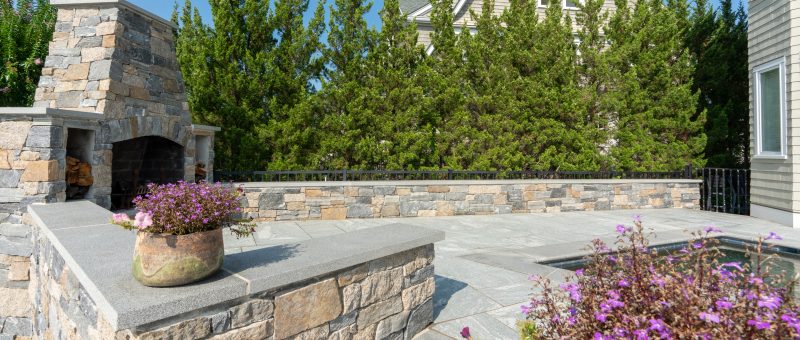
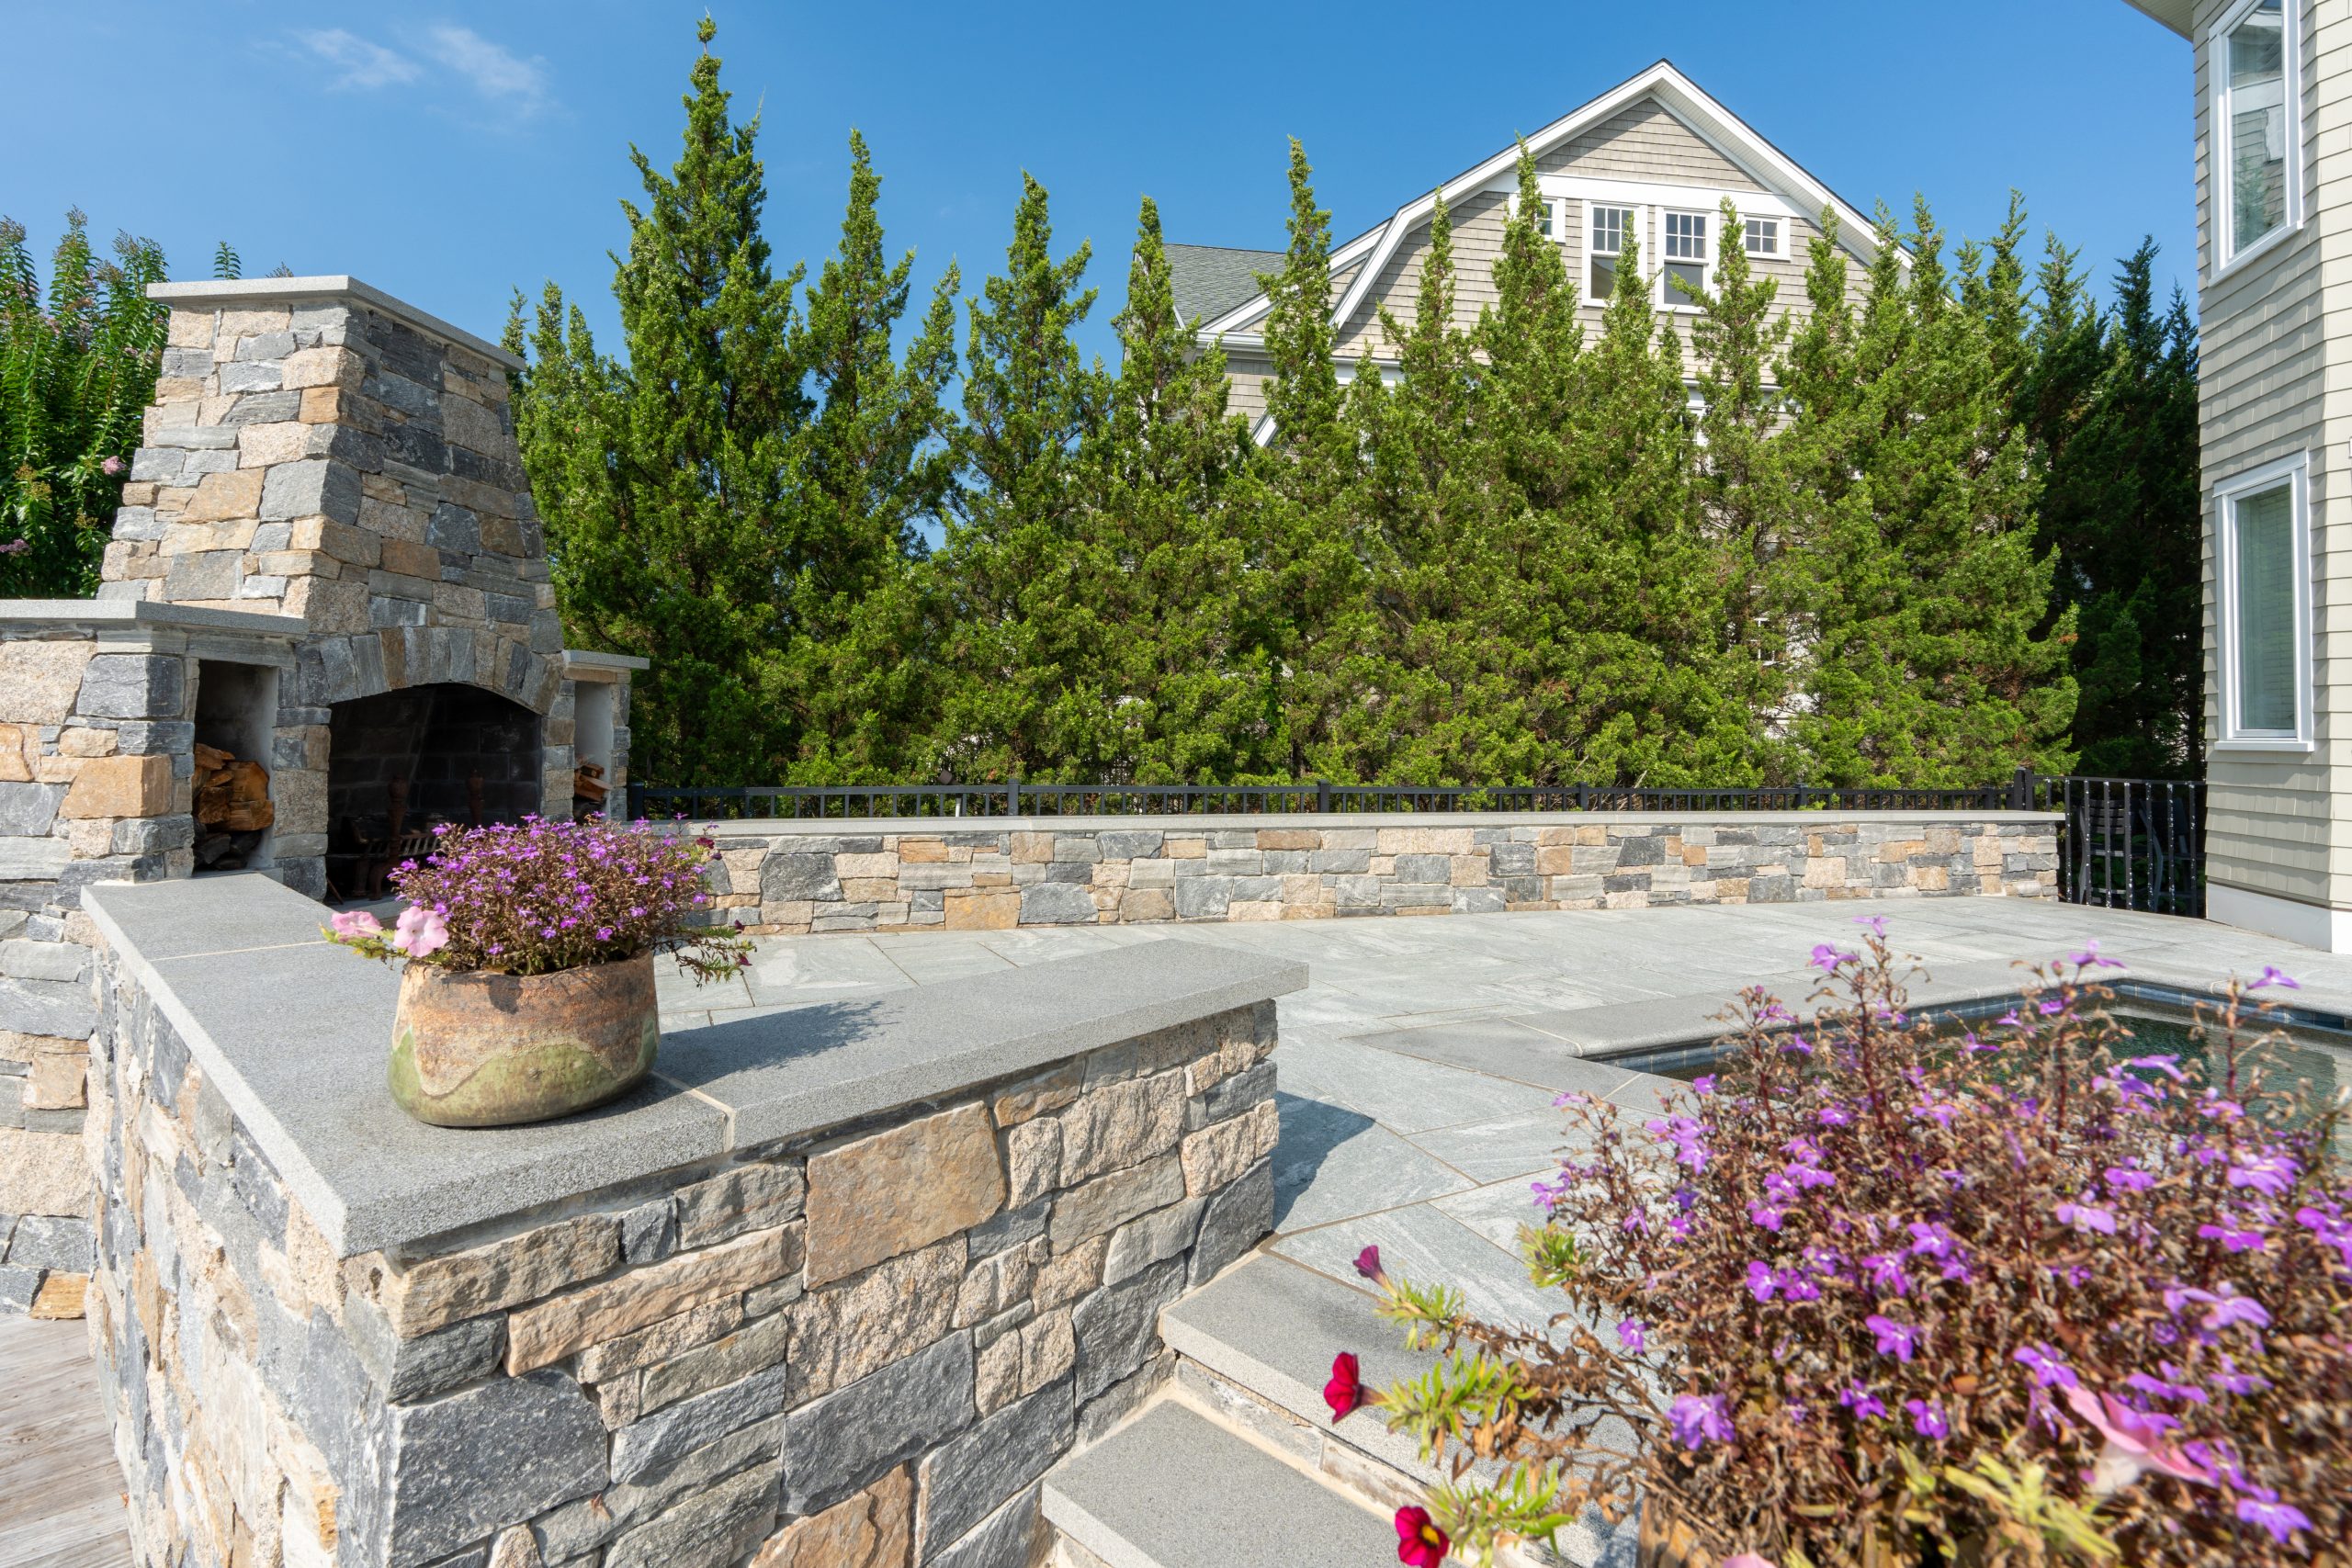
2.Accentuate the Architecture
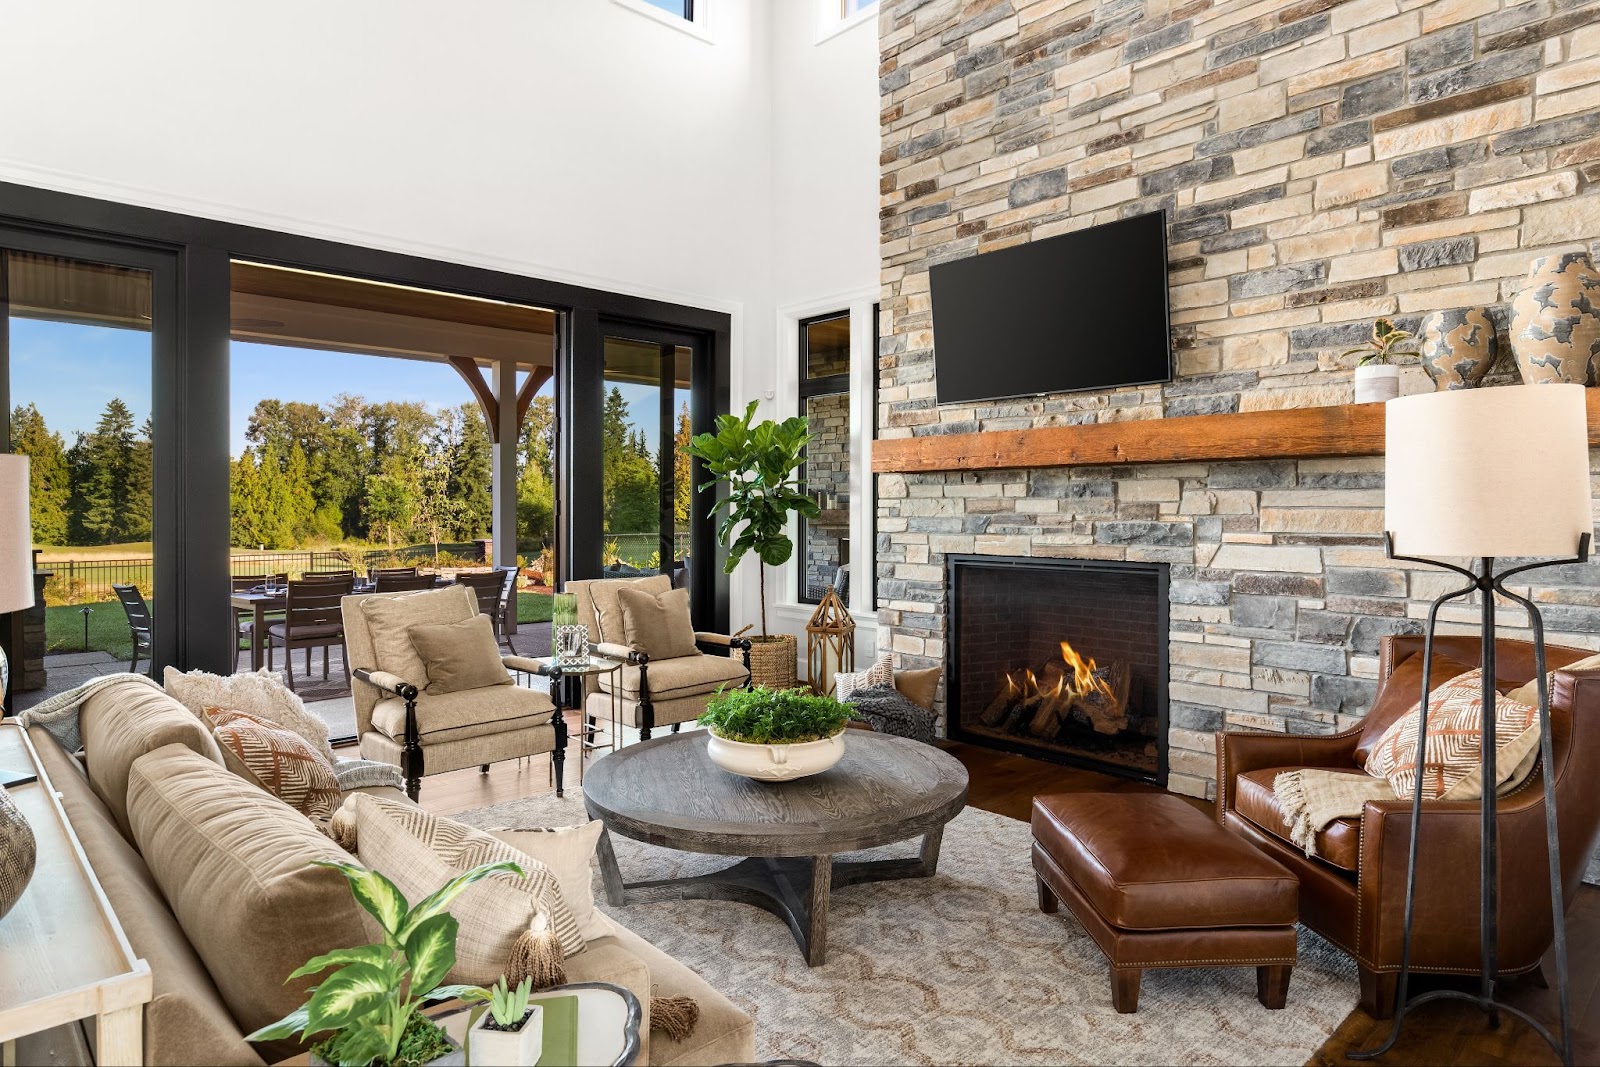
Craftsmen know that great rooms deserve great features. Stone veneer can turn ordinary walls into stunning showcases. Fireplaces, floating room dividers, and walls with architectural details become canvases for your creativity.
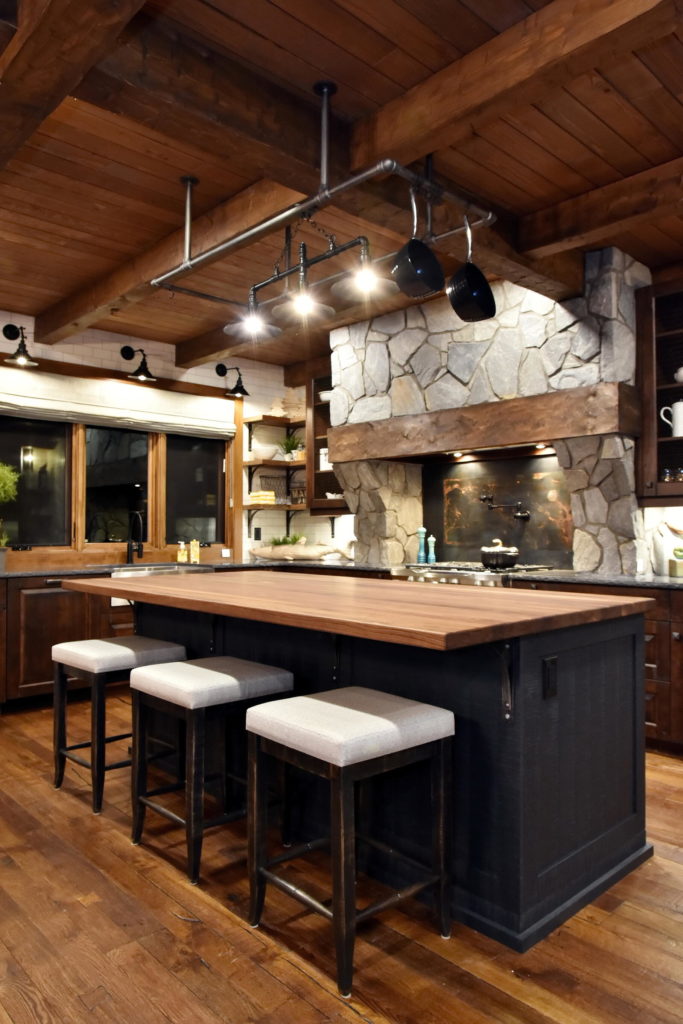
A masterful example of this approach can be achieved with Be.on Stone® Carbo Classic veneer panels. Rather than installing shelves in the cutout section of the kitchen shown above, a stone matching the style around the adjoining room was applied, with artwork placed over it. From this vantage point, it gives the appearance of a window that offers a peak at the stone wall continuing behind it.
Ready to accentuate your home walls with another quick renovation, then look no further than your dated fireplace. Building materials like thin stone veneer and Pangaea® Fieldstone Cambria, seen above, transform any drab fireplace wall or surround into the family’s room’s best feature. See more fireplace inspiration in our blog, 5 Interior Projects To Tackle This Winter with Stone Veneer.
Pangaea® New England Quarry Ledgestone
Artepiso Andes
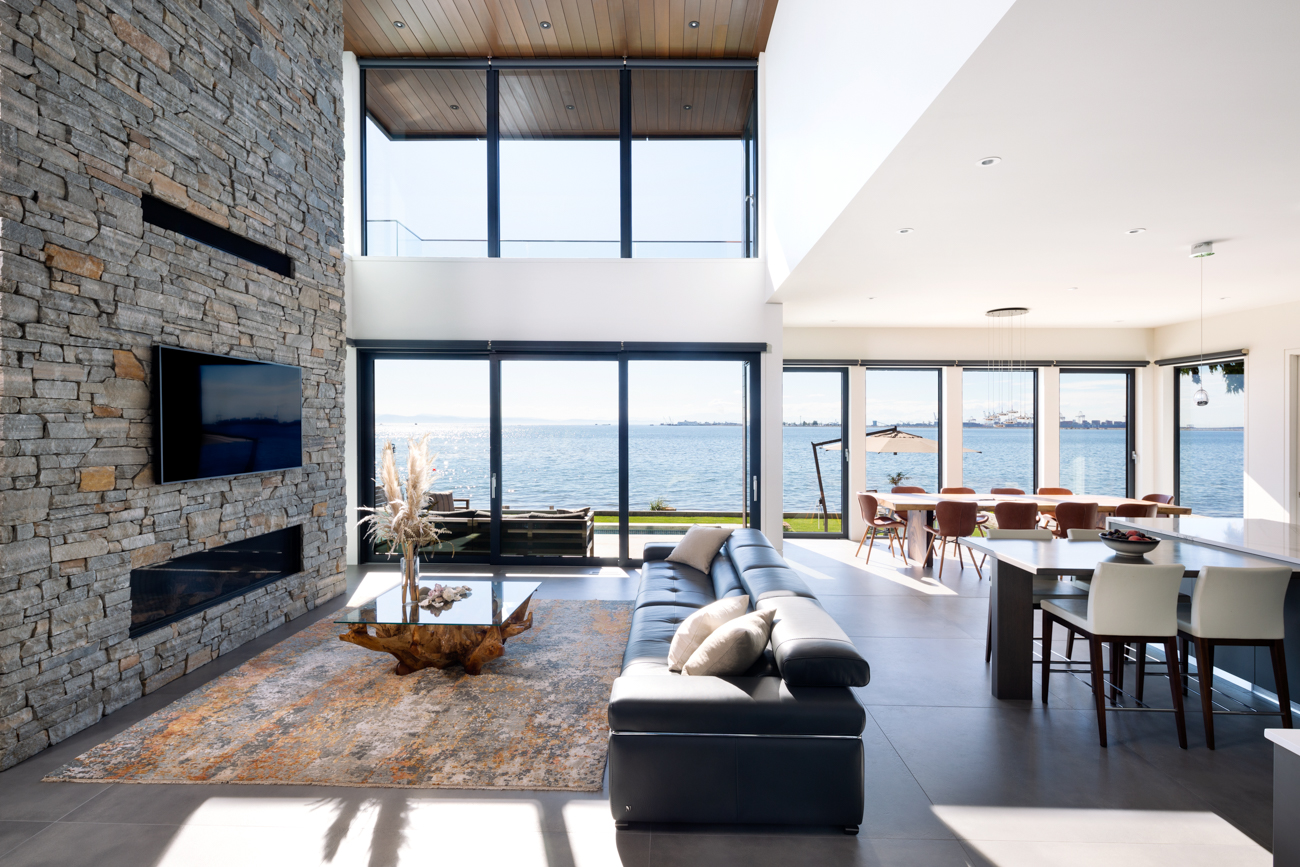
3. Chase the Light
Sometimes, all you need to find the perfect spot for your accent wall is to follow the light. Let the natural light be your guide, drawing visitors’ eyes to your masterpiece. However, be cautious with walls that get intense backlighting or the window views will overshadow the veneer.
When crafting the room with those captivating waterfront views in mind, practicality was key. The choice of Pangaea® New England Quarry Ledgestone veneer wasn’t just about aesthetics; it was a smart decision. It blends seamlessly with the elegant wood paneling on the ceiling, all while ensuring the natural light from those massive windows takes center stage.
For those of you who like to get creative with lighting, consider adding some excitement with Artepiso 3D architectural tiles, seen here in hexagonal Andes shapes. These tiles boast intricate grooves and peaks, creating a mesmerizing interplay of light and shadow. And if you want to kick it up a notch, apply a coat of vibrant, glossy paint to make them shine even brighter.
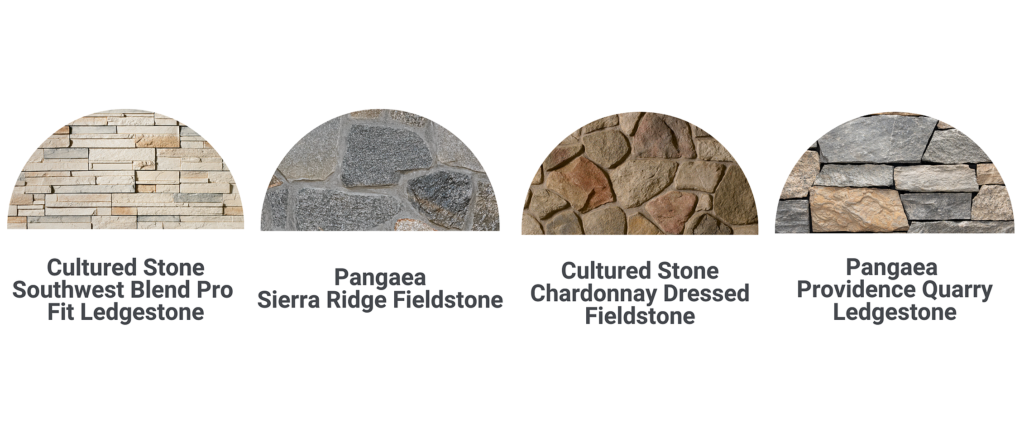
Cultured Stone® Echo Ridge Country Ledgestone
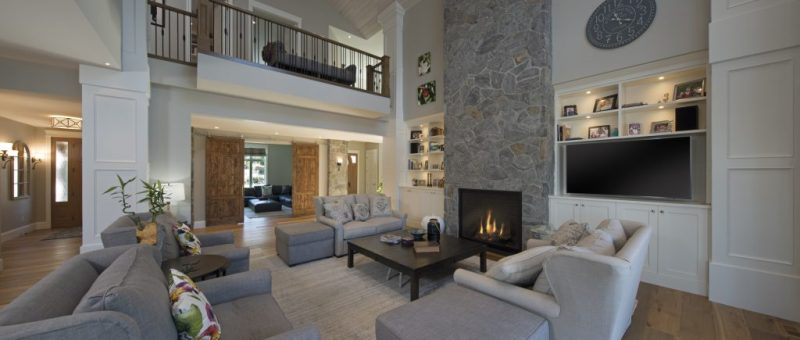
4. Read the Room
Look at the room’s layout; it often reveals the ideal accent wall location. Is there a wall where all the furniture converges? Maybe one housing a fireplace or TV? That’s your focal point, and that’s where stone veneer shines.
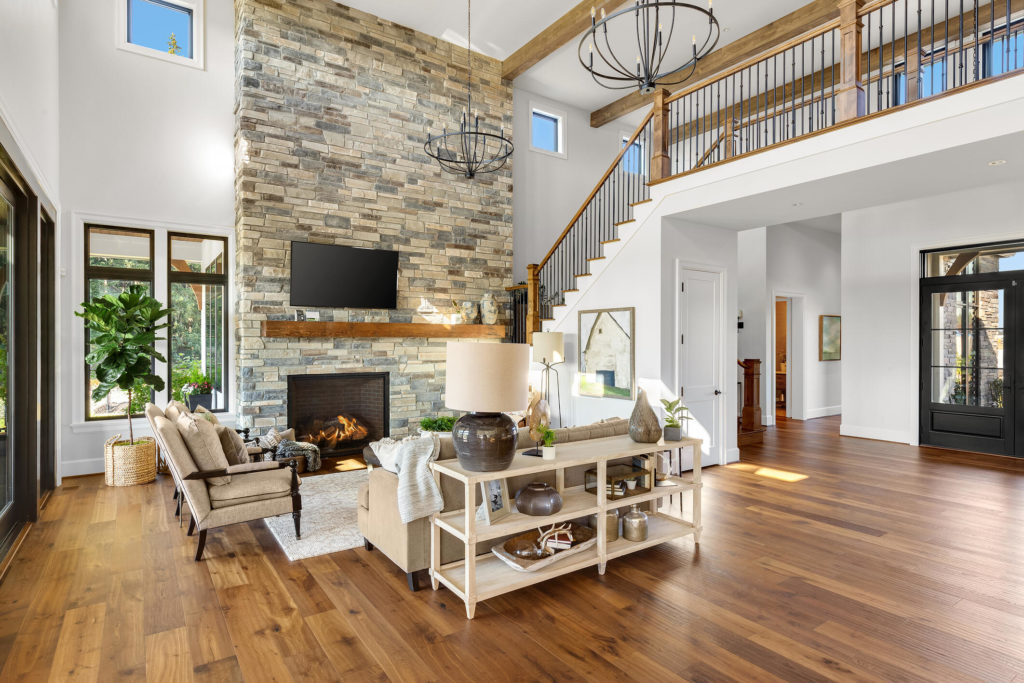
Take a look at the arrangement of the above living room, featuring Cultured Stone’s® Echo Ridge Country Ledgestone veneer. Would a feature have made better sense anywhere else? Note how the veneer calls out to the stone visible through the window on the home’s exterior.
Dutch Quality Winesburg Plank 4&6
5. Beside Views
In the bedroom, the most impactful accent wall is typically the one behind the bed. It highlights the bed as the most important feature of the room (which it is), and with the right material choice, can look like an extension of the headboard itself. And when you’re laying in bed, the view of an accent wall straight ahead may not have the calming effect you need.
Take a look at the red and brown hues of the Cultured Stone® Winesburg Weathered Plank 4&6 veneer. This manufactured stone was molded to precisely replicate the grain and character of reclaimed barn wood; its artistry and craftsmanship are molded to replicate the warmth of reclaimed barn wood.
We Make It Easy!
Creating a statement with stone veneer has never been easier. six brands of natural and manufactured stone veneer products available in hundreds of colors, shapes and sizes, Instone is your partner in making your vision a reality.
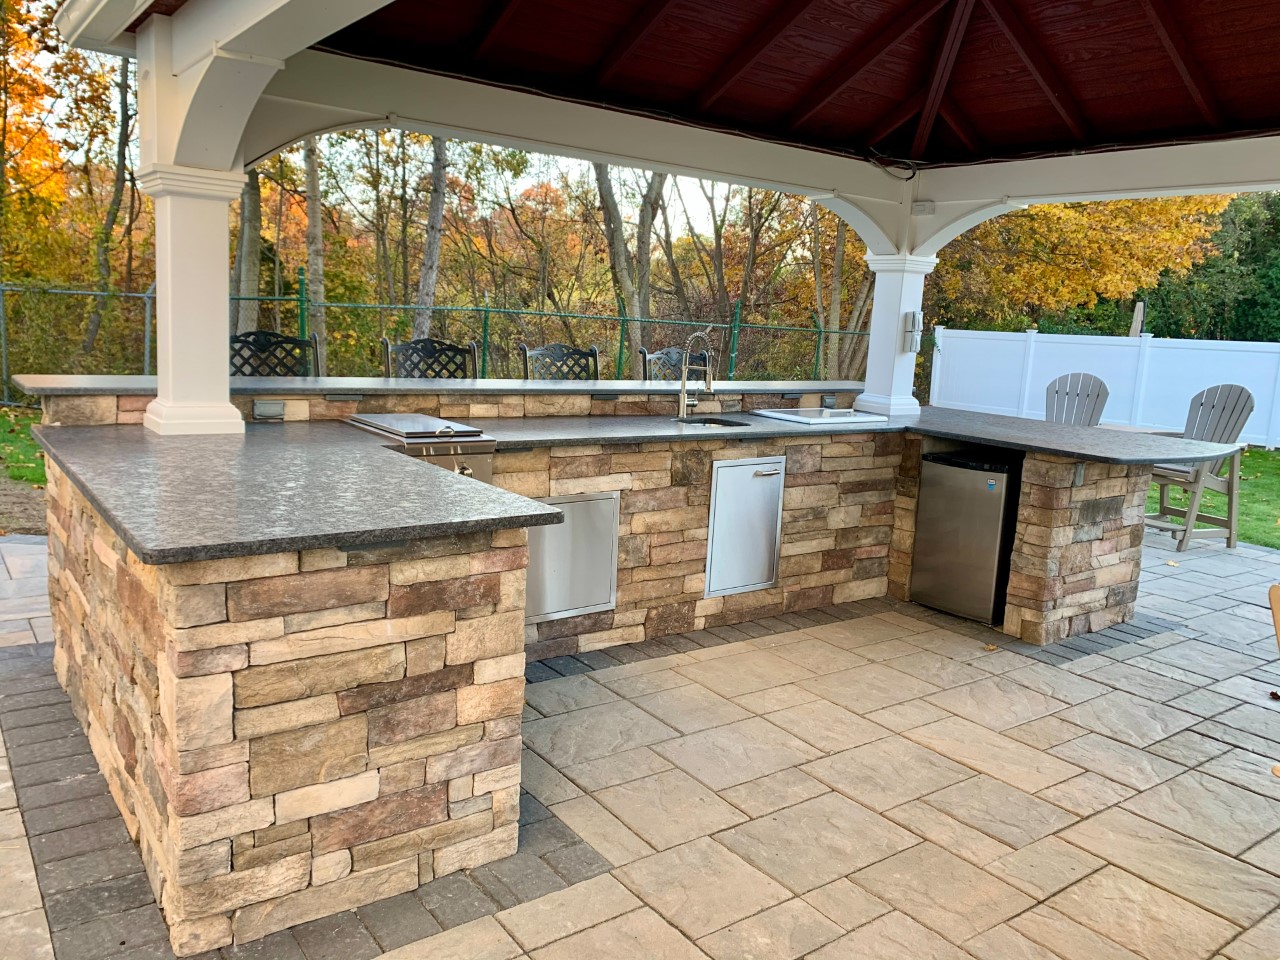
A Step-by-Step Guide to Stone Veneer Fireplace Upgrades
Ready for a decorative fireplace makeover? If that old brick fireplace doesn’t quite match your home’s new vibe, there’s no need to fret. Think of it as an opportunity rather than a challenge.
Swapping out the dated look for a stylish stone veneer fireplace is simpler than you might think. And guess what? In most scenarios, you can leave those bricks right where they are.
Sure, red brick fireplaces have that quintessential American charm. But, if yours looks a bit weary after years of cozy fires, it might be time for a change. While some folks opt for a quick brick fireplace makeover with heat-resistant paint, nothing beats the elegance and value boost of a naturalstone facade.
Wondering about the how-tos? Whether you’re thinking of adhering stone veneers directly onto the bricks or using nifty tools for an extra-sturdy bond, we’ve got the lowdown. Take a look at your options and tap into Instone’s treasure trove of resources to guide you every step of the way.
Prepping for Interior Stone Veneer
Before you dive into your fireplace transformation, it’s essential to set the stage for a smooth installation. Start by laying a tarp around the fireplace area. This step ensures that any stray mortar or debris doesn’t play havoc with your floors.
Next, give those bricks some TLC. It’s important to remove any dirt, dust, or loose materials that could compromise the adhesion of the stones. A vacuum with a brush attachment should do the trick for most of the cleaning. For stubborn spots, a gentle wipe with a damp sponge will work wonders. And if you come across areas of the brickwork that are crumbling or a bit unstable, consider giving them a light sanding to create an even surface.
Choose Your Backing
Option 1: Metal Lath
Want to ensure that your stone veneer clings on like a champ? Enter the metal lath. This meshy marvel is not only strong but also flexible. Shape it around your fireplace, get it to hug those corners, and even trace out that fancy mantel.
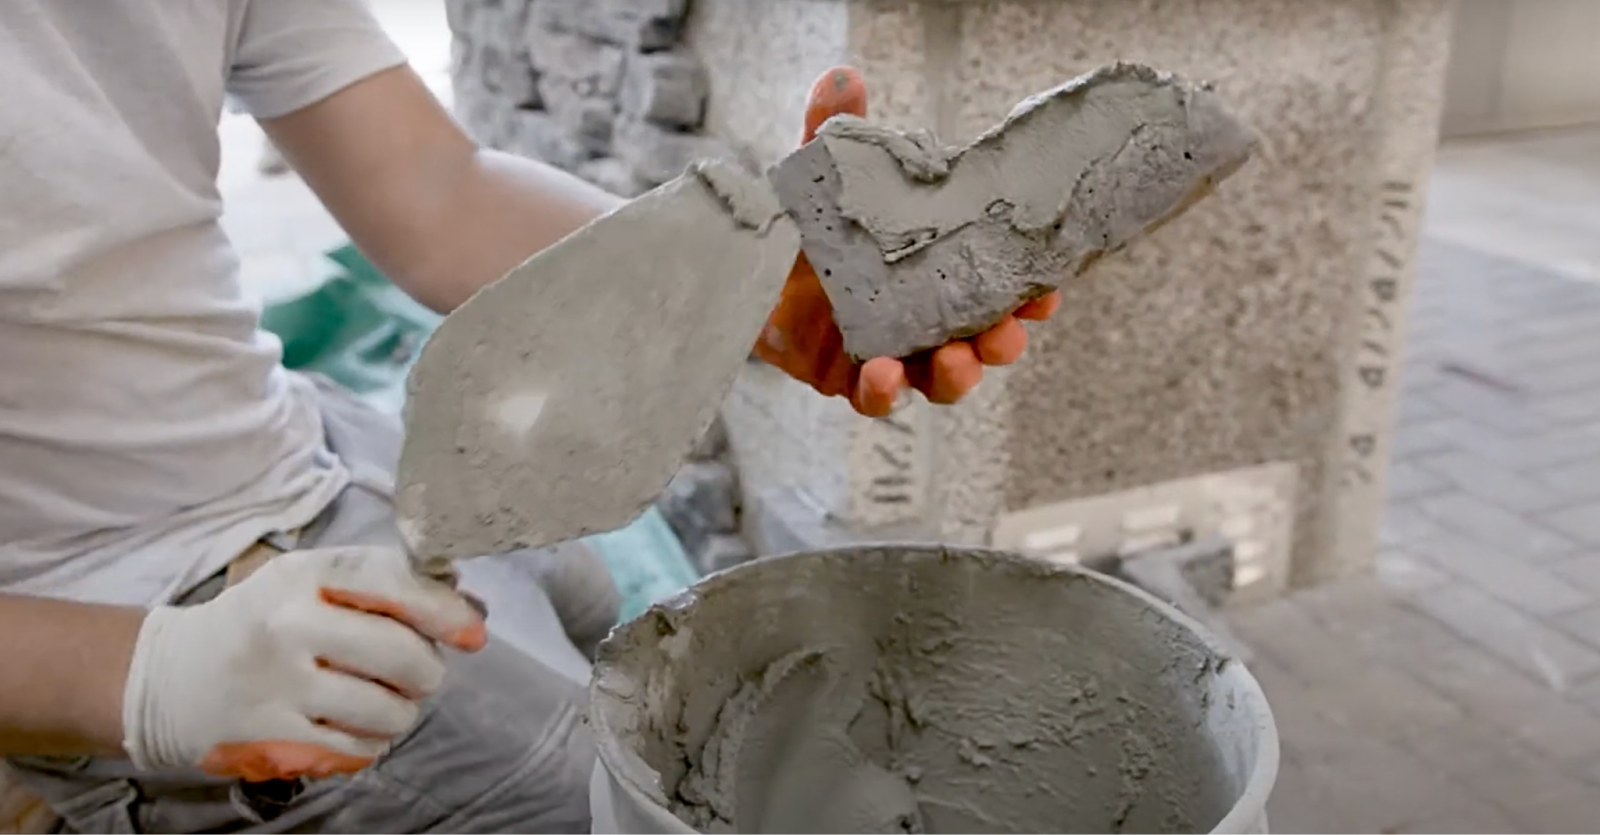
After drilling or nailing the lath into the bricks, you’ll want to apply a scratch coat over its entire area. Fill all of the gaps with mortar, build about ½ inch layer on top of the lath, and comb over it with the trowel’s teeth to create grooves for the stones to grip to. Once the scratch coat dries, you can begin applying mortar to the back of the stones and attach them to the surface.
Option 2: Cement Board
Want a simpler DIY? Then cement board might be your best bet. It offers a clean slate, making your veneer application smooth and easy. After fastening the cement board to your fireplace, you’ll want to spread a scratch coat, groove it nicely, let it dry, and then give it time to dry.
Then you can apply mortar to your stones and install them with ease.
Option 3: Direct Application
Got a fireplace in tip-top condition? Why not skip the lath or cement board and go direct? Apply the veneer straight onto the brick, but make sure those bricks are ready for the spotlight — means no crumbling faces, loose bricks, unstable cracks, or other substances on the fireplace that could weaken the bonding.
A tiny caveat: if your bricks have a paint job, it’s best to opt for either Option 1 or 2.
If you choose traditional stone veneer take the time to do a little prep. Before you begin, make sure your stones are clean and lay them out in your desired pattern.
Be sure that you have all the necessary materials at hand. Always follow the manufacturer’s guidelines for installing your chosen type of stone veneer. In most cases, you’ll need your trusty trowel, type S Mortar, and a masonry saw before getting started.
For more detailed instructions, check out these comprehensive guides for Cultured Stone and Pangaea.
If you’re seeking inspiration for your fireplace makeover, take a look at these inspiration pages.
And if the DIY route isn’t your cup of tea, you can find a certified installer near you by searching our database.
Let Instone Make it Easy
Navigating the world of stone veneer fireplaces can be overwhelming, but don’t sweat it! Instone’s network of suppliers is ready to guide you. They’ll help you pinpoint the perfect method and materials tailor-made for your project. Ready to rock that decorative fireplace transformation? Contact Instone today for a dealer in your area.
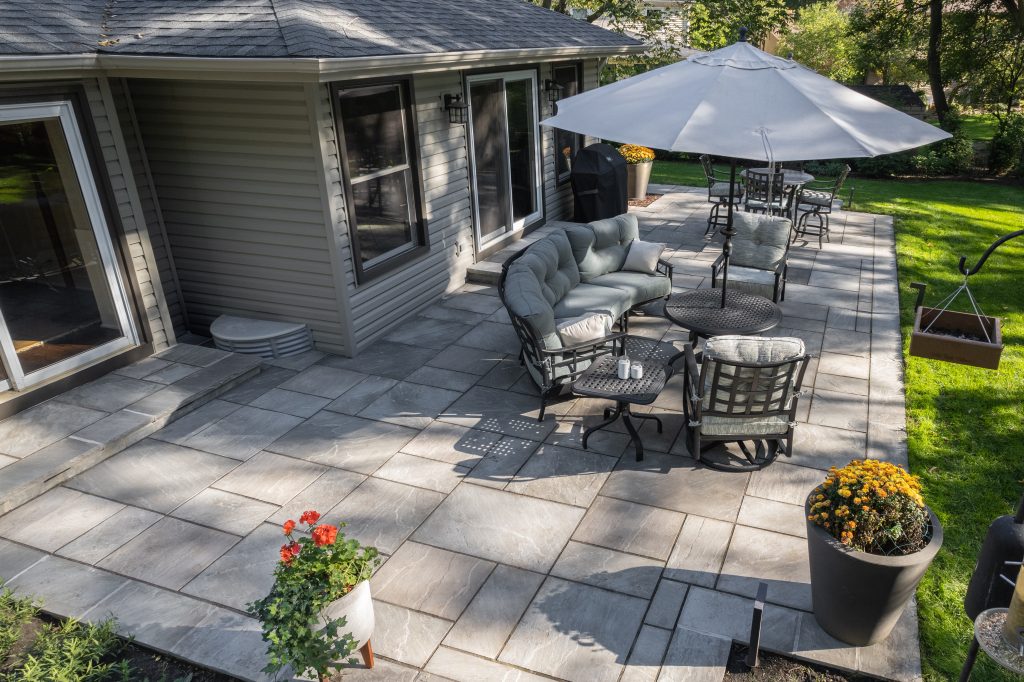
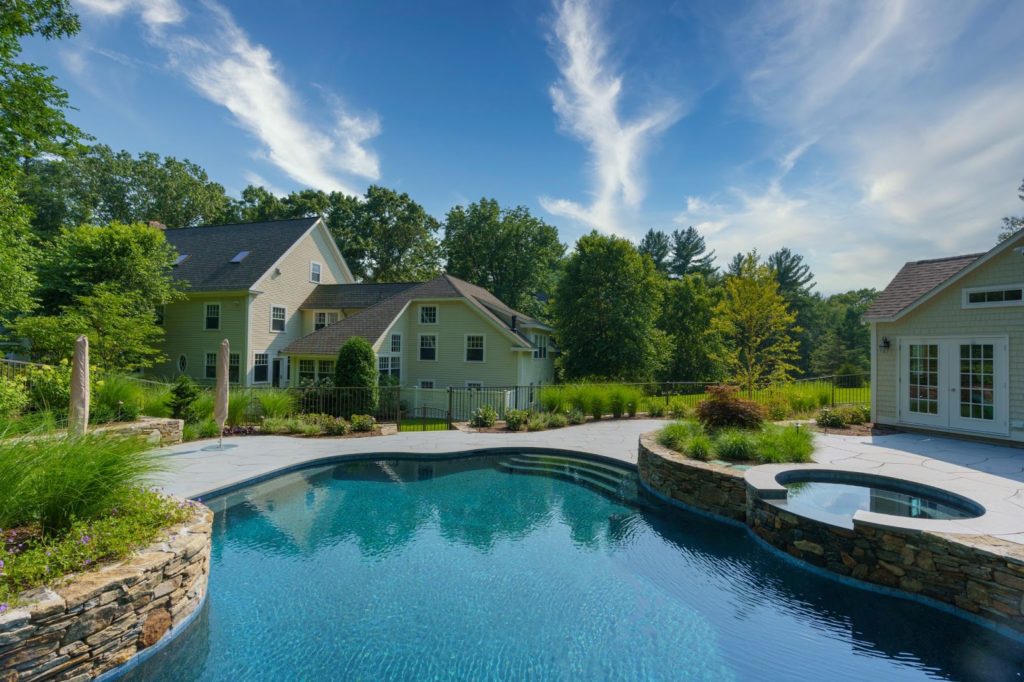
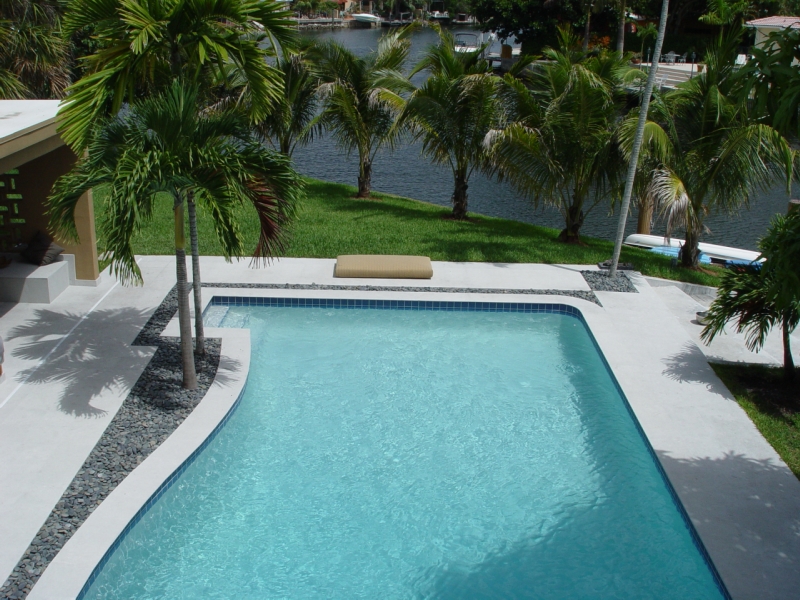
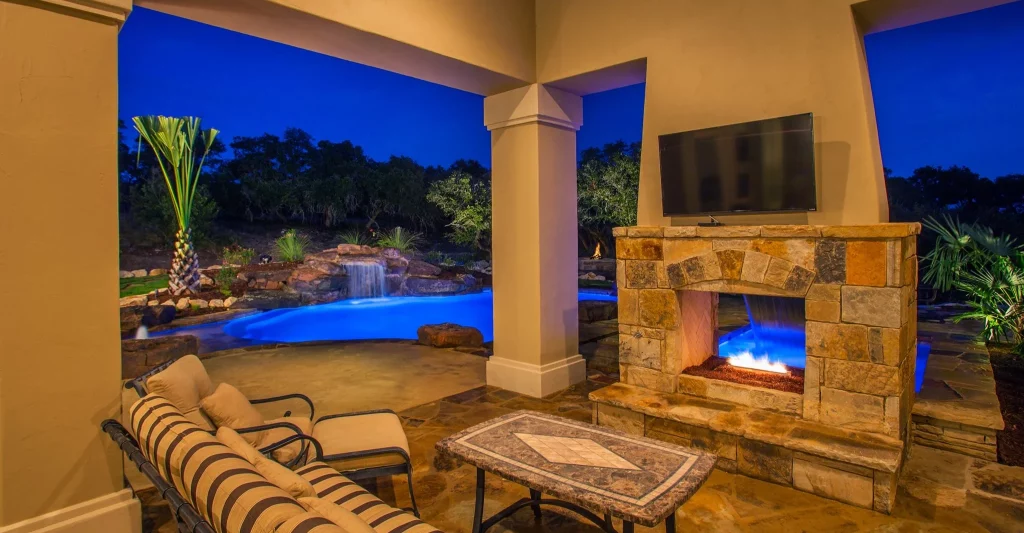
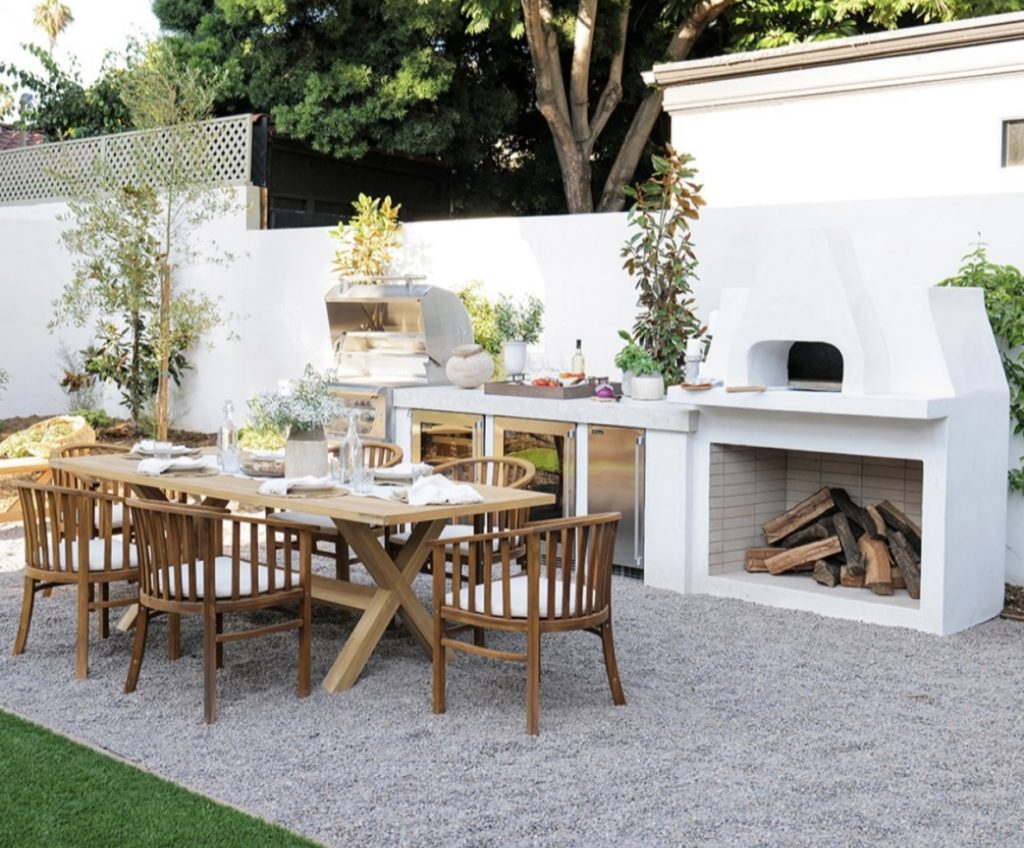
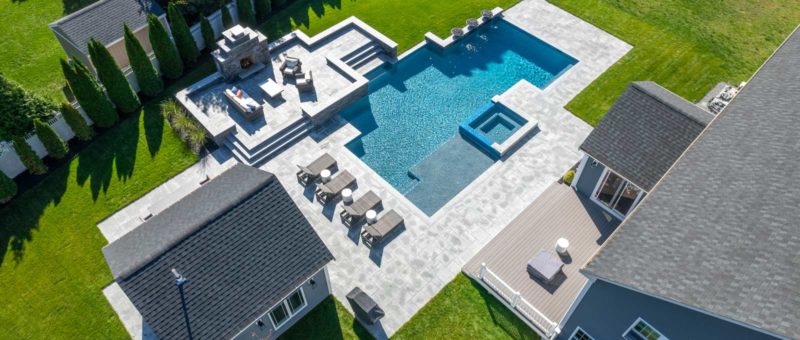
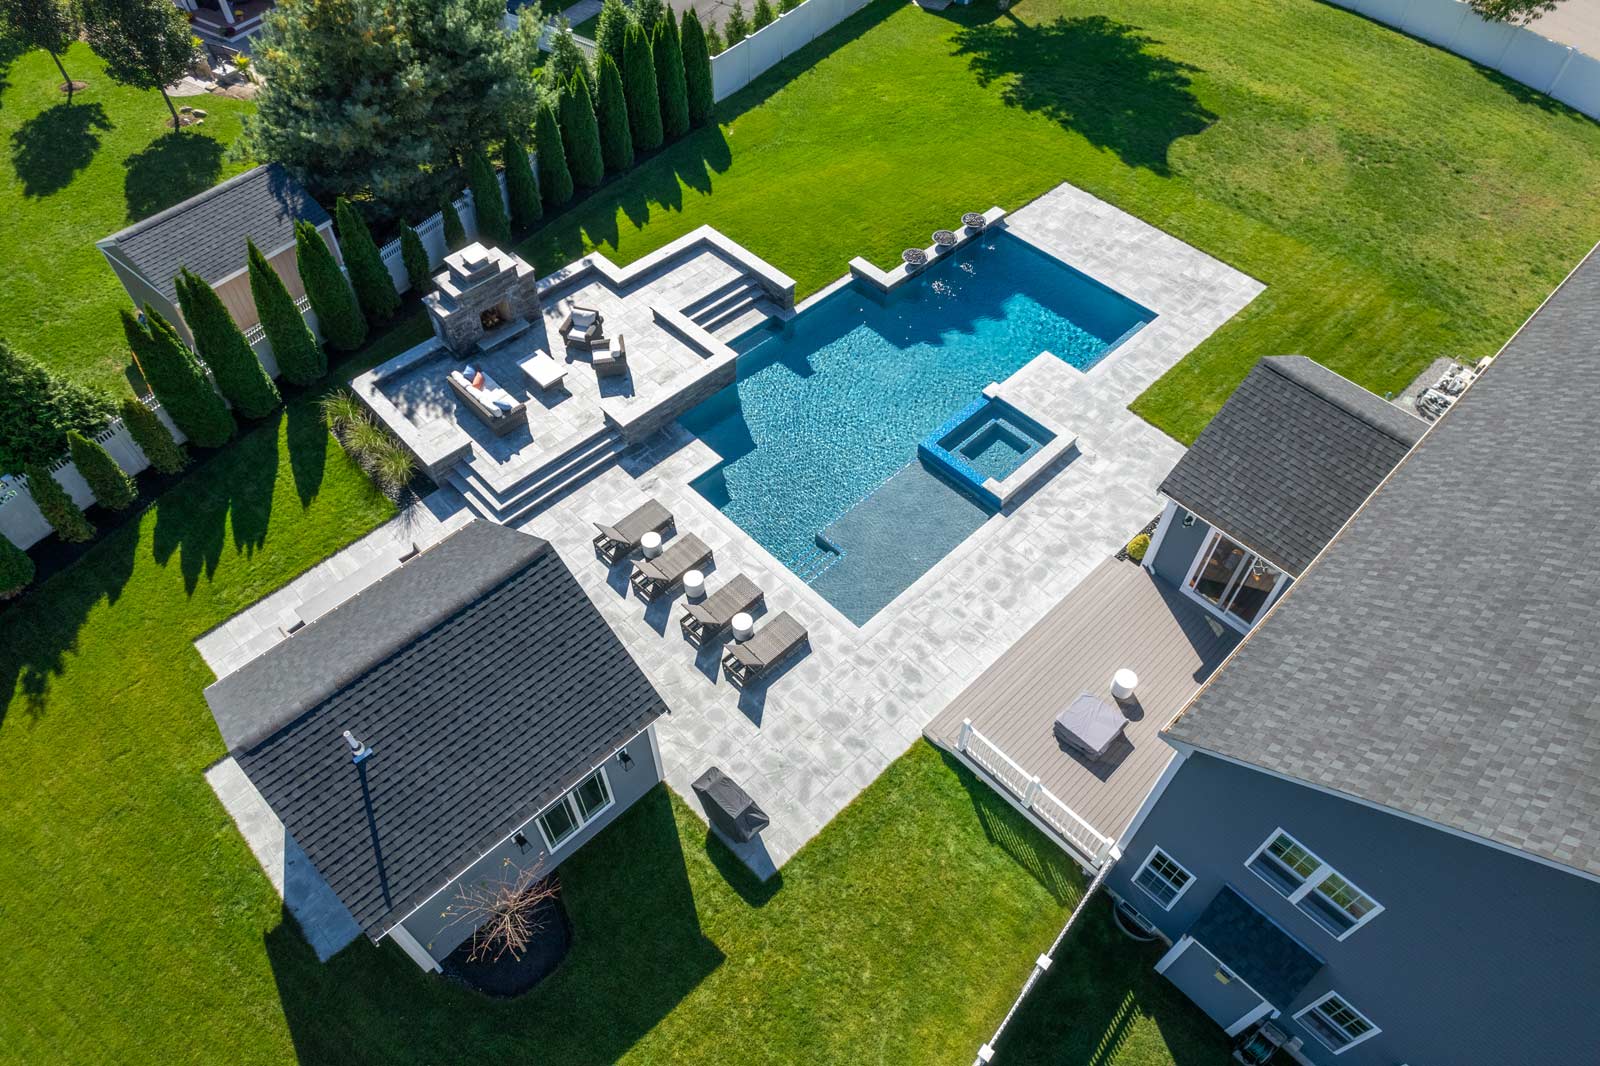
Backyard Makeovers: What You Must Know Before Planning a Backyard Project for Summer
The Do’s & Don’ts Of Planning a Backyard Makeover
Dreaming of summer already? Even though the weather outside may be too chilly for dining al fresco or a dip in the pool, the winter is actually the perfect time to start planning your backyard makeover projects. We recently interviewed Paul Saladino, owner of Stone Creations of Long Island, who shared his dos and don’ts to make sure that your project goes as smoothly as those summer days you’re day dreaming about while the snow falls. Whether building a pool, patio, fireplace, outdoor kitchen or the full works, Saldino will set you on the right path to completing your build in time for outdoor fun and entertaining with family and friends.
DO Have Inspiration
Saladino says the first question he always asks his customers is, “what inspired you to do this project?” Is it something you saw on social media, something at a neighbor’s house?” “Years ago, everyone got their ideas from catalogs. Now it’s all social media,” says Saladino. “Once they tell me the idea for what they want, I can start a design and work in the different elements.”
If you don’t have an inspiration yet, there is a wealth of content online, from Pinterest to Instagram, to get ideas for your backyard stone project. You can even check out our very own Pinterest page for some more backyard makeover inspiration.
Still have a creative block and need some help getting started and inspired? Our good friends at Tilly Design can hold your hand through the design process.
DO Build in Phases
Creating a backyard oasis sounds like a dream come true. But it’s a big project and investment. Saladino suggests setting the expectation of doing your backyard amenities in phases. “You don’t want to go and spend a quarter of a million dollars and get yourself deep in debt. Phase it out. Start with a pool, then a patio the following year,” he says.
Check out our Guide to Building a Backyard Oasis for design and material inspiration for for pools, patios and outdoor kitchens to more extravagant pavilions and beyond.
DO Plan Ahead
Saladino says one of the most frustrating things he experiences as a builder is when a customer comes to him with a request for pool in May, expecting the project to be installed in two weeks. Contractors book jobs far in advance, and summer is their busiest time of year. If you want a pool in time for summer entertaining, the winter is the ideal time to get started planning. “I always say two seasons out. Give yourself six months to get your inspiration together, get the permits, get the contract done, check the liabilities and insurance of the people doing the work, then book them,” he says.
DO Make The Time
There’s no set amount of time a job will take. It depends on the project’s complexity and also making allowance for bad weather days when the project needs to be paused. Saladino says to expect about two weeks for each phase.
DO Your Research
A must is to check out the company that is doing the work and make sure you get along with them. Check references, check licenses and check insurance. Saladino says to ask to see their paperwork, don’t just take their word for it. “Some guys are like, ‘yeah, yeah I got it,’ real nasty about it when asked for papers. These are not people you want to work with. Tell them you want to see it. Any licensed contractor would be more than happy to show their papers.”
A liability contract is important with coverage of a million or two. Also, make sure every worker on site is covered under the company’s workman’s comp. “You want to know they’re not just picking up workers on the corner,” says Saladino. And check that the state attorney licenses your contractor.
Most importantly, get everything in writing. “You want to have the contract, the warranty and go over every single detail,” Saladino says.
DON’T Go with The Lowest Bid
Backyard makeover build projects can run from affordable to luxurious. The cost depends on the size of the project, the materials you use, the labor, and the job’s complexity. Saladino says whatever you do, don’t try to save money. “You’ll get prices that are on the high end and the low end. Try to stay in the middle. Never go with the lowest bid and try to save money. Those contractors will try to skimp on the materials they use and cut corners. Skip a few dinners, save your money and get it done right,” he advises.
He adds to also plan for a little extra in case something comes up that will increase the cost of the project. “If a contractor gives you an estimate, add 10% just in case. If you don’t spend it, great. “You don’t want to get halfway through a job and run out of money. Put a little extra in the cookie jar.”
DON’T Disappear During the Job
When you have builders doing work on your property, it’s your responsibility to check the work daily and ensure the work is going according to your plan. “Don’t go on vacation with the idea that when you come back, you’ll have a pool,” says Saladino. All the decision makers in the household should also be looking at the job daily to make sure it’s what was agreed upon by all. Revisiting any work will cost you more money, time, and aggravation.
DON’T Be Afraid To Ask Questions
Saladino says you shouldn’t be afraid to ask questions before or during a build. “Check progress daily to ensure everything is going as planned. Sometimes they miss things and you’ll want to catch any mistakes right away. Morning meets are often the best time to connect with your contractor. “
Checklist for Homeowners When Planning an Outdoor Project
Get Inspiration
Pinterest is a wonderful platform to explore for outdoor project inspiration. Search for terms like these to explore boards and starting pinning your favorites……..
Patios
Outdoor living
Stone veneer
Pavers
There are many online sources to help you create a vision or plan for your backyard oasis. Here are a few from Instone:
Make sure your backyard makeover ideas and materials are appropriate and available for your area. Instone can assist you and your contractor/builder with locating a dealer in your area. Contact us here.
Plan Ahead
Start planning your backyard makeover project in winter to break ground in spring/summer.
Plan for larger projects in phases and anticipate two weeks for each phase of work.
Check that you have the space to accommodate your project(s).
Find out what building permits are needed.
Review bids and consider the quote that comes in the middle, never go with the lowest bid to save money.
Check out the license and insurance of the company you want to work with.
During The Build
Make sure you have the money to pay in full when the build starts and anticipate that the cost can go up as the project moves along.
Put it on your schedule to be home during construction.
Review the work daily to maintain good communication with your builder and to ensure there are no mistakes that would cost you more money and delay the project.
Stone Samples – Ask your local dealer for stone samples to pair with other finishes and colors and to perform your own tests. Place the samples in different areas in the stone installation area to see how it changes in various lighting and with different conditions (i.e. when wet, dry).
Square Footage – Learn how to calculate the area for your stone project to set realistic estimations and a budget before you meet with your contractor. The calculation at its basics is length multiplied by width, but this can get a little tricky if the space is not perfectly rectangular or square. This means there may be times where you need to get approximate square footages instead. There are other variables as well of where you may need to subtract from the area like if there was going to be a firepit, water feature or flower beds in that area. This work will help save time and effort on everyone’s part. It will also help you to determine if that material you fell in love with is a fit for your project.
Stone Fabrication – Seeing, understanding and approving of your backyard design before it is sent to a fabrication shop is key to ensuring that your project meets your expectations. You may also learn more about the wide-variety of finishes, edge profiles (split face, eased edge, bevel), and the cuts that can bring your project to life and in line with your vision.
When Instone’s Fabrication and Design teams receive a plan (or drawing) set of a full backyard design, takeoff and stone schedule, they then provide an estimate to your local stone distributor. Once the quote is approved, the shop drawing process begins for each stone. It includes the type of stone, dimensions, finish and fabrication work such as edging and placement according to the stone schedule. Instone works closely with local distributors, landscape designers and contractors to ensure the shop drawing is perfectly constructed and accommodates the needs of their projects.
Technical data – Instone will give your contractor the technical data including the stone’s stocking sizes and country of origin, as well as mechanical properties such as density, water absorption, and rupture compression strength. This information is helpful so you can have a conversation with your contractor when they reference the materials you select for the backyard makeover project. For example, will the stone you use around your pool be slip resistant and suitable for a salt water or chlorine? Will the stone be warm or cool on bare feet? What are the care and maintenance considerations? These are all good questions to ask when sourcing your project materials.
If you have questions or need assistance sourcing material or a dealer in your area, contact Instone today. Start planning in the winter months for a fun-filled summer in your new outdoor space.
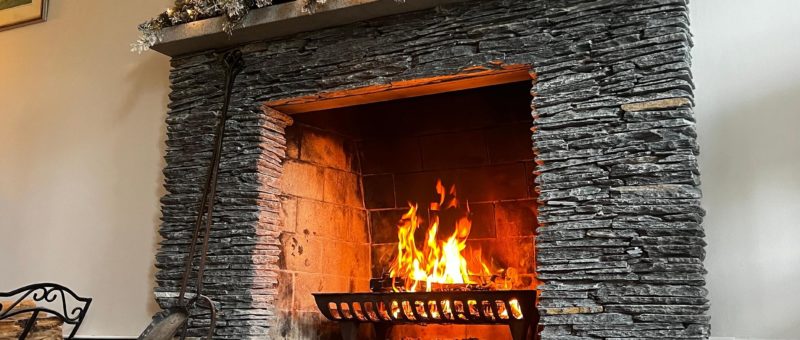
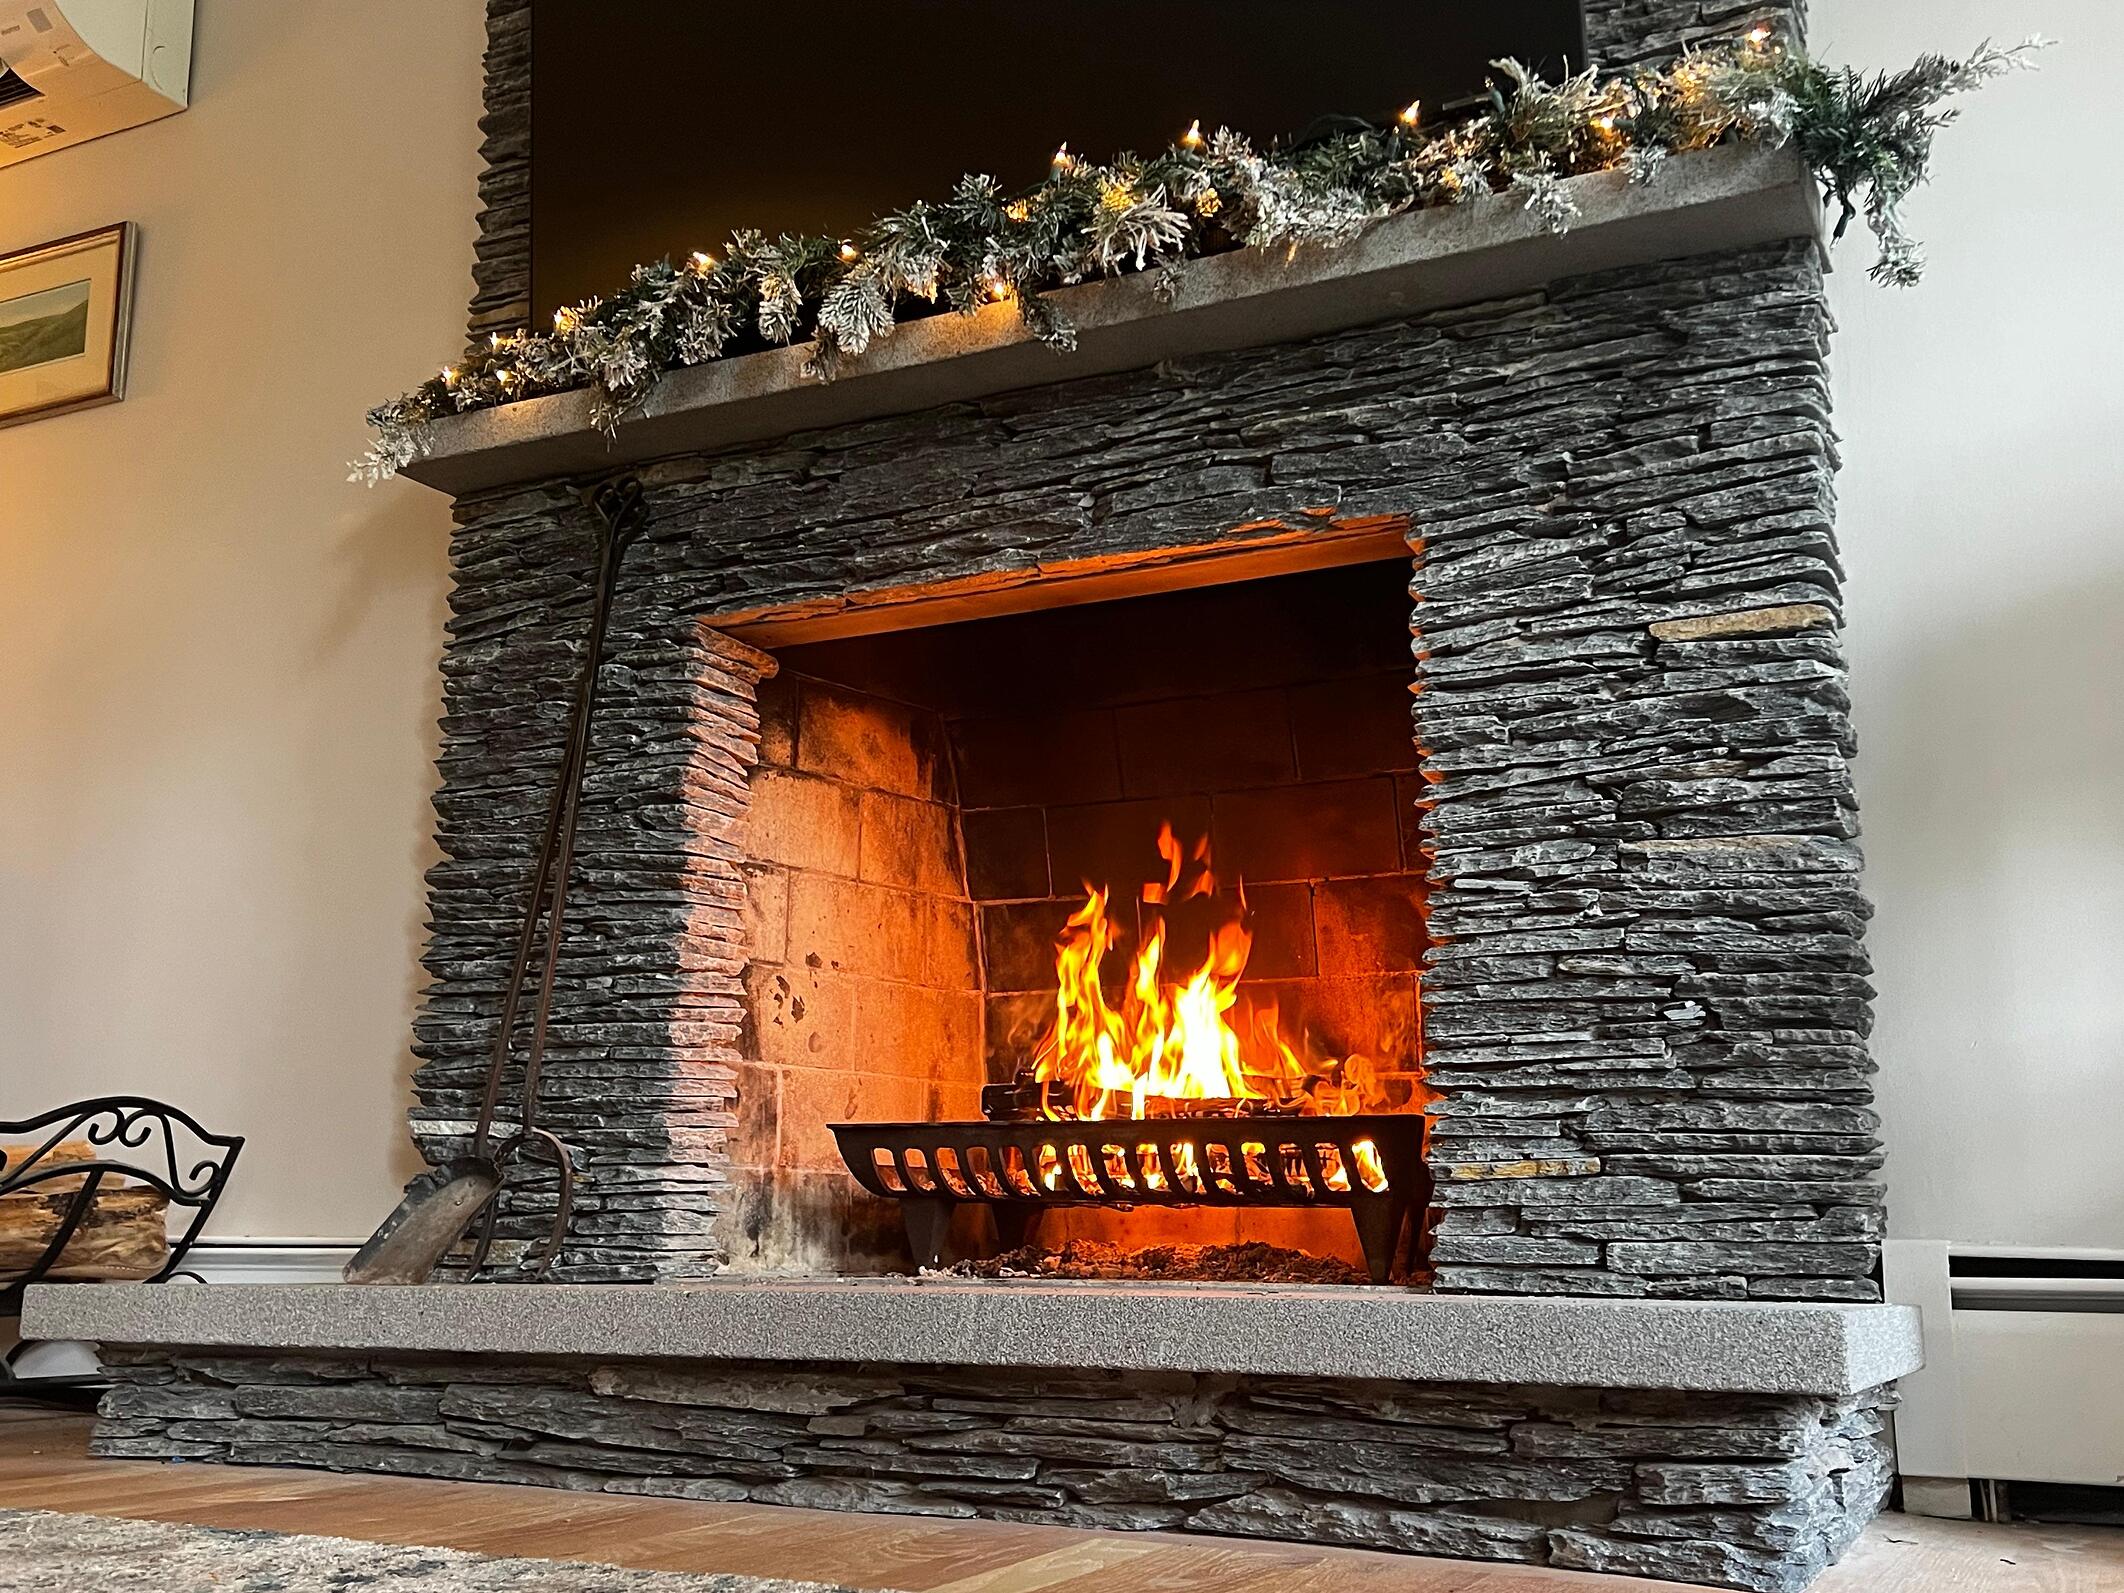
Creating a Decorative Fireplace With Stone Veneer This Holiday Season
Published:
Last Updated:
Author:
instone
‘Tis the season when your home becomes the focal point for holiday gatherings. There isn’t a better centerpiece than your fireplace for making memories with family and friends. But is your fireplace looking a little drab? Give it a makeover with stone veneers.
The look of a natural stacked-stone fireplace adds charm to any space, and it’s easy to do. Thin stone veneers can be adhered around an existing fireplace made of brick or tile. The industry term is a “fireplace surround,” because that’s exactly what it does to give your fireplace a new look.
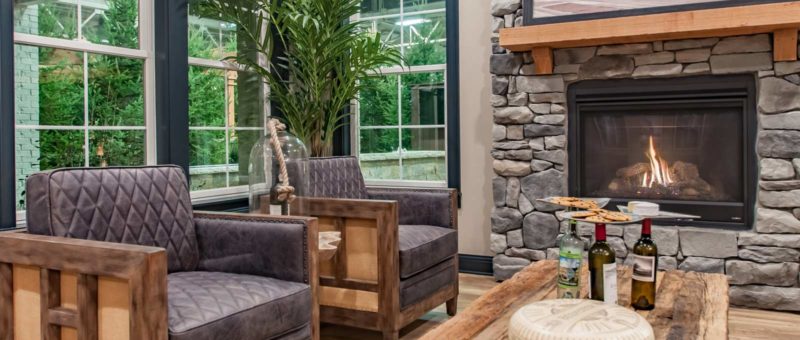
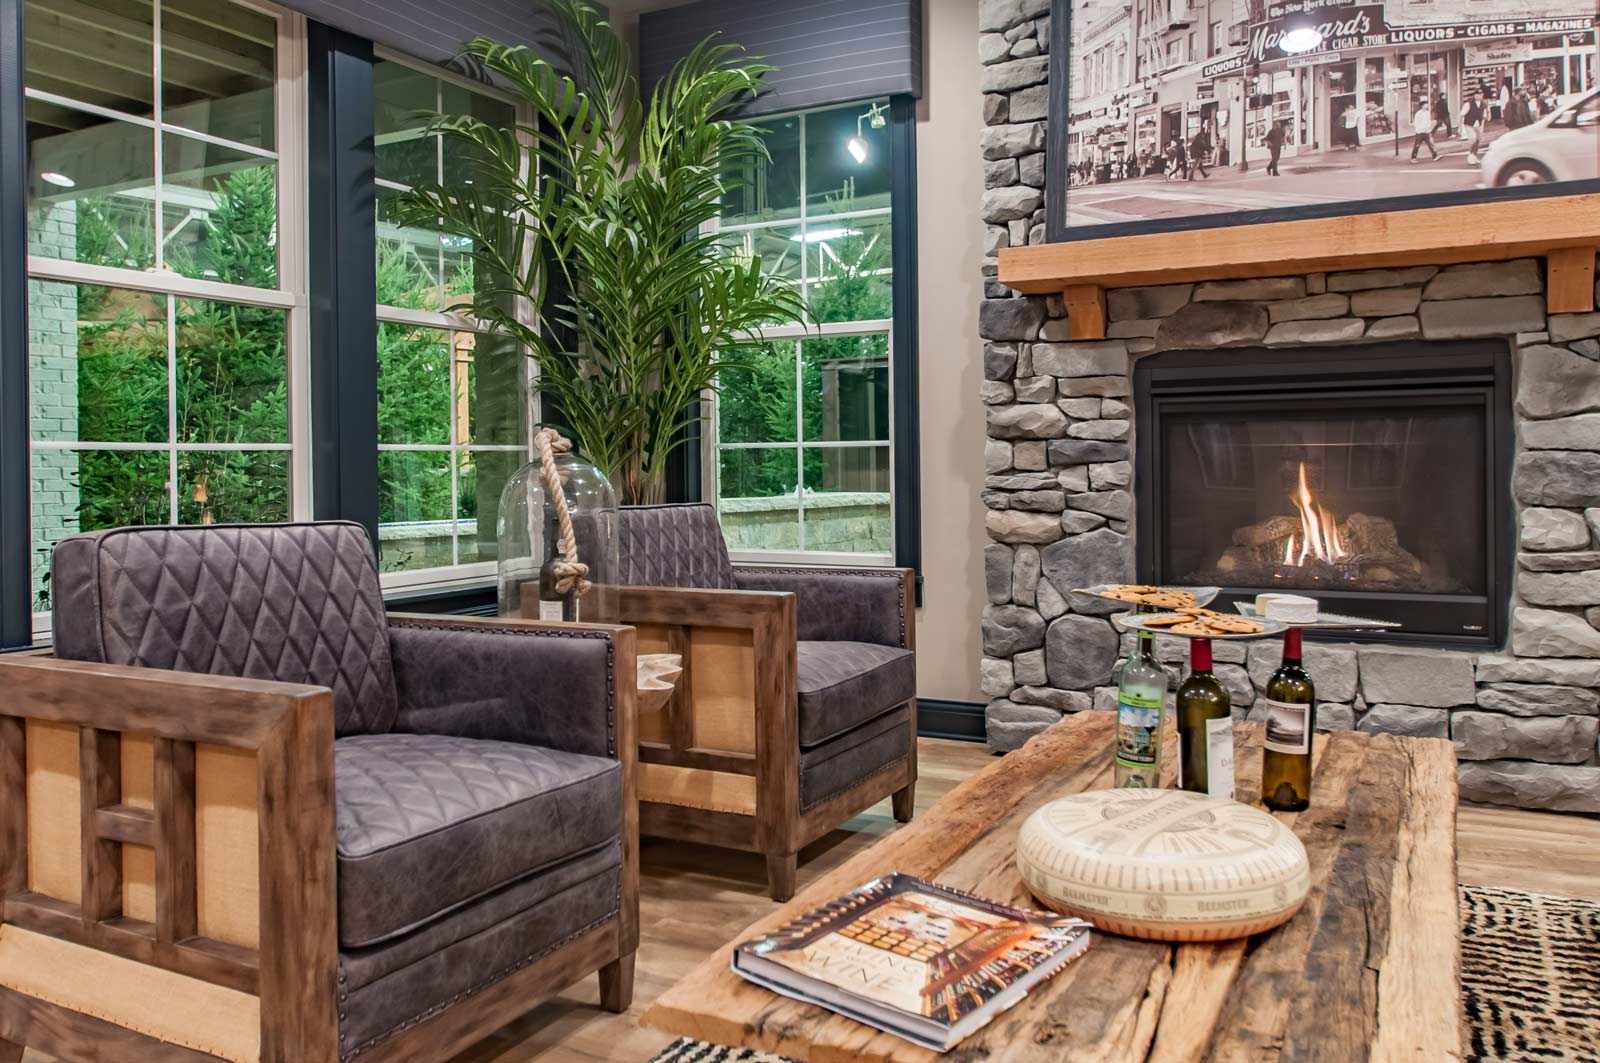
Installing a Thin Stone Veneer Fireplace Surround
Like the name sounds, a fireplace surround includes all the elements surrounding the firebox itself, which includes the area inserted into the wall where the fire lit. Thin stone veneers can be installed around the firebox and up to the mantel area or all the way up the ceiling to give the look of a natural stone chimney.
Cultured Stone Echo Ridge Country Ledgestone
Thin stone veneers are natural or manufactured stones usually about 1-2” thick that can be attached over an existing brick fireplace. Because thin veneers are lighter in weight, they are faster and easier to install than building a new stone fireplace, saving you time and labor costs. Not to mention not having to take on a messy demo project in your home before the holidays. Not only will you achieve the look of a full stone fireplace, you’ll have the same durability and low-maintenance care.
If you’re handy around the house, you could DIY your fireplace surround. Puzzle lovers will enjoy the process of putting the pieces together in place. If you’re unsure of your DIY skills or you’re in a time crunch to get it done before a holiday party, it will be easier and faster to contract a professional mason or contractor.
Stone Veneers for Your Fireplace Surround Makeover
Dress Up Your Stone Fireplace for the Holidays
Once you have your new stone veneer fireplace done, you’ll want to dress it up with some holiday cheer.
A big staple for your fireplace decorating is the lush greenery. Place garland across the mantel and perhaps drape down the sides of the firebox area (be sure to keep all décor from getting too close to the fire and heat.). Within the garland, the possibilities are endless to nestle fairy lights, figurines, ornaments, fruit such as cranberries, flowers such as poinsettias, pinecones and more. Perhaps, hide an Elf or two.
Pick a color theme and coordinate your holiday décor. It could be traditional Christmas colors of red and green, more frosted wintery shades of blue, white and silver or even something offbeat such as pink. If you put up a Christmas tree, you can match your fireplace décor with your tree décor by using bauble, ornament, ribbons and candles in matching colors.
Is your style ultra modern, vintage/retro or farmhouse? Make your holiday décor match your design style in your home, or give it a style all its own. Modern style may use sleek ornaments, metallics and high-contrasting colors, while farmhouse leans to soft neutrals or all-white with black trim. Mid-century modern has become very popular, with more of this type of décor hitting the market in playful colors of pink, teal and orange.
Once the stone veneer is set and garland is hung, all of us at Instone wish you a joyful season by the fire with loved ones.
Ready to dress up your fireplace with stone veneer? Make your wish list and contact us for samples of Pangaea, Cultured Stone and Dutch Quality stone veneers.
Cottagecore Style: Bringing Nature Indoors with Stone Veneers
Published:
Last Updated:
Author:
instone
As winter moves in, if you’re looking for ideas to cozy up your home, look no further than the cottagecore trend. This lifestyle aesthetic celebrates the slow-paced, romanticized aspects of countryside living and bringing elements of nature indoors. Cottagecore began with streams of photos on social media around 2018 and really gathered steam during the pandemic for those wanting to embrace staying home and sheltering from the fast-paced, modern world. The look is now hitting the mainstream as an interior design style that provides balance from the hustle of life as we begin post-pandemic normalcy.
What is Cottagecore Interior Design Style?
Rustic, farmhouse and antique furniture, vintage collectibles, handmade items and decorative textiles, fresh and dried flowers, warm tones of aged and well-loved pieces are just a few of the elements you’ll want to incorporate to create this vibe in your home.
If it looks familiar to you, it may be because it borrows elements of other popular design trends such as shabby chic, cottage, granny, and English country. The idea is to strive for simple pleasures and comfort with a focus on nature and sustainability. A large aspect of cottagecore is using and repurposing items you already have—or have gathered from your own rural property—such as produce and flowers and handmade items. It also involves bringing in vintage or antique items, rather than those that are mass-produced, to produce a sense of calm and tranquility.
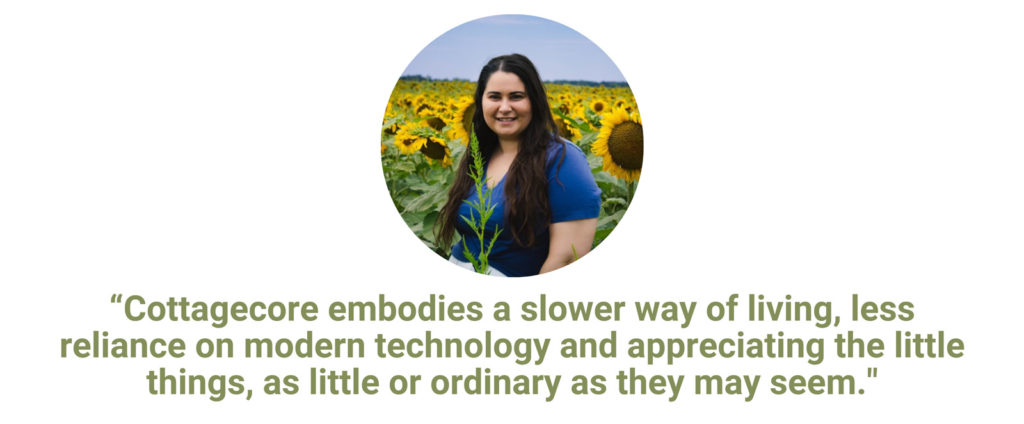
For Tara Kelly, whose blogs on The Art of Cottagemaking and Instagrams are filled with English-cottage style decorating tips, handmade how-tos, recipes and gardening inspiration, she says cottagecore is about creating a lifestyle that speaks to you, “I grew up on a small farm, so it’s about getting back to my roots and country life,”. she says. “Cottagecore embodies a slower way of living, less reliance on modern technology and appreciating the little things, as little or ordinary as they may seem. It’s about how I choose to go about living life: engrossed in nature, putting myself and my family first, and creating things that feed my soul.”
How to Use Stone Veneers for the Cottagecore Look
Adding elements of stone to your interior and exterior environment is a seamless fit for this design style to reflect nature and old-world charm. There are several ways you can use stone veneers to easily and instantly create the cottagecore look of a quaint home in the European countryside.
Add a stone feature wall: Create interest on a bare wall by using stone from top to bottom for a feature/accent wall. This wall could be anywhere in the home, from enhancing a headboard behind the bed in the bedroom, to a living room or a dining room. The look of natural stone will warm up the space with texture and color (not to mention it will look great for Instagram photos and videos or as a backdrop for Zoom meetings.) If you don’t want to commit to a full wall, stone wainscoting can also add some natural-looking texture to a space.
Do your kitchen backsplash in stone: A big part of the cottagecore lifestyle is spent in the kitchen. If you look at any cottagecore content creator’s social pages, you’ll find photo after photo of people baking pies and pouring tea. So the kitchen is the perfect place to incorporate stone into your backsplash, making you feel you’re cooking in an authentic English country kitchen.
Redo your fireplace surround with stone: If your fireplace is outdated and just not giving snuggly vibes, you can use stone veneers to basically wrap your existing fireplace and make it look like it was built with authentic stacked stone to add character and a vintage look.
Home exterior: Spice up the entryway of your home by using stone veneer for a textured, timeless look. Use it around doorways, posts and lampposts or as a wainscot siding.
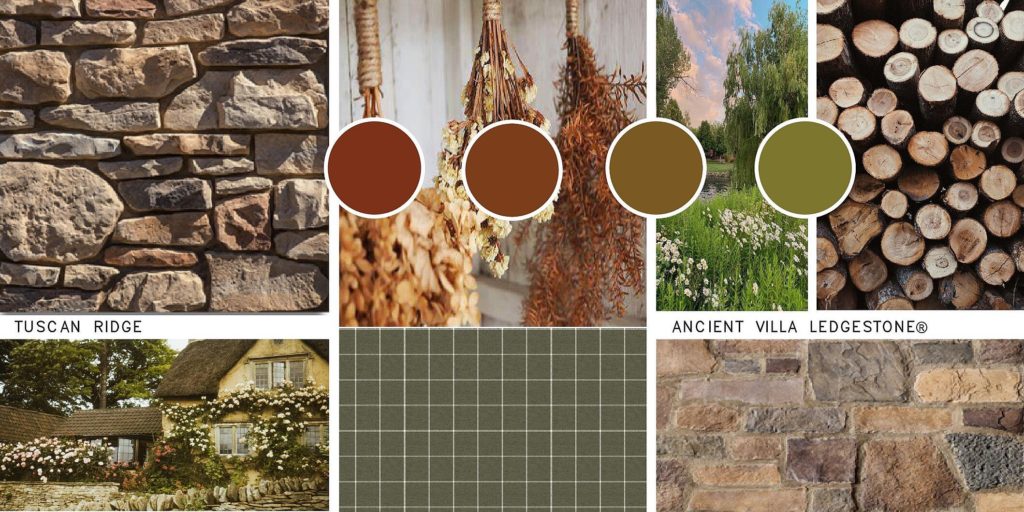
Design Inspiration: Cottagecore
Need some more inspiration? Check out our mood boards:
What Stone Veneers Work Best for Cottagecore Décor?
We suggest these stone veneer options for your cottagecore home upgrade:
Cultured Stone – a manufactured stone veneer that is made with eco-friendliness in mind by using an average of 58% pre-consumer recycled content.
Dutch Quality – a manufactured stone veneer inspired by nature. It is made using art and technology for an authentic natural stone look.
Install a stone accent in your home, gather some wildflowers from the field and you, too, can be like an Instagram cottagecore influencer pouring a long, slow cup of tea before you tuck into a freshly baked pie and crack open a vintage book in front of your stone fireplace.
Ready to go cottagecore? Make your wish list and contact us for samples of Pangaea, Cultured Stone and Dutch Quality stone veneers.
The Homeowner’s Guide to Building a Backyard Oasis With Natural Stone
Published:
Last Updated:
Author:
instone
Imagine stepping into your backyard and having everything you love right at your fingertips.
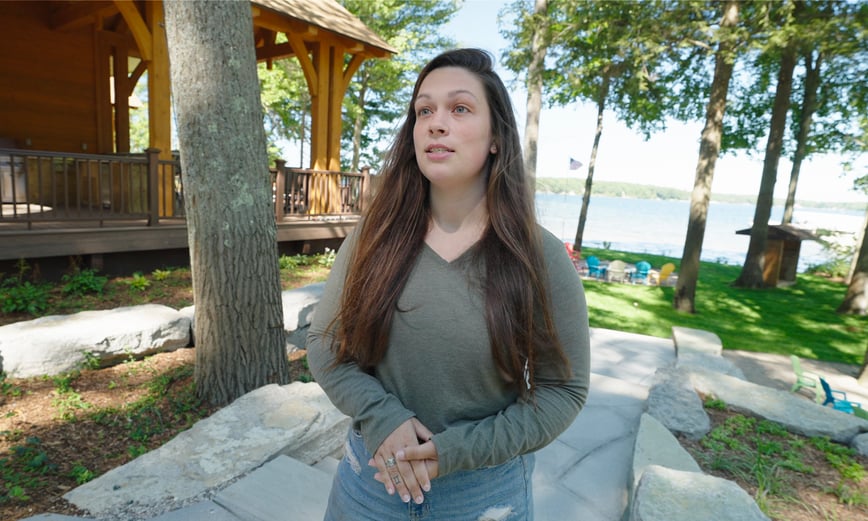
—a pool for cooling off, a fireplace for warming up, and an outdoor entertainment area for drinks and dinners. If you’re planning to create a backyard oasis, whether small or big, there are a few things you should keep in mind. We spoke with landscape designer Cysilia Schaub with The Concrete Service, Inc. to find out what you need to know before you start designing your backyard project.
Landscape Designer, Cysilia Schaub
What’s Your Vision for Your Backyard Oasis?
When you look out back, what do you want to see? Maybe it’s a pool for the kids and a patio dining area for you? Schaub suggests starting by living in your space for a little while to get a feel for how you might want to use it. Then make a wish list. Be sure to have all parties involved who will be using the space, such as both partners in a couple.
“If it’s just the wife doing the design, then the husband may come in and want something different. Then the designer has to do a lot of extra work going back and redoing the plan to accommodate them both, which can also push out the timeline.” Schaub says.
She suggests putting what you want in your wish list and your likes and dislikes. If you see something at a neighbor’s house or online, add it to the list to share with the designer. “That way I can make sure to start steering them in the right direction,” says Schaub.
If you need some more direction when it comes to the design process from inspiration to finalizing a design for a contractor, Tilly Design is a great resource for helping you create a custom landscape design.
Timing Is Everything
Being aware of timing is also important. Schaub says many homeowners want to start a backyard project as soon as the warm spring weather hits. But then they face the reality of waiting for materials, available contractors or the project taking longer than they imagined. She says it’s a good idea to start planning a year to six months in advance. “If you only give your contractor a couple of months to come up with the design, figure out a budget and get everything mobilized, chances are it’s not going to happen. If you want a project for next summer, start planning this summer.”
Start By Contacting a Reputable Landscape Designer or Architect
As a homeowner, it may be daunting to know whom to call to start a backyard project. A little industry insight: A landscape designer can create a backyard project based on their experience and knowledge. They may not be formally educated in the trade or have a degree in a related skill. A landscape architect may have a higher education in engineering or civil architecture. Some design-build firms are both design and install, and have a collection of landscape designers and builders who work for them and can complete a project from beginning to end. Some designers work independently to design a project and then can recommend contractors to do the work.
Schaub says finding the right people is really important. Not only are you making a major investment in your home, and you want the work to be done well, but you also have to work—and live—with these people around your home potentially for months. “You’re going to have to look at and be with them every day,” she says. “You want to trust them and get along with them.”
Be sure to take the time to research them and meet them. Look at their portfolio, understand their experience. Get a sense of how they work and their capability of handling your project so you both feel comfortable going in.
The Onsite Walk-Through to the Design
Your landscape professional will first want to do a walk-through of your property and discuss what you want to do. Keep in mind that functionality is a priority over aesthetics. Your intended use of the area must be established. Then you can make it pretty. Once the designer understands your vision, they will create a design for you to approve or ask for revisions. Schaub says it’s worth including a building contractor in the discussions to note any challenges to technical aspects of the installation and to make sure the design is within budget.
Natural Stone vs. Manufactured Stone or Concrete
Schaub notes that a big part of the budget will be determined by the cost of the materials, followed by the labor cost. When your design is getting to the final stage, your designer will likely bring you samples from a company like Instone for you to select the stone style you want. While natural stone such as Aura Natural Landscapes may be a bit more expensive than manufactured stone, Schaub recommends it because the benefits outweigh the cost. “A big benefit is the aesthetic. The color and movement of natural stone just looks so much better,” she says. “Concrete products are made to mimic natural stone and some do it well, others don’t.”
She adds that the durability of natural stone also can’t be beaten. It’s stain resistant, scratch resistant and fade resistant. It’s been on earth for millions of years and can withstand the elements. While some concrete products try to include these benefits, Schaub cautions, “By the time you’re getting into the price range of a concrete product that has all of these features, it’s pretty close to the price of natural stone. So it’s pretty easy to make that jump and just go with natural stone.”
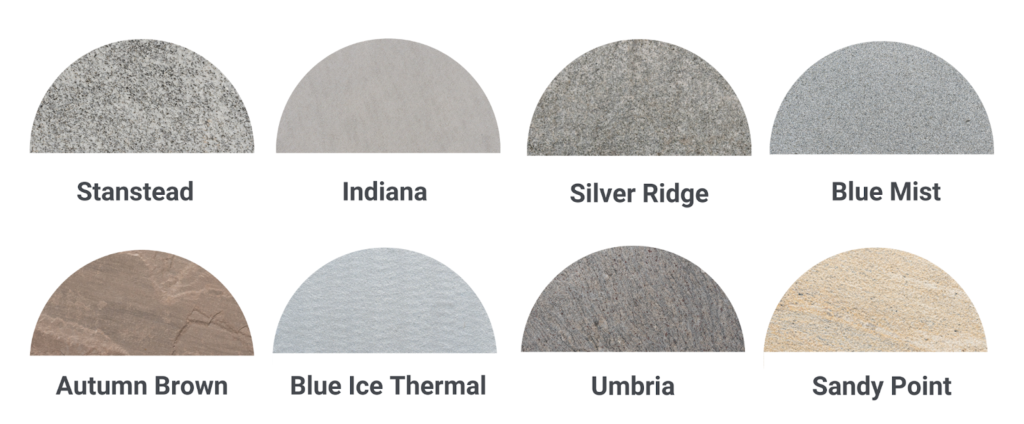
Here are some selections of Aura Natural Landscapes:
Benefits of Using Aura Natural Landscapes
Schaub says she’s now worked with Aura Natural Landscapes for several projects. She says what she likes about it is how consistent the product is. “The colors and thickness of the stone are exactly what you’re expecting, which is really important from an install standpoint.”
She says the availability is also better than other products meaning short lead times. “It’s not uncommon to have to wait three months for materials. But with Aura, I can usually get it within a couple of weeks. And their customer service is great. I’ve had questions about how to manipulate the product, and they are quick to respond.”
What Can You Put in Your Backyard?
Some options to consider when setting up your backyard oasis include:
Features:
Outdoor kitchen/bar
Pool
Patio
Garden
Sitting area
Fireplace
Fire pit
Water feature (fountain, waterfall)
Design Style:
Formal
Informal
Modern/Contemporary
Woodland/Natural/Rustic
While it’s easy to want everything, and improving your backyard space will bring a higher return on your home’s value, it’s better to start small than go overboard. You want to make sure you’re going to use everything you put in. A simple design may also be more attractive if you want to sell your home later on to someone who will like what you’ve done rather than someone who may want to rip out an overdone backyard. And remember, the more complex the project, the longer the installation will take.
Other Considerations for Your Backyard Oasis
Schaub says you also want to consider what is already in your backyard. Is there a view you want to take advantage of? Are there slopes that need to be accommodated with steps and proper water drainage? Are there mature trees with large roots? Your designer will help you work around challenges and take advantage of the natural beauty of your property.
Also, note what permits you may need to do building work. These can range from county soil and erosion permits, building permits and permits if your property is on an inland lake or stream. Check your local township and state requirements for what’s needed. In addition, check what setbacks you have to follow for your particular property. Your landscape designer should be able to help you find out what permits you need for your specific design.
So if you’re thinking about a backyard makeover, the time to start planning is now. Make your wish list and contact us for samples of Aura Natural Landscaping products!
5 Steps to Expertly Source Natural Stone: The Landscape Architects Resource
Published:
Last Updated:
Author:
instone
With more people spending time outdoors, backyard designs are in high demand. And so is beautiful stonework to create all the amenities for luxurious outdoor living: patios, pools, spas, outdoor kitchens, fireplaces and fire pits, as well as the hardscaping: steps, walls and walkways.
5 Steps to Expertly Source Natural Stone: The Landscape Architects Resource
Instone can provide landscape designers and architects with the stone information, samples, technical specs, shop drawings and custom stone fabrication they need to complete projects and satisfy clients.
It starts with a plan set. When that is sent to Instone, the Fabrication and Design Teams get to work to provide the support that landscape architects’ needs.
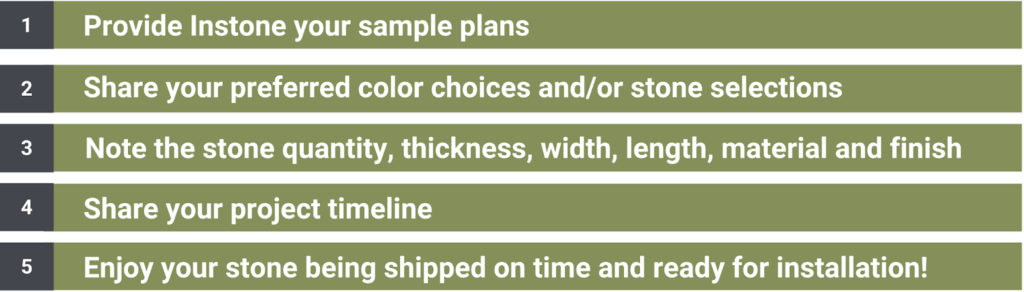
A Stone Sourcing Checklist for Landscape Professionals:
“Availability is key,” says Instone’s senior estimator, Nicole Blackburn. “We can let them know what standards we have in stock and how fast they can get it. We provide samples for their requests. We’ll also provide options based on our experience and expertise. We will let them know the time it will take to get the product and the price point so they can take it back to the homeowner to decide on what they want.”
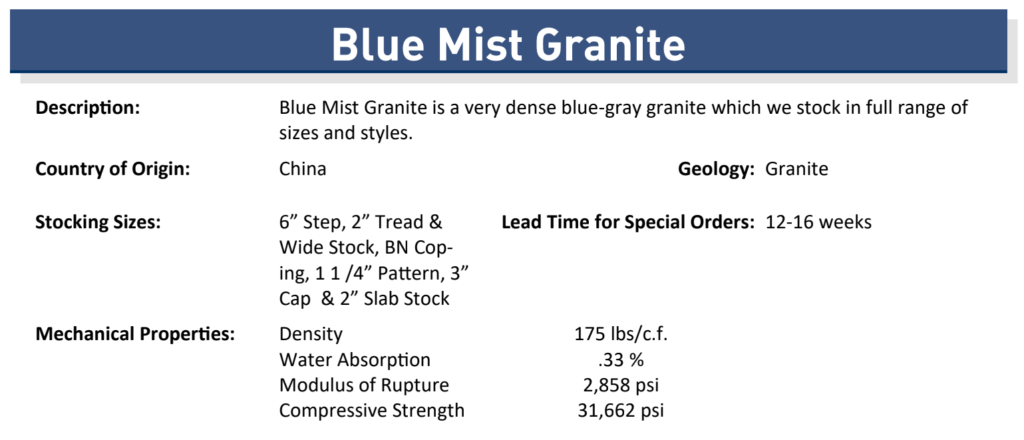
Instone also gives landscape architects the technical data including the stone’s stocking sizes and country of origin, as well as mechanical properties such as density, water absorption, and rupture compression strength.
Example of the product specification Instone provides for each of its Aura stone products.
“Usually, they want to know the density of the stone, how durable it is, how it will hold up under the weather conditions and if the stones get hot underfoot. We can provide all of that information,” says Blackburn.
When the Fabrication and Design Teams receive a plan (or drawing) set of a full backyard design, takeoff and stone schedule, they then provide an estimate to a local stone distributor. Once the quote is approved, the shop drawing process begins for each stone. It includes the type of stone, dimensions, finish and fabrication work such as edging and placement according to the stone schedule. Instone works closely with local distributors, landscape designers and contractors to ensure the shop drawing is perfectly constructed and accommodates their needs.
Once all parties approve the specifics, the work begins with fabrication cuts on the natural stones to prepare them for installation.
Because timing is everything with stone, Blackburn advises homeowners and landscape architects to plan ahead. “Most people want to start backyard projects as soon as winter is ending. The weather is warming up, and they want the stone quickly. They may be limited to what we have in stock, or they will have to wait if their heart is set on a particular stone, we work to get it for them.” She recommends people start their planning process before or during the winter months, so if there is some wait time, the project will be completed by the start of summer.
Instone’s Fabrication and Design Teams are here to help landscape architects and designers get what they need quickly and professionally to create beautiful outdoor living spaces for their clients.